
Introduction
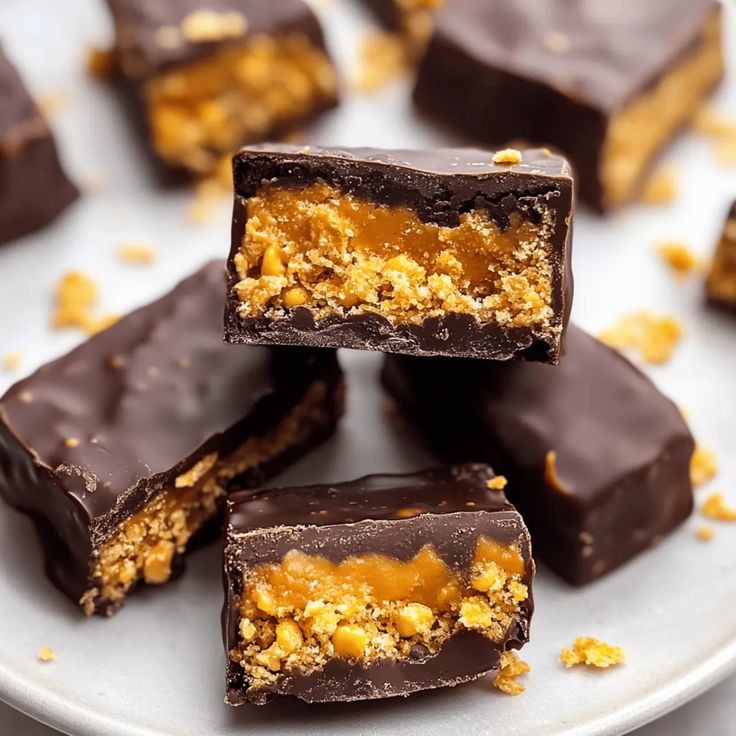
Are you ready for a sweet treat that tastes like your childhood but loves your body? Say hello to our Healthy Homemade Butterfingers! This incredible recipe takes everything you adore about that classic, crunchy, peanut buttery candy bar and transforms it into a wholesome, guilt-free delight. Each bite delivers that irresistible crispy texture and rich, nutty flavor, all coated in smooth, decadent dark chocolate. It’s truly a special treat that will satisfy any sweet craving.
The best part? These homemade Butterfingers are surprisingly easy and quick to make. You won’t need any fancy equipment or complex techniques. With just a few simple ingredients and minimal active time, you can whip up a batch of these glorious bars. They are perfect for meal prep, a healthier dessert, or a satisfying snack any time of day. Forget the store-bought versions filled with artificial ingredients; this recipe uses real food you can feel good about.
So, get ready to dive into a world of deliciousness! Whether you’re a seasoned baker or a complete beginner, you’ll find this recipe straightforward and fun. We promise that once you try these Healthy Homemade Butterfingers, they’ll become a regular favorite in your kitchen. Let’s make some magic!
Cooking Time & Prep Time
- Prep Time: 25 minutes
- Chilling Time: 90 minutes
- Total Time: 115 minutes
Small tip: You can divide the prep work. Prepare the nougat and let it chill, then melt the chocolate and finish the bars later in the day when you have another short window.
Ingredients
This recipe makes approximately 12-16 bars, depending on how large you cut them.
For the Peanut Butter Nougat
- 1 cup (250g) creamy natural peanut butter (no added sugar or oil)
- 1/2 cup (120ml) maple syrup or honey
- 1/4 cup (28g) coconut flour
- 1 teaspoon vanilla extract
- 1/4 teaspoon sea salt
- 1 cup (24g) puffed rice cereal (ensure it’s unsweetened)
For the Chocolate Coating
- 1 cup (170g) dark chocolate chips (70% cacao or higher recommended)
- 1 tablespoon coconut oil
Step-by-Step Instructions
-
Step 1: Prepare Your Pan
Line an 8×8 inch (20×20 cm) baking dish or square pan with parchment paper. Make sure the parchment paper hangs over the sides. This creates “handles” which will make it super easy to lift the nougat out later. It’s a small step that saves a lot of hassle.
-
Step 2: Mix the Wet Nougat Ingredients
In a large mixing bowl, combine the natural peanut butter, maple syrup (or honey), vanilla extract, and sea salt. Stir these ingredients together really well until they are completely smooth and evenly combined. A sturdy spatula or wooden spoon works best for this part.
-
Step 3: Add Coconut Flour and Cereal
Now, add the coconut flour to the wet mixture. Mix it in thoroughly until no dry spots remain. The mixture will start to thicken. Next, gently fold in the puffed rice cereal. Be careful not to crush the cereal too much, as we want to maintain that lovely crispy texture.
-
Step 4: Press into the Pan and Chill
Transfer the peanut butter nougat mixture into your prepared 8×8 inch pan. Use the back of a spoon or your hands to press it down firmly and evenly into the pan. Make sure the surface is smooth and compact. Place the pan in the refrigerator for at least 60 minutes, or until the nougat is firm enough to cut.
Small tip: For an extra firm nougat that’s easier to handle, you can pop it into the freezer for 30 minutes instead of the fridge.
-
Step 5: Melt the Chocolate Coating
While the nougat is chilling, prepare your chocolate coating. In a microwave-safe bowl, combine the dark chocolate chips and coconut oil. Microwave in 30-second intervals, stirring well after each, until the chocolate is completely melted and smooth. Alternatively, you can use a double boiler on the stovetop for a more controlled melt.
-
Step 6: Cut the Nougat into Bars
Once the nougat is firm, lift it out of the pan using the parchment paper handles. Place it on a cutting board. Using a sharp knife, cut the large square into 12-16 individual bar shapes. You can make them long and thin, or shorter and thicker, depending on your preference. Wipe your knife clean between cuts for neat edges.
-
Step 7: Dip the Bars in Chocolate
Carefully dip each nougat bar into the melted chocolate, ensuring it’s fully coated. You can use a fork or two small spoons to help with this. Let any excess chocolate drip off. Place the chocolate-coated bars back onto the parchment-lined pan or a new sheet of parchment paper.
Small tip: If your chocolate starts to thicken, gently reheat it for a few seconds in the microwave or over the double boiler until smooth again.
-
Step 8: Final Chill and Serve
Once all the bars are coated, return the pan to the refrigerator for another 30 minutes, or until the chocolate coating is completely set and firm. Once set, your Healthy Homemade Butterfingers are ready to enjoy! Peel them off the parchment paper and serve.
Tips & Variations
- Gluten-Free Option: This recipe is naturally gluten-free! Just ensure your puffed rice cereal is certified gluten-free, as some brands may have cross-contamination. Always check ingredient labels carefully.
- Vegan Option: To make these completely vegan, simply use maple syrup instead of honey for the nougat. Also, ensure your dark chocolate chips are dairy-free and vegan-friendly.
- Boost the Protein: For an extra protein kick, add 1-2 tablespoons of your favorite unflavored or vanilla protein powder to the peanut butter nougat mixture. You might need to add a tiny bit more maple syrup if the mixture becomes too dry.
- Spicy Kick: If you enjoy a bit of heat, add a tiny pinch of cayenne pepper (1/8 teaspoon) to the melted chocolate coating. It creates a delightful subtle warmth that pairs surprisingly well with the sweet and nutty flavors.
- Nut Butter Alternatives: Feel free to experiment with other creamy nut butters like almond butter or cashew butter for a different flavor profile. Just ensure they are natural and drippy, without added sugars or oils, for the best consistency.
Nutritional Information
Approximate values per serving (based on 16 servings):
- Calories: 220 kcal
- Protein: 7g
- Carbohydrates: 17g
- Fat: 15g
Note: These values are approximate and may vary depending on the specific brands and exact amounts of ingredients used.
Health Benefits
Our Healthy Homemade Butterfingers aren’t just delicious; they also pack some wonderful health benefits thanks to their wholesome ingredients!
- Peanut Butter Power: Natural peanut butter is a fantastic source of plant-based protein, which helps with muscle repair and keeps you feeling full. It also contains healthy monounsaturated fats, beneficial for heart health, along with important vitamins and minerals like niacin, folate, vitamin E, and magnesium.
- Fiber from Coconut Flour: Coconut flour is a unique ingredient that adds a good amount of dietary fiber. Fiber is crucial for digestive health, helps regulate blood sugar levels, and contributes to satiety, making these bars more satisfying.
- Antioxidant-Rich Dark Chocolate: By using dark chocolate (70% cacao or higher), you’re getting a boost of antioxidants, particularly flavonoids. These compounds can help protect your cells from damage, improve blood flow, and may even have mood-boosting properties.
- Reduced Refined Sugars: Unlike traditional candy bars, this recipe uses natural sweeteners like maple syrup or honey. While still sugar, these options offer a small amount of minerals and antioxidants not found in highly processed white sugar, and they contribute to a lower glycemic load compared to pure refined sugars.
- Wholesome Ingredients: Overall, this recipe avoids artificial flavors, colors, and preservatives often found in store-bought candies. You’re fueling your body with real, recognizable ingredients, which is always a win for your health.
Serving Suggestions
- Enjoy one as a satisfying afternoon snack to beat the 3 PM slump.
- Serve as a healthier dessert option after a light family meal.
- Pack them in lunchboxes for a wholesome treat for kids and adults alike.
- Grab one for a quick energy boost before or after a workout.
- Crumble a chilled bar over a bowl of plain Greek yogurt for an indulgent breakfast.
Storage Tips
Store your Healthy Homemade Butterfingers in an airtight container in the refrigerator for up to 1-2 weeks. They are best enjoyed chilled, as the texture and chocolate coating remain firm. For longer storage, you can freeze them in an airtight container for up to 2 months. When ready to eat, simply take them out of the freezer and let them sit at room temperature for 5-10 minutes, or enjoy them straight from frozen for an extra firm, fudgy bite. Reheating is not necessary or recommended for this type of candy bar.
Conclusion
There you have it – a truly irresistible recipe for Healthy Homemade Butterfingers! These bars are everything you could want in a sweet treat: incredibly delicious, wonderfully crunchy, and packed with that classic peanut buttery goodness, all without the guilt. They prove that you don’t have to sacrifice flavor for health. The simple process and wholesome ingredients make this recipe a winner in any kitchen.
We truly hope you give this recipe a try. You’ll be amazed at how easy it is to create such a fantastic snack or dessert from scratch. Imagine the joy of biting into a homemade Butterfinger, knowing exactly what went into it and feeling good about every single ingredient. It’s a wonderful way to enjoy a classic without compromise.
So go ahead, gather your ingredients, and whip up a batch. These Healthy Homemade Butterfingers are perfect for sharing with family and friends, or simply keeping all to yourself for those moments when you need a little healthy indulgence. Happy making, and happy eating!


