
Introduction
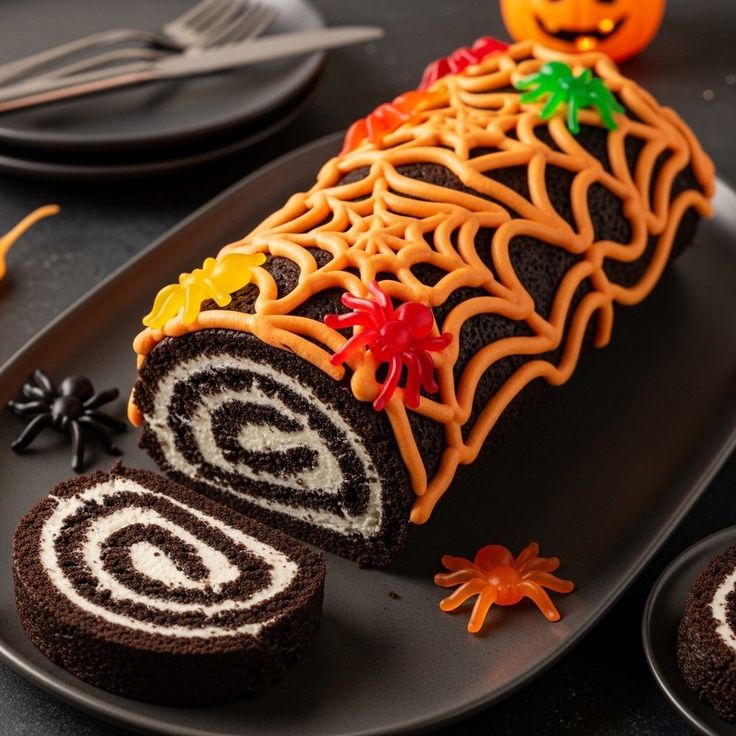
Get ready for a treat that’s spooky good and unbelievably simple! The Halloween Oreo Roll is a no-bake wonder perfect for your festive celebrations. It’s a delightful combination of crunchy Oreo cookies, creamy filling, and vibrant Halloween sprinkles. This dessert is not just delicious; it’s a visual spectacle that will bring smiles to everyone’s faces.
What makes this roll so special? It’s the perfect balance of rich chocolate from the Oreos and a sweet, tangy cream cheese filling. Plus, it comes together without an oven, making it a fantastic project for all skill levels. You’ll love how quickly you can create something so impressive, freeing up time for all your other Halloween fun.
So, whether you’re hosting a ghoulish gathering or just want a fun dessert for your family, this Halloween Oreo Roll is your answer. It’s easy, it’s festive, and it’s absolutely irresistible. Let’s dive into making this magical Halloween dessert!
Cooking Time & Prep Time
- Prep Time: 30 minutes
- Chilling Time: 2 hours
- Total Time: 2 hours 30 minutes
Small tip: The chilling time is crucial for the roll to set properly, so don’t rush this step for the best results!
Ingredients
This recipe makes 8-10 servings.
For the Oreo Base
- 36 Halloween Oreos (1 family-size package), finely crushed
- 6 tablespoons unsalted butter, melted
For the Cream Cheese Filling
- 8 ounces cream cheese, softened
- 1/2 cup unsalted butter, softened
- 3 cups powdered sugar, sifted
- 1 teaspoon vanilla extract
- 1-2 tablespoons milk (optional, for consistency)
For Decoration
- 1/2 cup Halloween-themed sprinkles
- Optional: Melted white chocolate or dark chocolate for drizzling
Step-by-Step Instructions
-
Step 1: Crush the Oreos
Start by crushing your Halloween Oreos. You can do this in a food processor until they resemble fine crumbs. If you don’t have a food processor, place the Oreos in a large zip-top bag and crush them with a rolling pin. Make sure there are no large chunks left.
Small tip: The finer the crumbs, the smoother your roll will be. This helps the base hold together better.
-
Step 2: Prepare the Oreo Base Mixture
In a medium bowl, combine the finely crushed Oreo crumbs with the melted unsalted butter. Stir well until all the crumbs are moistened and the mixture looks like wet sand. This will be the foundation of your roll.
Small tip: Ensure the butter is fully melted and evenly distributed to bind the crumbs perfectly.
-
Step 3: Form the Oreo Rectangle
Lay out a large piece of parchment paper or plastic wrap on your countertop. Transfer the Oreo mixture onto the center of the paper. Use your hands or a spatula to press and spread the mixture into a neat rectangle, approximately 12×9 inches. Aim for an even thickness.
Small tip: Using another piece of parchment paper on top can help you roll and flatten the mixture smoothly without sticking.
-
Step 4: Prepare the Cream Cheese Filling
In a separate large bowl, beat the softened cream cheese and softened butter together with an electric mixer until light and fluffy. Gradually add the sifted powdered sugar, a cup at a time, mixing until fully incorporated. Stir in the vanilla extract.
Small tip: Sifting the powdered sugar prevents lumps, ensuring a silky-smooth filling.
-
Step 5: Adjust Filling Consistency (Optional)
If your filling seems too thick, add milk one tablespoon at a time until you reach a smooth, spreadable consistency. You want it firm enough to hold its shape but soft enough to spread easily. Taste and adjust sweetness if desired.
Small tip: Start with a little milk and add more sparingly; you can always add more, but you can’t take it away!
-
Step 6: Spread the Filling
Evenly spread the cream cheese filling over the Oreo rectangle, leaving about a 1/2-inch border along one of the longer edges. This border will help prevent the filling from squeezing out when you roll it.
Small tip: Use an offset spatula for the smoothest and most even spread of the filling.
-
Step 7: Roll the Oreo Delight
Carefully lift the parchment paper from the longer edge closest to you. Gently begin to roll the Oreo rectangle away from you, creating a log shape. Use the parchment paper to help you guide and tighten the roll as you go. Be firm but gentle.
Small tip: Roll slowly and try to keep the log tight to prevent it from cracking. If cracks appear, gently press them together.
-
Step 8: Chill and Decorate
Once rolled, wrap the entire log tightly in the parchment paper or plastic wrap. Place it in the refrigerator for at least 2 hours to chill and firm up. Once chilled, unwrap the roll and transfer it to a serving platter. Sprinkle generously with Halloween sprinkles. You can also drizzle with melted chocolate for an extra touch.
Small tip: For cleaner slices, chill the roll for an extra 15-20 minutes after decorating, right before serving.
-
Step 9: Slice and Serve
Using a sharp knife, slice the Halloween Oreo Roll into 1-inch thick rounds. Serve immediately and enjoy your spooky, delicious creation!
Small tip: Wipe your knife clean between each slice for perfectly neat and attractive portions.
Tips & Variations
- Gluten-Free Option: Simply use gluten-free Oreo cookies! Many brands now offer delicious gluten-free versions that work perfectly in this recipe.
- Vegan/Vegetarian Option: For a vegan version, ensure your Oreos are vegan (most classic Oreos are, but always check ingredients). Use a plant-based butter alternative and vegan cream cheese. The result will be just as delightful!
- Add More Texture/Protein: Stir in 1/2 cup of finely chopped nuts (like pecans or walnuts) into the Oreo base mixture for added crunch and a boost of healthy fats and protein. You could also add a layer of nut butter to the filling before rolling.
- Spicy Chocolate Kick: For a subtle spicy twist, add 1/4 teaspoon of cayenne pepper or chili powder to the Oreo base mixture. It creates a surprising and delicious “Mexican hot chocolate” flavor.
- Flavor Variations: Experiment with different flavored Oreos like mint, peanut butter, or red velvet for a unique twist. You can also add a few drops of peppermint extract or almond extract to the cream cheese filling for a different aroma and taste.
Nutritional Information
Approximate values per serving (based on 10 servings):
- Calories: 420 kcal
- Protein: 4g
- Carbohydrates: 55g
- Fat: 25g
Please note: These values are approximate and may vary depending on the specific brands and ingredients used.
Health Benefits
While this is a festive treat, some of its components offer small benefits!
- Cocoa in Oreos: The cocoa powder in Oreos contains flavonoids, which are antioxidants. These compounds can help fight free radicals in the body. It’s a small amount, but every bit counts!
- Dairy from Cream Cheese and Butter: If you’re using traditional dairy products, cream cheese and butter provide calcium and Vitamin A. Calcium is essential for strong bones and teeth, and Vitamin A supports good vision and immune function.
- Mood Booster: Enjoying a delicious homemade treat can genuinely lift your spirits! The act of baking (or no-baking!) and sharing food can be a wonderful way to reduce stress and promote happiness.
- Energy: The carbohydrates and fats in this roll provide a quick source of energy, perfect for fueling your Halloween adventures (in moderation, of course!).
Serving Suggestions
- Classic Pairing: Serve slices with a tall glass of cold milk or a warm cup of coffee or tea.
- Dessert Platter Star: Arrange slices on a festive Halloween-themed platter alongside other spooky treats like ghost meringues or pumpkin cookies.
- Ice Cream Companion: A slice of Oreo Roll is fantastic with a scoop of vanilla bean or chocolate ice cream.
Storage Tips
Store leftover Halloween Oreo Roll slices in an airtight container in the refrigerator for up to 3-4 days. It’s best enjoyed chilled. This dessert can also be frozen! Wrap the entire log tightly in plastic wrap, then aluminum foil, and freeze for up to 1 month. Thaw in the refrigerator overnight before slicing and serving. This recipe is not meant to be reheated; it’s a delicious cold dessert.
Conclusion
And there you have it – your very own Halloween Oreo Roll! This dessert is truly a triple threat: incredibly easy to make, wonderfully festive, and absolutely delicious. It combines the nostalgic flavor of Oreos with a creamy, rich filling, all wrapped up in a fun, no-bake package.
You’ll love how quickly this comes together, leaving you more time to enjoy the spooky season. It’s the perfect recipe for busy parents, budding bakers, or anyone looking for a simple yet impressive treat. Don’t let the idea of rolling intimidate you; it’s much easier than it looks, and the results are always worth it!
So, gather your ingredients, put on some spooky tunes, and create this delightful Halloween Oreo Roll. Share it with your family and friends; they’ll be so impressed with your culinary magic. Happy Halloween and happy no-baking!


