
Introduction
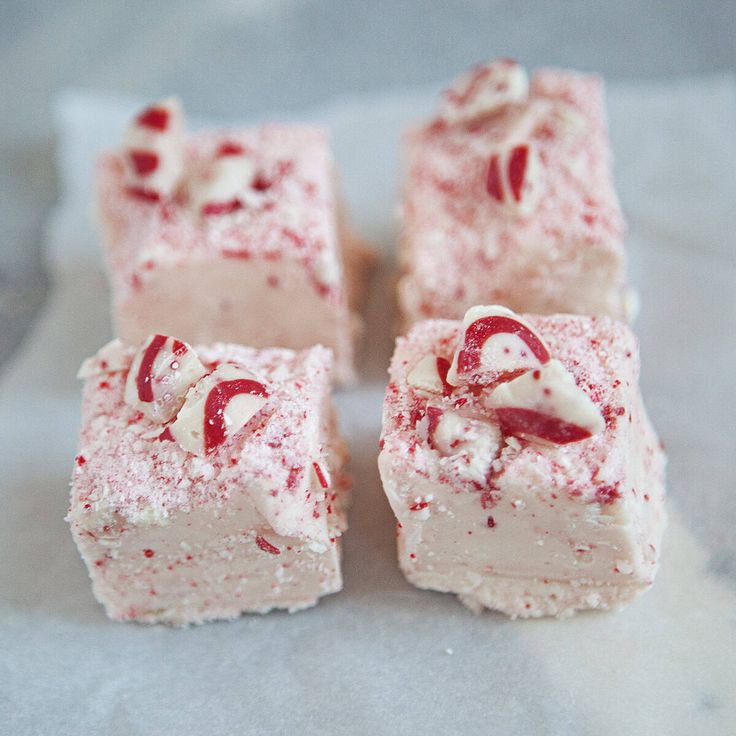
Get ready for a holiday treat that is as beautiful as it is delicious! Our White Chocolate Candy Cane Fudge is a festive delight, bursting with the creamy sweetness of white chocolate and the refreshing crunch of peppermint candy canes. It’s the perfect blend of rich, smooth texture and cool, minty flavor, making every bite a little taste of winter magic.
The best part? This fudge is incredibly easy to make. You don’t need any special equipment or complicated techniques. It’s a no-bake recipe that comes together quickly, leaving you more time to enjoy the season. In just a few simple steps, you’ll have a batch of gorgeous, homemade fudge ready to impress.
So, whether you’re looking for a last-minute gift, a stunning addition to your holiday dessert table, or just a sweet treat for yourself, this White Chocolate Candy Cane Fudge is an absolute winner. We promise you’ll love how simple and satisfying it is. Let’s get started!
Cooking Time & Prep Time
- Prep Time: 15 minutes
- Chilling Time: 2 hours
- Total Time: 2 hours 15 minutes
Small tip: To speed up the chilling process, you can place the fudge in the freezer for about 30-45 minutes, but keep a close eye on it to prevent freezing solid.
Ingredients
This recipe makes approximately 36 servings (1-inch squares).
For the Fudge:
- 1 (14 ounce) can sweetened condensed milk
- 3 cups white chocolate chips (high quality recommended)
- 1 teaspoon vanilla extract
- 1/4 teaspoon peppermint extract (or more, to taste)
For the Topping:
- 1 cup candy canes, crushed (about 10-12 regular sized candy canes)
- Optional: 1/4 cup extra white chocolate chips, melted, for drizzling
Step-by-Step Instructions
-
Step 1: Prepare Your Pan
Line an 8×8 inch square baking pan with parchment paper. Make sure the paper hangs over the sides. This will make it easy to lift the fudge out later. You can also lightly spray the parchment with non-stick cooking spray for extra insurance.
Small tip: Using parchment paper is key for easy removal and clean cuts. Don’t skip this step!
-
Step 2: Crush the Candy Canes
Place your candy canes in a sturdy Ziploc bag. Use a rolling pin or the back of a heavy pan to crush them into small pieces. You want a mix of fine dust and small crunchy bits for the best texture.
Small tip: Don’t crush them too finely unless you prefer less crunch. A mix of textures is wonderful!
-
Step 3: Melt the White Chocolate
In a large microwave-safe bowl, combine the sweetened condensed milk and white chocolate chips. Microwave on high for 1 minute. Stir well. Continue microwaving in 30-second intervals, stirring thoroughly after each, until the mixture is completely smooth and melted.
Small tip: Stirring frequently prevents the white chocolate from scorching. Low and slow is the way to go!
-
Step 4: Add Flavorings
Once the chocolate mixture is smooth, stir in the vanilla extract and peppermint extract. Mix until both extracts are fully incorporated. The mixture will be thick and glossy.
Small tip: Taste a tiny bit of the mixture after adding peppermint extract to ensure it’s to your liking. You can always add a tiny bit more if you want a stronger mint flavor.
-
Step 5: Pour and Spread
Quickly pour the fudge mixture into your prepared 8×8 inch pan. Use an offset spatula or the back of a spoon to spread it evenly into all corners. Work quickly, as the fudge will start to set.
Small tip: If the fudge starts to firm up too much, you can gently warm it in the microwave for 10-15 seconds to make it more spreadable.
-
Step 6: Add Topping
Immediately sprinkle the crushed candy canes evenly over the top of the warm fudge. Gently press them down lightly with the back of your hand or a clean spatula to help them adhere. This ensures they don’t fall off when you cut the fudge.
Small tip: Don’t wait too long to add the candy canes; the fudge needs to be warm enough for them to stick properly.
-
Step 7: Chill and Set
Place the pan in the refrigerator for at least 2 hours, or until the fudge is completely firm. This is crucial for clean cuts.
Small tip: For best results, let it chill overnight. Patience makes perfect fudge!
-
Step 8: Cut and Serve
Once firm, use the parchment paper overhangs to lift the fudge out of the pan. Place it on a cutting board. Use a sharp, warm knife to cut the fudge into 1-inch squares. For cleaner cuts, wipe the knife clean with a damp cloth after every few cuts. If desired, melt the extra white chocolate chips and drizzle over the top before serving.
Small tip: Running your knife under hot water and drying it between cuts helps create super clean edges.
Tips & Variations
- Gluten-Free Option: This recipe is naturally gluten-free! All ingredients listed are typically free from gluten. Always double-check ingredient labels to be absolutely sure.
- Vegan/Vegetarian Option: To make this vegan, use vegan white chocolate chips and a can of full-fat coconut milk (the solid part) instead of sweetened condensed milk. You may need to adjust the amount slightly for consistency. Ensure your candy canes are also vegan (some contain gelatin). This recipe is inherently vegetarian.
- Adding More Substance: For a slightly more substantial fudge, you can fold in 1/2 cup of finely chopped pecans or walnuts into the fudge mixture before spreading it into the pan. This adds a nice textural contrast and a bit of healthy fat.
- Spicy Version: For a surprising kick, add a tiny pinch (1/8 teaspoon) of cayenne pepper or chili powder to the melted white chocolate mixture. It creates a “hot chocolate” inspired flavor profile that is uniquely delicious.
- Different Flavors: Experiment with other extracts! Try almond extract for a nutty flavor, orange extract for a citrusy twist, or even a different type of crushed candy, like butterscotch or toffee bits, instead of candy canes.
- Chocolate Drizzle: Instead of just candy canes, drizzle melted dark chocolate or milk chocolate over the set fudge for an extra layer of flavor and visual appeal.
Nutritional Information
Approximate values per serving (based on 36 servings):
- Calories: 130 kcal
- Protein: 1.5 g
- Carbohydrates: 22 g
- Fat: 4.5 g
Note: These values are approximate and may vary depending on the specific brands and amounts of ingredients used.
Health Benefits
While fudge is undeniably a treat, we can still find a few points to appreciate! White chocolate, though high in sugar and fat, does contain cocoa butter. Cocoa butter is a source of healthy fats and contains some antioxidants, which can contribute to overall well-being when consumed in moderation.
The sweetened condensed milk provides some calcium and protein, which are essential for bone health and muscle repair. Of course, these are present in small amounts given the serving size.
Peppermint, found in candy canes, is traditionally known for its digestive benefits and ability to soothe upset stomachs. While the amount in candy canes is small, the aroma and flavor can still offer a subtle calming effect and a sense of freshness.
Ultimately, the biggest health benefit of enjoying a delicious treat like this fudge is the joy and satisfaction it brings. Sharing homemade goodies with loved ones can boost mood and create positive memories, which are invaluable for mental and emotional health. Remember, moderation is key to enjoying all foods as part of a balanced lifestyle.
Serving Suggestions
- Holiday Dessert Platter: Arrange the fudge squares alongside cookies, truffles, and other festive treats for an impressive holiday spread.
- Edible Gifts: Package a few pieces in a decorative box or cellophane bag with a ribbon. It makes a thoughtful, homemade gift for friends, neighbors, or teachers.
- Coffee or Hot Chocolate Companion: Enjoy a small square of fudge with your morning coffee or a cozy mug of hot chocolate for an extra special moment.
- Festive Snack: Keep a batch on hand for a quick, sweet bite whenever you need a little pick-me-up during the busy holiday season.
Storage Tips
Store White Chocolate Candy Cane Fudge in an airtight container at room temperature for up to 1 week, or in the refrigerator for up to 2 weeks. If refrigerated, allow it to come to room temperature for about 10-15 minutes before serving for the best texture. This fudge freezes beautifully! Wrap individual pieces tightly in plastic wrap, then place them in a freezer-safe bag or container for up to 3 months. Thaw frozen fudge in the refrigerator overnight or at room temperature for a few hours. Reheating is not necessary; simply enjoy at room temperature.
Conclusion
There you have it – a truly magical and incredibly simple recipe for White Chocolate Candy Cane Fudge! This treat is a celebration of holiday flavors, combining the rich creaminess of white chocolate with the festive zing of peppermint. It’s quick to prepare, requires no baking, and delivers a stunning result that tastes like pure joy.
We absolutely encourage you to give this recipe a try. Whether you’re a seasoned baker or new to the kitchen, you’ll find this fudge forgiving and fun to make. Imagine the smiles when you present these beautiful, homemade squares!
So go ahead, whip up a batch (or two!). Share this delightful White Chocolate Candy Cane Fudge with your family and friends, spread some holiday cheer, and make sweet memories that will last long after the last piece is gone. Happy fudging!


