
Introduction
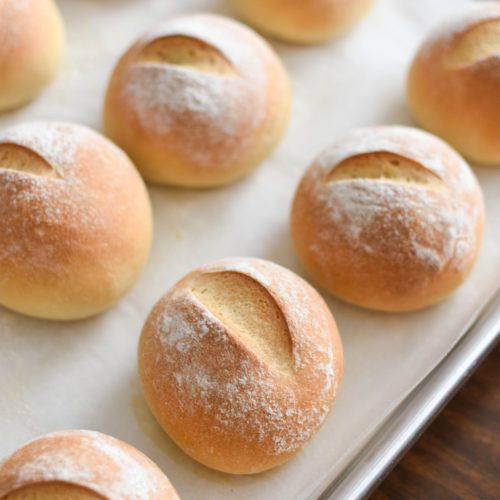
There’s nothing quite like the smell of freshly baked bread filling your kitchen. These White Bread Rolls are pure comfort food. They are incredibly soft, wonderfully fluffy, and have that perfect golden crust. They are ideal for any meal, whether you’re serving them with soup, as a side for dinner, or simply enjoying them with a pat of butter.
You might think baking bread is complicated, but this recipe makes it simple and enjoyable. We’ve broken down each step so it’s easy to follow, even if you’re new to baking. With just a few basic ingredients and a little patience, you’ll be creating bakery-quality rolls right in your own home. It’s a truly rewarding experience!
So, get ready to roll up your sleeves and treat yourself to these delightful homemade white bread rolls. Your family and friends will be so impressed, and you’ll love how easy it is to bring such warmth and deliciousness to your table. Let’s bake some magic together!
Cooking Time & Prep Time
Here’s a quick overview of the time you’ll need:
- Prep Time: 30 minutes (active time)
- First Rise: 60-90 minutes
- Second Rise: 30-45 minutes
- Cooking Time: 15-20 minutes
- Total Time: Approximately 2 hours 35 minutes to 3 hours 15 minutes (including rise times)
Small tip: The rise times can vary depending on the warmth of your kitchen. A warmer spot will help the dough rise faster!
Ingredients
This recipe makes 12 delicious white bread rolls.
For the Dough
- 1 cup (240ml) warm water (about 105-115°F or 40-46°C)
- 2 ¼ teaspoons (7g) active dry yeast (one standard packet)
- 2 tablespoons (25g) granulated sugar
- 1 teaspoon (6g) salt
- ¼ cup (56g) unsalted butter, melted and cooled slightly
- 1 large egg, at room temperature
- 3 ½ to 4 cups (420-480g) all-purpose flour, plus more for dusting
For the Egg Wash (Optional)
- 1 large egg, beaten
- 1 tablespoon (15ml) water or milk
Step-by-Step Instructions
-
Step 1: Activate the Yeast
In a large mixing bowl, combine the warm water, yeast, and sugar. Stir gently. Let it sit for 5-10 minutes until the mixture becomes foamy. This shows your yeast is active and ready to work! If it doesn’t foam, your water might have been too hot or too cold, or your yeast might be old.
Small tip: Ensure your water isn’t too hot, as it can kill the yeast. It should feel comfortably warm to the touch.
-
Step 2: Add Wet Ingredients
Once the yeast is foamy, add the melted butter, salt, and room temperature egg to the bowl. Whisk everything together until it’s well combined. This creates a rich base for your rolls.
Small tip: Using a room temperature egg helps it incorporate better into the dough and can contribute to a softer texture.
-
Step 3: Incorporate the Flour
Gradually add 3 ½ cups of the all-purpose flour to the wet mixture, one cup at a time. Mix with a wooden spoon or a stand mixer with a dough hook attachment until a shaggy dough forms. Continue to mix until the dough comes together.
Small tip: Don’t add all the flour at once. Different flours absorb liquid differently, so you might need slightly more or less.
-
Step 4: Knead the Dough
Turn the dough out onto a lightly floured surface. Knead the dough for 8-10 minutes until it becomes smooth, elastic, and no longer sticky. If using a stand mixer, knead with the dough hook for 6-8 minutes on medium-low speed. The dough should spring back when gently poked.
Small tip: If the dough is too sticky, add a tiny bit more flour, a tablespoon at a time, until it’s manageable. Avoid adding too much flour, which can make the rolls dense.
-
Step 5: First Rise
Lightly grease a large bowl with a little oil. Place the dough in the bowl, turning it once to coat the top. Cover the bowl with plastic wrap or a clean kitchen towel. Let the dough rise in a warm place for 60-90 minutes, or until it has doubled in size.
Small tip: A slightly warm oven (turned off, with the light on) can be a perfect spot for rising dough, especially on a cold day.
-
Step 6: Shape the Rolls
Once the dough has doubled, gently punch it down to release the air. Turn the dough out onto a lightly floured surface and divide it into 12 equal pieces. Shape each piece into a smooth, round ball. You can do this by cupping your hand over the dough on the counter and moving it in a circular motion.
Small tip: For perfectly even rolls, you can weigh your dough and then divide the total weight by 12.
-
Step 7: Second Rise
Arrange the shaped rolls on a baking sheet lined with parchment paper, leaving some space between them. Cover the baking sheet loosely with plastic wrap or a clean kitchen towel. Let the rolls rise in a warm place for another 30-45 minutes, or until they look puffy and almost doubled in size.
Small tip: Don’t rush this second rise; it’s crucial for light and airy rolls.
-
Step 8: Prepare for Baking
While the rolls are on their second rise, preheat your oven to 375°F (190°C). If using an egg wash, whisk together the beaten egg and water/milk in a small bowl. Gently brush the tops of the risen rolls with the egg wash. This will give them a beautiful golden-brown crust.
Small tip: The egg wash is optional but highly recommended for that classic shiny, golden finish.
-
Step 9: Bake the Rolls
Bake the rolls in the preheated oven for 15-20 minutes, or until they are golden brown on top and sound hollow when tapped on the bottom. Keep an eye on them to prevent over-browning.
Small tip: If the rolls are browning too quickly, you can loosely tent them with aluminum foil for the last few minutes of baking.
-
Step 10: Cool and Serve
Once baked, remove the rolls from the oven and transfer them to a wire rack to cool slightly. They are best enjoyed warm, fresh from the oven. Serve them with butter, jam, or alongside your favorite meal.
Small tip: Brushing the warm rolls with a little melted butter right after they come out of the oven will add extra flavor and a soft crust.
Tips & Variations
- Gluten-Free Option: While traditional white bread relies on gluten, you can try a gluten-free version using a 1:1 gluten-free all-purpose flour blend. You might need to add a teaspoon of xanthan gum if your blend doesn’t contain it, to help with structure. The dough will be stickier and less elastic, so shaping might be different.
- Vegan/Vegetarian Option: To make these rolls vegan, substitute the butter with a plant-based butter alternative or olive oil. Replace the egg with a flax egg (1 tablespoon ground flaxseed mixed with 3 tablespoons water, let sit for 5 minutes) or simply omit the egg and add an extra tablespoon of water or plant-based milk to the dough.
- Add More Flavor/Texture: For a savory twist, knead in a ½ cup of shredded cheddar cheese and 2 tablespoons of chopped chives or dried herbs like oregano or rosemary during the last few minutes of kneading. You could also sprinkle sesame seeds or poppy seeds on top before baking.
- Sweet Cinnamon Rolls: Turn these into simple cinnamon rolls! After the first rise, roll the dough into a rectangle, spread with softened butter, sprinkle with cinnamon sugar, roll it up, slice, and bake. You can even add a simple powdered sugar glaze after baking.
- Whole Wheat Blend: For a slightly healthier and heartier roll, substitute up to half of the all-purpose flour with whole wheat flour. You might need a little extra liquid, as whole wheat flour absorbs more. This will result in a denser roll with a nuttier flavor.
Nutritional Information
Approximate values per serving (based on 12 servings):
- Calories: 220 kcal
- Protein: 7g
- Carbohydrates: 38g
- Fat: 5g
Please note that these values are approximate and may vary depending on the specific brands and exact quantities of ingredients used.
Health Benefits
Even simple white bread rolls can offer some benefits, especially when made at home where you control the ingredients.
Energy Boost: The primary ingredient, all-purpose flour, provides carbohydrates, which are your body’s main source of energy. These carbs are essential for fueling your daily activities and brain function.
B Vitamins: Enriched all-purpose flour is often fortified with B vitamins like niacin, thiamine, and riboflavin. These vitamins play crucial roles in metabolism, helping your body convert food into energy and supporting nerve function.
Iron Content: Fortified flour also typically contains iron, an essential mineral for transporting oxygen in the blood and preventing anemia. Making rolls at home means you avoid many of the preservatives found in store-bought options.
Calcium and Protein: The milk or water used, especially if it’s dairy milk, contributes calcium for strong bones. The egg also adds a good source of protein, which is vital for muscle repair and growth, along with healthy fats.
Serving Suggestions
- Classic Side: Serve warm with a generous pat of butter alongside your favorite soup, stew, or chili. They are perfect for soaking up delicious broths.
- Sandwich Base: Slice them horizontally and use them as mini sandwich buns for sliders, deli meat, or grilled cheese.
- Breakfast Treat: Enjoy them for breakfast with jam, marmalade, or honey. They are also wonderful for making small egg and cheese breakfast sandwiches.
- Dinner Party Star: Offer them in a bread basket with herbed butter or olive oil and balsamic vinegar for an elegant touch at any dinner gathering.
Storage Tips: Store leftover white bread rolls in an airtight container or bag at room temperature for up to 2-3 days. To freeze, let them cool completely, then place them in a freezer-safe bag. They will keep well for up to 2-3 months. To reheat, thaw frozen rolls at room temperature, then warm them in a preheated oven at 350°F (175°C) for 5-7 minutes, or microwave for 15-30 seconds until warm and soft.
Conclusion
There you have it – a straightforward and utterly delicious recipe for homemade White Bread Rolls! These rolls are more than just food; they are a warm invitation to gather, share, and enjoy the simple pleasures of life. Their soft texture and inviting aroma are sure to bring smiles to everyone around your table.
Don’t be intimidated by baking; this recipe is designed to guide you every step of the way. The joy of pulling a tray of golden, puffy rolls from your oven is truly unmatched. You’ll be amazed at how easy it is to create something so wonderful from scratch.
So go ahead, give this recipe a try! Bake a batch for your next family dinner, a potluck, or simply to enjoy a cozy afternoon treat. Share the warmth and deliciousness with your loved ones. Happy baking!


