
Introduction
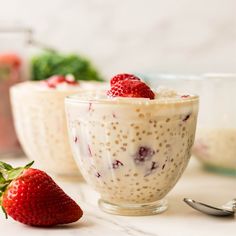
Get ready to discover your new favorite dessert: Strawberry Sago! This delightful treat is a vibrant, creamy, and incredibly refreshing dish that brings together bouncy tapioca pearls with the sweet tang of fresh strawberries and a luscious coconut milk base. It’s like a tropical vacation in a bowl, perfect for cooling down on a warm day or enjoying as a light, satisfying sweet ending to any meal.
What makes Strawberry Sago truly special is its wonderful play of textures and flavors. You have the chewiness of the sago, the smoothness of the creamy sauce, and the bursts of fresh fruit. Despite its sophisticated taste and appearance, this dessert is surprisingly easy and quick to whip up. Most of the time is spent chilling, allowing the flavors to meld beautifully.
Whether you’re a seasoned chef or just starting your culinary journey, this recipe is designed for success. With simple ingredients and straightforward steps, you’ll be enjoying your homemade Strawberry Sago in no time. So, let’s gather our ingredients and create something truly delicious together!
Cooking Time & Prep Time
- Prep Time: 25 minutes
- Cooking Time: 15 minutes
- Total Time: 40 minutes
Small tip: You can cook the sago ahead of time, even the day before, to make the assembly process even quicker when you’re ready to serve.
Ingredients
This recipe makes approximately 4-6 servings.
For the Sago Pearls
- ½ cup small tapioca pearls (sago)
- 6 cups water (for cooking sago)
For the Strawberry Cream Base
- 2 cups fresh strawberries, hulled and quartered (plus more for garnish)
- 1 (13.5 oz) can full-fat coconut milk (about 1 ¾ cups)
- ½ cup regular milk (dairy or non-dairy like almond or oat milk)
- ¼ cup sweetened condensed milk (adjust to taste)
- 2 tablespoons granulated sugar (adjust to taste)
- ½ teaspoon vanilla extract (optional)
For Garnish
- Fresh strawberry slices
- Fresh mint leaves (optional)
Step-by-Step Instructions
-
Step 1: Cook the Sago Pearls
Bring 6 cups of water to a rolling boil in a medium pot. Add the small tapioca pearls and stir immediately to prevent sticking. Cook for 10-12 minutes, stirring occasionally, until most of the pearls are translucent with just a tiny white dot in the center. Do not overcook.
Small tip: Use a larger pot than you think you need, as the sago will expand and can boil over easily. Keep an eye on it!
-
Step 2: Rinse and Drain the Sago
Once cooked, immediately drain the sago pearls into a fine-mesh sieve. Rinse them thoroughly under cold running water for 1-2 minutes until all the excess starch is washed away and the pearls are completely separated and bouncy. This stops the cooking process and prevents stickiness.
Small tip: Rinsing well is key to achieving perfectly separate and chewy sago pearls. Don’t skip this step!
-
Step 3: Prepare the Strawberry Puree
In a blender, combine 1 ½ cups of the hulled and quartered fresh strawberries with 2 tablespoons of granulated sugar. Blend until completely smooth. Taste and adjust sugar if needed; some strawberries are sweeter than others.
Small tip: For a chunkier texture, you can mash half the strawberries with a fork instead of blending them all.
-
Step 4: Create the Creamy Base
Pour the full-fat coconut milk, regular milk, and sweetened condensed milk into a large mixing bowl. Add the vanilla extract, if using. Whisk everything together until well combined and smooth. Taste the mixture and add a little more condensed milk or sugar if you prefer it sweeter.
Small tip: Using full-fat coconut milk is essential for that rich, creamy texture that makes this dessert so indulgent.
-
Step 5: Combine Strawberry Puree with Cream
Gently fold the strawberry puree into the creamy base mixture. Stir until the beautiful pink color is evenly distributed. You want a consistent, smooth strawberry-infused cream.
Small tip: Don’t overmix at this stage; a gentle fold is all you need to combine the liquids without incorporating too much air.
-
Step 6: Assemble the Strawberry Sago
Add the rinsed and drained sago pearls to the strawberry cream mixture. Stir gently with a spatula or large spoon until the sago is evenly dispersed throughout the creamy base. Be careful not to mash the pearls.
Small tip: If the mixture seems too thick, you can add a splash more regular milk until it reaches your desired consistency.
-
Step 7: Chill Thoroughly
Cover the bowl with plastic wrap and refrigerate for at least 2-3 hours, or preferably overnight. Chilling allows the sago to absorb more of the creamy goodness and intensifies the flavors. It’s best served very cold.
Small tip: The longer it chills, the better it tastes! Plan ahead for optimal flavor and texture.
-
Step 8: Garnish and Serve
Before serving, give the Strawberry Sago a gentle stir. Ladle it into individual serving bowls or glasses. Garnish each serving with fresh strawberry slices and a few fresh mint leaves for a beautiful presentation and added freshness. Enjoy your delightful creation!
Small tip: A clear glass bowl or mason jar can beautifully showcase the vibrant colors of this dessert.
Tips & Variations
- Gluten-Free Option: Sago (tapioca pearls) is naturally gluten-free. Just ensure your coconut milk, regular milk, and condensed milk are also certified gluten-free, which most commonly are.
- Vegan/Vegetarian Option: This recipe is almost entirely vegan! Simply swap the regular dairy milk for a plant-based alternative like almond, oat, or soy milk. For the sweetened condensed milk, use a vegan condensed milk brand (often made from coconut or oat milk) or sweeten with maple syrup or agave nectar to taste.
- Add More Fruit or Protein: While not a vegetable dish, you can certainly boost the fruit content! Add diced mango, blueberries, or raspberries along with the strawberries for a mixed fruit sago. For a protein boost, stir in a tablespoon of unflavored or vanilla plant-based protein powder into the creamy base before adding the sago.
- Spicy Version: For an unexpected kick, add a tiny pinch of finely grated fresh ginger or a very small dash of chili flakes to the strawberry puree before blending. This adds a subtle warmth that can be surprisingly delicious!
- Other Flavor Variations: Experiment with different fruits! Try Mango Sago, using fresh mango puree instead of strawberry. Or for a tropical twist, add a few drops of pandan extract to the creamy base for a vibrant green color and fragrant aroma.
Nutritional Information
Approximate values per serving (based on 4 servings):
- Calories: 410 kcal
- Protein: 4g
- Carbohydrates: 62g
- Fat: 22g
Note: These values are approximate and may vary depending on the specific brands and amounts of ingredients used.
Health Benefits
Strawberry Sago is more than just a delicious dessert; it offers some lovely health benefits too, thanks to its wholesome ingredients.
- Strawberries: These vibrant berries are packed with Vitamin C, a powerful antioxidant that supports immune health and skin vitality. They also provide dietary fiber, which aids digestion, and contain manganese, important for bone health and metabolism.
- Coconut Milk: Full-fat coconut milk offers healthy medium-chain triglycerides (MCTs), which can be easily converted into energy by the body. It also contains minerals like iron, magnesium, and potassium, contributing to overall well-being.
- Sago (Tapioca Pearls): Sago is primarily a source of carbohydrates, providing quick and easily digestible energy. It’s naturally gluten-free and can be a good option for those with sensitivities, offering a gentle way to fuel your body.
- Hydration and Antioxidants: With fresh fruit and a creamy liquid base, this dessert contributes to your daily hydration. The antioxidants from the strawberries help combat free radicals in the body, supporting cellular health.
Serving Suggestions
- A Perfect Dessert: Serve Strawberry Sago chilled in elegant glasses after a main course, like a light grilled fish or a stir-fry, for a refreshing and satisfying sweet finish.
- Light Breakfast or Snack: Enjoy a smaller portion as a delightful and energizing breakfast on a warm morning, or as a rejuvenating afternoon snack.
- Party Treat: Prepare a large batch and serve it in a beautiful punch bowl, allowing guests to scoop their own. It’s a fantastic, crowd-plepleasing dessert for potlucks and gatherings.
- Meal Prep Idea: The sago and strawberry cream base can be prepared separately and stored in the refrigerator. Combine them just an hour or two before serving to ensure the sago maintains its perfect texture and absorbs the flavors beautifully.
Storage Tips
Store leftover Strawberry Sago in an airtight container in the refrigerator for up to 2-3 days. The sago pearls may soften slightly over time, but it will still be delicious. This dish is best enjoyed cold and does not require reheating. Freezing is not recommended, as the texture of the sago pearls and the creamy base can become unpleasant and watery upon thawing.
Conclusion
There you have it – your very own homemade Strawberry Sago! This delightful dessert is truly a triple threat: it’s incredibly easy to make, bursting with fresh, vibrant flavors, and offers a wonderfully satisfying texture. The combination of chewy sago, sweet strawberries, and a rich coconut cream base creates a harmonious symphony that will tantalize your taste buds.
Don’t hesitate to give this recipe a try. It’s a fantastic way to impress your family and friends without spending hours in the kitchen. Plus, it’s easily customizable, allowing you to tailor it to your dietary needs and flavor preferences. You’ll love how quickly it comes together and how refreshing it is.
So, go ahead, gather your ingredients, and whip up a batch of this irresistible Strawberry Sago. Share it with your loved ones, or simply treat yourself to a moment of pure, fruity bliss. Happy cooking and even happier eating!


