
Introduction
There’s nothing quite like a warm, savory stuffing to complete a holiday meal. It’s that comforting side dish, often brimming with aromatic herbs, tender bread, and rich flavors, that brings everyone to the table. Stuffing isn’t just food; it’s a memory-maker, a taste of tradition that signals festive gatherings and happy times.
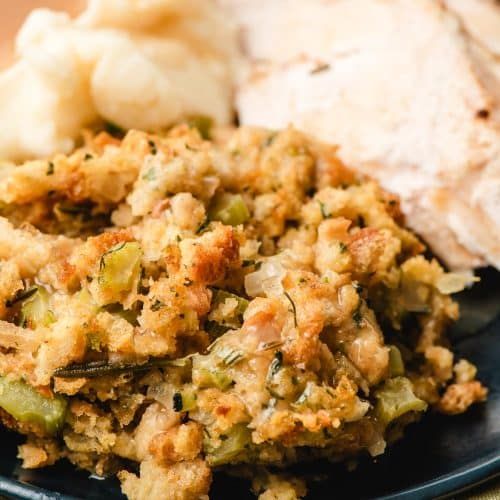
Many of us grew up with the convenience of boxed stuffing, known lovingly as “Stove Top.” It’s quick, easy, and undeniably nostalgic. But what if I told you that making a homemade stuffing, just as delicious and almost as quick, is entirely possible right on your stove top? This recipe proves that you don’t need hours or an oven to create a truly spectacular, from-scratch stuffing that will impress everyone.
Get ready to discover the joy of a truly flavorful, easy homemade stuffing that can go head-to-head with any boxed variety. It’s so simple, so satisfying, and so packed with fresh taste, you’ll wonder why you didn’t try it sooner. Let’s get cooking and make some holiday magic!
Cooking Time & Prep Time
- Prep Time: 20 minutes
- Cooking Time: 15 minutes
- Total Time: 35 minutes
Small tip: Chop your vegetables ahead of time to make the prep even quicker when you’re ready to cook!
Ingredients
This recipe makes 6-8 generous servings.
- 8 cups day-old bread, cut into ½-inch cubes (about 1.5 lbs, a standard loaf)
- ½ cup unsalted butter (1 stick)
- 1 large yellow onion, finely chopped
- 3 stalks celery, finely chopped
- 1 large clove garlic, minced
- 1 teaspoon dried sage
- ½ teaspoon dried thyme
- ¼ teaspoon black pepper
- ½ teaspoon salt, or to taste
- 2 ½ cups low-sodium chicken or vegetable broth
- ¼ cup fresh parsley, chopped (for garnish, optional)
Step-by-Step Instructions
Step 1: Prepare Your Bread
Start by cubing your day-old bread. You can use any type of bread you prefer – white, sourdough, or whole wheat work wonderfully. Spread the bread cubes out on a large baking sheet and let them air dry for an hour or two, or gently toast them in a 250°F (120°C) oven for 10-15 minutes until slightly crisp. This step is key for preventing soggy stuffing.
Small tip: If your bread is very fresh, toasting it lightly is essential for the best texture.
Step 2: Sauté Aromatics
Melt the unsalted butter in a large, deep skillet or Dutch oven over medium heat. Add the finely chopped yellow onion and celery. Cook these vegetables, stirring occasionally, for about 8-10 minutes until they are softened and translucent. Don’t rush this step, as it builds the flavor base.
Small tip: Cooking the vegetables slowly helps to bring out their natural sweetness and deepens the overall flavor of your stuffing.
Step 3: Add Garlic and Herbs
Once the onion and celery are soft, stir in the minced garlic, dried sage, dried thyme, black pepper, and salt. Cook for just 1 minute more, stirring constantly, until the garlic is fragrant. Be careful not to burn the garlic, as it can turn bitter very quickly.
Small tip: Adding dried herbs and spices to the hot butter and vegetables helps to “bloom” their flavors, making them more vibrant.
Step 4: Combine with Bread and Broth
Add the prepared bread cubes to the skillet with the sautéed vegetables and herbs. Pour in the low-sodium chicken or vegetable broth. Stir gently but thoroughly, ensuring all the bread cubes are moistened by the broth and coated with the aromatic mixture. You want the bread to absorb the liquid without becoming mushy.
Small tip: Use a wide spatula or spoon to fold the ingredients together, rather than aggressively stirring, to keep the bread cubes intact.
Step 5: Cook on the Stove Top
Cover the skillet with a tight-fitting lid and reduce the heat to low. Let the stuffing cook for 5-7 minutes, allowing the bread to fully absorb the broth and the flavors to meld. The steam trapped inside will help to tenderize the bread and warm everything through beautifully.
Small tip: Resist the urge to lift the lid too often, as this releases the steam crucial for tenderizing the stuffing.
Step 6: Fluff and Serve
Once cooked, remove the skillet from the heat. Carefully uncover and gently fluff the stuffing with a fork. Taste and adjust seasonings if needed – perhaps a little more salt or pepper. Transfer the warm, fragrant stuffing to a serving dish and garnish with fresh chopped parsley, if desired. Serve immediately and enjoy!
Small tip: A sprinkle of fresh parsley adds a lovely pop of color and a fresh finish to your delicious homemade stuffing.
Tips & Variations
- Gluten-Free Option: Simply use your favorite gluten-free bread for this recipe. Ensure it’s day-old or lightly toasted for the best texture.
- Vegan or Vegetarian Option: Use vegetable broth instead of chicken broth and a plant-based butter substitute. The rest of the recipe is naturally vegetarian!
- Add More Vegetables or Protein: For extra texture and flavor, sauté ½ cup chopped mushrooms with the onions and celery. You could also add ½ cup dried cranberries or chopped pecans for a sweet and nutty twist. For protein, brown ½ lb of crumbled sausage (pork or plant-based) before adding the onions.
- Spicy Version: If you love a little kick, add ¼ teaspoon of red pepper flakes along with the dried herbs in Step 3. You can also use a pinch of cayenne pepper.
- Flavor Boost: For a deeper, more complex flavor, consider adding a tablespoon of apple cider or a splash of dry white wine with the broth. You could also swap out some of the dried herbs for fresh ones, using 1 tablespoon fresh chopped sage and 1 teaspoon fresh chopped thyme.
Nutritional Information
Approximate values per serving (based on 8 servings):
- Calories: 280
- Protein: 7g
- Carbohydrates: 35g
- Fat: 12g
Please note: Nutritional values may vary depending on the specific ingredients and brands used.
Health Benefits
This homemade stuffing, while comforting, also brings some wonderful health benefits thanks to its wholesome ingredients:
- Fiber-Rich Bread: Using whole wheat or sourdough bread adds dietary fiber, which is crucial for digestive health and helps you feel full and satisfied. Fiber also contributes to stable blood sugar levels.
- Nutrient-Packed Vegetables: Onions and celery are low in calories but high in essential nutrients. Onions provide antioxidants like quercetin, which can help reduce inflammation. Celery is a good source of Vitamin K, Vitamin A, and folate.
- Aromatic Herbs: Sage and thyme are more than just flavor enhancers! They are packed with antioxidants and have anti-inflammatory properties. Sage, in particular, has been studied for its potential cognitive benefits.
- Healthy Fats from Butter: While used in moderation, butter provides fat-soluble vitamins like A, D, E, and K2. It also adds a satisfying richness that helps in the absorption of certain nutrients from the vegetables.
Serving Suggestions
- Classic Holiday Pairing: This stuffing is the perfect companion to roasted turkey, baked ham, or a juicy roast chicken. Don’t forget the gravy and cranberry sauce!
- Main or Side Dish: While typically a side, a generous portion of this stuffing, especially if you add sausage or mushrooms, can make a satisfying light main course for a weeknight meal.
- Brunch Delight: Serve a smaller portion alongside scrambled eggs and bacon for a comforting and unique brunch offering.
Storage Tips
Leftover stuffing stores beautifully! Place any cooled stuffing in an airtight container and refrigerate for up to 3-4 days. For longer storage, you can freeze it in a freezer-safe container or bag for up to 1 month. To reheat, simply warm it in the microwave until hot, or place it in an oven-safe dish covered with foil and bake at 350°F (175°C) for 15-20 minutes, or until heated through. A splash of extra broth can help moisten it during reheating.
Conclusion
So, Stove Top versus homemade? This easy, incredibly flavorful stove-top stuffing recipe makes a strong case for homemade every time! It’s proof that you don’t need to sacrifice convenience for quality, especially during busy holiday seasons. With fresh ingredients and minimal effort, you can create a side dish that tastes like it took hours, but only took minutes.
This recipe is designed to bring that classic, comforting stuffing flavor to your table without all the fuss. It’s a fantastic way to elevate your holiday spread or simply add a touch of warmth to any meal. Give it a try, and you might just find your new favorite go-to stuffing recipe!
Share this delicious creation with your family and friends, and watch their faces light up with every savory bite. Happy cooking, and happy feasting!


