
Introduction
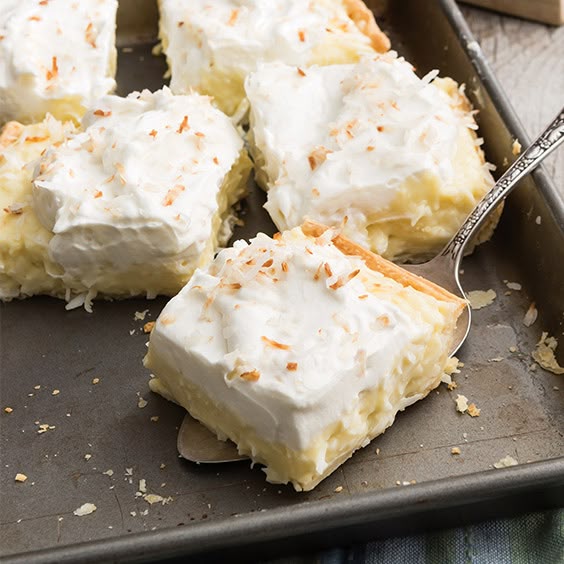
Get ready to discover a true classic with “Paula’s Coconut Cream Pie”! This dessert is a dream come true for anyone who loves rich, tropical flavors. Imagine a smooth, creamy coconut custard nestled in a flaky crust, all topped with a cloud of fresh whipped cream. It’s an unforgettable treat that brings a little bit of sunshine to your table.
You might think a pie this delicious would be complicated, but think again! This recipe is surprisingly simple to master. We’ll use a few clever shortcuts and straightforward steps to create a show-stopping dessert without any fuss. The ingredients are easy to find, and the process is designed to be stress-free, even for beginner bakers.
So, why wait? Gather your ingredients and prepare to impress your family and friends. This pie is perfect for holidays, potlucks, or just a special weeknight indulgence. You’re going to love how easy it is to make and how absolutely irresistible it tastes. Let’s get baking!
Cooking Time & Prep Time
- Prep Time: 30 minutes
- Cooking Time: 15 minutes
- Total Active Time: 45 minutes (plus 4 hours chilling time)
Small tip: The chilling time is crucial for the pie to set properly, so plan ahead for this delicious wait!
Ingredients
This recipe makes 8 generous servings.
-
For the Pie Crust
- 1 (9-inch) pre-baked pie crust (store-bought or homemade)
-
For the Coconut Custard
- 1 cup granulated sugar
- 1/2 cup cornstarch
- 1/4 teaspoon salt
- 3 cups whole milk
- 4 large egg yolks
- 1/4 cup unsalted butter, cut into pieces
- 2 teaspoons vanilla extract
- 1 teaspoon coconut extract (optional, but highly recommended for extra flavor)
- 1 cup sweetened shredded coconut
-
For the Whipped Topping & Garnish
- 1 1/2 cups heavy cream, very cold
- 1/4 cup powdered sugar
- 1 teaspoon vanilla extract
- 1/2 cup toasted shredded coconut, for garnish
Step-by-Step Instructions
-
Step 1: Prepare the Pie Crust
Ensure your 9-inch pie crust is fully baked and cooled. If using a frozen crust, follow package directions for baking. A golden-brown crust will provide a lovely contrast to the creamy filling.
Small tip: You can bake your pie crust a day in advance to save time on baking day.
-
Step 2: Whisk Dry Ingredients
In a large, heavy-bottomed saucepan, combine the granulated sugar, cornstarch, and salt. Whisk them together thoroughly. This step helps prevent lumps in your custard and ensures even sweetness.
-
Step 3: Add Milk and Egg Yolks
Gradually whisk in the whole milk into the dry mixture until smooth. In a separate small bowl, lightly beat the egg yolks. Slowly temper the egg yolks by whisking a small amount of the warm milk mixture into them, then add the tempered yolks back into the saucepan.
Small tip: Tempering the egg yolks prevents them from scrambling when added to the hot milk.
-
Step 4: Cook the Custard
Place the saucepan over medium heat. Cook, stirring constantly with a whisk, until the mixture thickens significantly and comes to a gentle boil. This usually takes about 8-10 minutes. Once boiling, continue to cook and stir for another minute to ensure the cornstarch is fully cooked.
-
Step 5: Incorporate Butter and Extracts
Remove the saucepan from the heat. Stir in the unsalted butter until it is completely melted and incorporated. Then, add the vanilla extract and coconut extract (if using), stirring until well combined. The extracts add depth to the coconut flavor.
-
Step 6: Add Shredded Coconut
Fold in the sweetened shredded coconut into the hot custard. Make sure it’s evenly distributed throughout the mixture. The coconut will soften and infuse the custard with even more flavor as it cools.
-
Step 7: Fill the Pie Crust and Chill
Pour the warm coconut custard filling into your prepared, cooled pie crust. Use a spatula to spread it evenly. Cover the pie loosely with plastic wrap, pressing it gently onto the surface of the custard to prevent a skin from forming. Refrigerate for at least 4 hours, or until completely set and chilled.
Small tip: Chilling the pie for longer, even overnight, will result in a firmer, more stable slice.
-
Step 8: Prepare Whipped Topping
Once the pie is fully chilled, make the whipped topping. In a large mixing bowl, combine the very cold heavy cream, powdered sugar, and vanilla extract. Beat with an electric mixer on high speed until stiff peaks form. Be careful not to overbeat, or you’ll end up with butter!
-
Step 9: Garnish and Serve
Spoon or pipe the whipped cream generously over the top of the chilled pie. Sprinkle with toasted shredded coconut for a beautiful finish and an extra crunch. Slice and serve immediately. Enjoy your delicious homemade coconut cream pie!
Tips & Variations
- Gluten-Free Option: Simply use a certified gluten-free pre-baked pie crust. The filling is naturally gluten-free!
- Vegan/Vegetarian Option: For a vegan version, use a vegan pie crust. Replace whole milk with full-fat canned coconut milk (not light). Replace egg yolks with 2 tablespoons of cornstarch whisked with 1/4 cup of the coconut milk. Use vegan butter and a plant-based whipped topping (like coconut cream whipped cream).
- Add More Substance: For a boost of healthy fats and fiber, consider adding a thin layer of finely chopped pecans or walnuts to the bottom of the pie crust before adding the custard. You could also sprinkle a tablespoon of chia seeds into the custard mixture as it cools for a slight nutritional boost and added texture.
- Spicy Version: For an unexpected kick, add a tiny pinch (about 1/8 teaspoon) of cayenne pepper to the dry ingredients for the custard. It won’t make it hot, but will add a subtle warmth that enhances the sweetness.
- Other Flavor Tips: Toast your shredded coconut for the garnish to bring out a deeper, nuttier flavor. You can also add a layer of fresh banana slices to the bottom of the pie crust before pouring in the custard for a banana coconut cream pie!
Nutritional Information
Approximate values per serving (based on 8 servings):
- Calories: 420 kcal
- Protein: 5g
- Carbohydrates: 45g
- Fat: 26g
Note: These values are approximate and may vary depending on the specific brands and exact quantities of ingredients used.
Health Benefits
While this is a dessert, some of its key ingredients offer delightful benefits!
- Coconut: Shredded coconut provides dietary fiber, which aids digestion. It also contains healthy fats, particularly medium-chain triglycerides (MCTs), which can be a quick source of energy. Coconut also offers minerals like manganese and copper.
- Milk: Whole milk is a good source of calcium, essential for strong bones and teeth. It also provides Vitamin D, which helps with calcium absorption, and Vitamin B12, important for nerve function.
- Eggs: Egg yolks are packed with protein, which is vital for muscle repair and growth. They also contain choline, a nutrient important for brain health, and various vitamins like A, D, E, and K.
- Vanilla: Beyond its comforting flavor, vanilla extract contains antioxidants, which help protect your body’s cells from damage. It also has a calming aroma that can have a positive effect on mood.
Serving Suggestions
- Serve a slice with a hot cup of coffee or tea for a perfect after-dinner treat.
- This pie is the star of the show! It’s definitely a main dessert, not a side dish.
- Bring it to a potluck or family gathering; it’s always a crowd-pleaser!
- For meal prep, you can prepare the custard a day ahead and store it in the fridge before assembling the pie. The toasted coconut can also be prepared in advance.
Storage Tips: Store the pie loosely covered with plastic wrap in the refrigerator for up to 3-4 days. It is not recommended to freeze a fully assembled coconut cream pie, as the texture of the custard and whipped cream can change upon thawing. If you must, freeze the custard filling separately before adding the whipped topping, then thaw in the fridge and add fresh topping.
Conclusion
“Paula’s Coconut Cream Pie” is more than just a dessert; it’s a slice of pure comfort and joy. With its rich, creamy filling, delicate crust, and fluffy whipped topping, it truly embodies the essence of a classic homemade treat. It’s the kind of pie that brings smiles to faces and creates lasting memories.
Don’t be intimidated by making pie from scratch. This recipe is designed to be straightforward and rewarding. Each step is simple, and the results are absolutely worth the minimal effort. You’ll be amazed at how easily you can create such a professional-looking and tasting dessert right in your own kitchen.
So, go ahead, give this recipe a try! Share your delicious creation with family and friends, or simply savor a slice all to yourself. We promise, once you taste this incredible coconut cream pie, it will quickly become a cherished favorite in your recipe collection. Happy baking!


