
Introduction
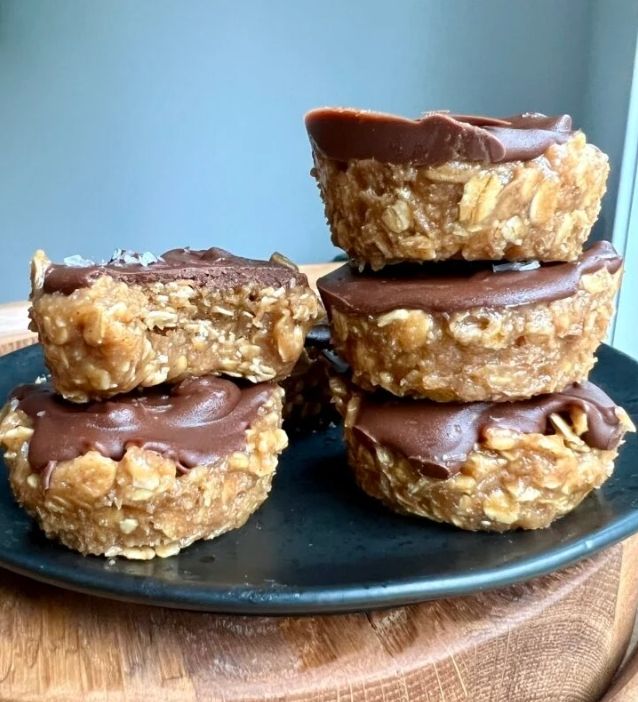
Get ready to discover your new favorite treat: Oat Flour Peanut Butter Cookie Cups! These delightful little bites are the perfect blend of soft, chewy peanut butter cookie and a surprise burst of chocolatey goodness in the center. Imagine a warm, comforting cookie that melts in your mouth, packed with wholesome ingredients and a rich, satisfying flavor. They are truly special and incredibly delicious, hitting all the right notes for a satisfying snack or dessert.
What makes these cookie cups even better? They are incredibly easy and quick to make! You don’t need any special equipment or complicated techniques. With simple pantry staples and just a few steps, you can whip up a batch of these beauties in no time. It’s a fantastic recipe for beginner bakers or anyone looking for a no-fuss dessert that still tastes gourmet.
So, are you ready to bring some joy into your kitchen? These Oat Flour Peanut Butter Cookie Cups are waiting to be baked and enjoyed. Gather your ingredients, put on your apron, and let’s create something truly wonderful together. You’ll be so glad you did!
Cooking Time & Prep Time
- Prep Time: 15 minutes
- Cooking Time: 12 minutes
- Total Time: 27 minutes
Small tip: Always preheat your oven while you gather your ingredients and prepare your muffin tin. This ensures the oven is at the correct temperature when your cookie cups are ready to bake, leading to perfectly cooked treats!
Ingredients
This recipe makes approximately 12 delicious cookie cups.
-
For the Cookie Cups
- 1 cup (100g) oat flour (ensure certified gluten-free if needed)
- ½ cup (128g) creamy peanut butter, unsweetened
- ¼ cup (50g) packed light brown sugar
- ¼ cup (50g) granulated sugar
- 1 large egg
- 1 teaspoon vanilla extract
- ½ teaspoon baking soda
- ¼ teaspoon salt
- 1-2 tablespoons milk (dairy or non-dairy, as needed for consistency)
-
For the Filling
- ½ cup (85g) mini chocolate chips or 12 mini peanut butter cups
Step-by-Step Instructions
-
Step 1: Prepare Your Oven and Muffin Tin
Preheat your oven to 350°F (175°C). Lightly grease a 12-cup mini muffin tin or line it with paper liners. This step ensures your cookie cups won’t stick and will be easy to remove once baked.
Small tip: If using paper liners, a little cooking spray inside the liners can help prevent sticking, especially with peanut butter cookies.
-
Step 2: Cream Wet Ingredients
In a large mixing bowl, combine the peanut butter, light brown sugar, and granulated sugar. Beat them together with an electric mixer or a sturdy spoon until the mixture is light and creamy. This can take about 1-2 minutes.
Small tip: Make sure your peanut butter is at room temperature. This makes it much easier to mix smoothly with the sugars.
-
Step 3: Add Egg and Vanilla
Crack the egg into the creamy peanut butter mixture. Add the vanilla extract. Beat again until everything is well combined and smooth. The mixture should look cohesive and slightly fluffy.
Small tip: Scrape down the sides of the bowl occasionally to ensure all ingredients are fully incorporated.
-
Step 4: Incorporate Dry Ingredients
Add the oat flour, baking soda, and salt to the wet ingredients. Mix on low speed or by hand until just combined. Be careful not to overmix, as this can lead to tougher cookies. The dough will be thick.
Small tip: If your dough seems too dry or crumbly, add milk one tablespoon at a time until it comes together into a cohesive, workable dough.
-
Step 5: Form the Cookie Cups
Scoop about 1 tablespoon of dough into each prepared muffin cup. Use your fingers or the back of a small spoon to gently press the dough into the bottom and up the sides of each cup, forming a small well in the center. Don’t worry if it’s not perfect; the oven will do some of the work.
Small tip: A small cookie scoop can help you portion the dough evenly, making all your cookie cups the same size.
-
Step 6: Add the Filling
Place a few mini chocolate chips (about 1 teaspoon) or one mini peanut butter cup into the well of each cookie dough cup. Gently press the filling down slightly so it’s nestled into the dough. This is where the magic happens!
Small tip: If using regular chocolate chips, you can roughly chop them to make them fit better into the mini wells.
-
Step 7: Bake to Perfection
Bake for 10-12 minutes, or until the edges are lightly golden and the centers are set. The cookie cups will look slightly soft in the middle when you take them out, but they will firm up as they cool. Do not overbake.
Small tip: Ovens can vary, so keep an eye on your cookie cups around the 10-minute mark to ensure they don’t overcook.
-
Step 8: Cool and Enjoy
Let the cookie cups cool in the muffin tin for about 5 minutes before carefully transferring them to a wire rack to cool completely. This allows them to firm up and prevents them from breaking apart. Once cooled, they are ready to be devoured!
Small tip: A small offset spatula or butter knife can help gently loosen the edges before removing them from the muffin tin.
Tips & Variations
- Gluten-Free Option: Oat flour is naturally gluten-free, but always ensure you purchase certified gluten-free oat flour if you have a severe gluten allergy or intolerance. Double-check all other ingredients, especially baking soda and vanilla extract, to ensure they are also certified gluten-free.
- Vegan/Vegetarian Option: To make these cookie cups vegan, substitute the egg with a “flax egg” (1 tablespoon ground flaxseed mixed with 3 tablespoons water, let sit for 5 minutes). Use a plant-based milk (like almond or oat milk) for consistency, and ensure your chocolate chips are dairy-free.
- Add More Protein or Fiber: For an extra boost, you can stir 1-2 tablespoons of chia seeds or ground flaxseeds into the dough. A small scoop of unflavored or vanilla protein powder can also be added, but you might need an extra splash of milk to maintain the correct dough consistency.
- Spicy Version: For a surprising kick, add a tiny pinch (⅛ teaspoon) of cayenne pepper to the dry ingredients. This subtle warmth pairs wonderfully with the peanut butter and chocolate, creating a sophisticated flavor profile.
- Flavor Fun: Experiment with different fillings! Try a dollop of your favorite jam for a PB&J twist, a mini caramel candy, or even a different type of nut butter in the center. A sprinkle of flaky sea salt on top before baking also enhances the flavors beautifully.
Nutritional Information
Approximate values per serving (based on 12 servings):
- Calories: 180 kcal
- Protein: 6g
- Carbohydrates: 18g
- Fat: 10g
Small note: These values are approximate and can vary depending on the specific brands and exact amounts of ingredients used.
Health Benefits
These Oat Flour Peanut Butter Cookie Cups are not just delicious; they also pack some wholesome goodness!
- Oat Flour Power: Oat flour is a fantastic whole grain. It’s rich in soluble fiber, particularly beta-glucan, which is known to help lower cholesterol levels and support a healthy digestive system. This fiber also contributes to a feeling of fullness, helping with satiety.
- Peanut Butter Goodness: Peanut butter is a great source of healthy monounsaturated and polyunsaturated fats, which are beneficial for heart health. It also provides a good amount of plant-based protein, essential for muscle repair and growth, and keeping you feeling energized.
- Vitamins and Minerals: Peanuts are packed with vitamins like Vitamin E and B3 (Niacin), and minerals such as magnesium, phosphorus, and zinc. These play crucial roles in everything from antioxidant protection to bone health and energy metabolism.
- Wholesome Indulgence: By using oat flour and healthy fats from peanut butter, these cookie cups offer a more nutrient-dense alternative to traditional cookies made with refined flours and sugars. They allow you to enjoy a treat while still getting some beneficial nutrients.
Serving Suggestions
- Perfect Anytime Treat: Enjoy these cookie cups with your morning coffee or tea for a delightful start to the day, or as an afternoon pick-me-up.
- Dessert Delight: Serve them slightly warm with a scoop of vanilla ice cream for an extra indulgent dessert after dinner.
- Lunchbox Hero: Pack one or two in lunchboxes for a wholesome and satisfying sweet treat for kids and adults alike.
- Party Pleaser: Arrange them on a platter for your next gathering. They are always a hit and easy to grab and enjoy!
Storage Tips
These Oat Flour Peanut Butter Cookie Cups keep wonderfully. Store them in an airtight container at room temperature for up to 3-4 days, or in the refrigerator for up to 5-7 days for extended freshness. Yes, they can be frozen! Place completely cooled cookie cups in a single layer in an airtight freezer-safe container or bag for up to 2-3 months. To reheat, simply let them thaw at room temperature, or warm them gently in the microwave for 10-15 seconds for a warm, gooey center.
Conclusion
There you have it – a recipe for the most delightful Oat Flour Peanut Butter Cookie Cups! These little gems truly are a perfect blend of simplicity, flavor, and wholesome ingredients. They offer that classic, comforting taste of peanut butter and chocolate in a soft, chewy package that’s hard to resist. Plus, knowing they’re made with oat flour makes indulging feel even better.
We hope you feel inspired to give this recipe a try. It’s a wonderful way to treat yourself, your family, or your friends to something homemade and delicious without spending hours in the kitchen. The ease of preparation combined with the incredible taste makes these cookie cups a definite winner in any recipe collection.
So go ahead, bake a batch (or two!), share the joy, and watch these Oat Flour Peanut Butter Cookie Cups disappear. Happy baking, and happy eating!


