
Introduction
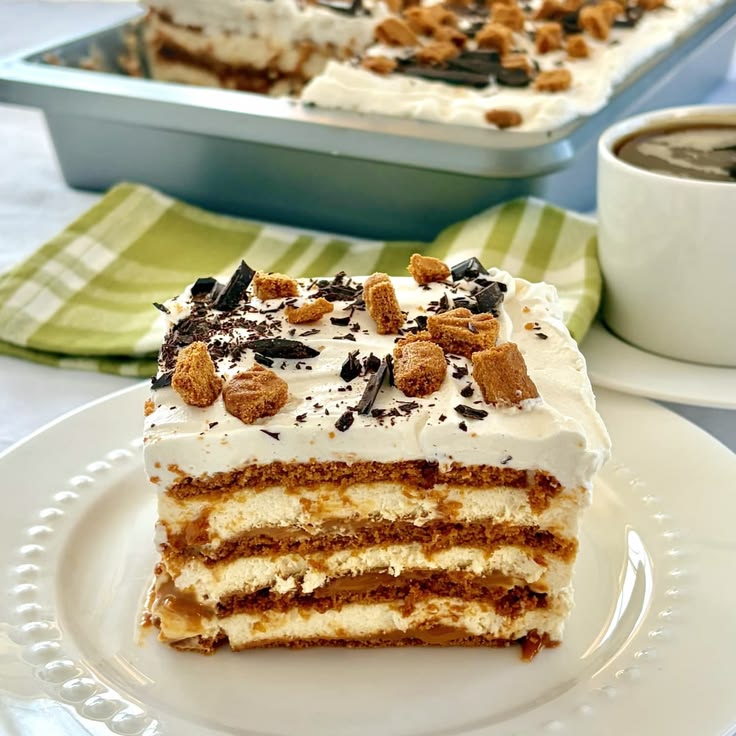
Get ready for a dessert that’s pure magic! Our No Bake Nutella Oreo Icebox Cake is a dream come true for chocolate lovers everywhere. Imagine layers of creamy, rich Nutella filling, crunchy Oreo cookies, and a delicate whipped cream frosting, all coming together in one spectacular bite. It’s decadent, it’s delightful, and it’s surprisingly simple to make.
The best part? No oven required! This icebox cake is famous for its ease. You’ll spend minimal time in the kitchen, mixing a few ingredients and layering them up. The refrigerator does all the hard work, transforming simple components into a cohesive, sliceable cake that tastes incredibly gourmet. It’s perfect for busy days or when you want an impressive dessert without the fuss.
So, whether you’re hosting a party, looking for a special treat, or just craving something sweet and satisfying, this recipe is for you. Dive into the world of no-bake desserts and prepare to fall in love with this Nutella Oreo masterpiece. Let’s make some magic together!
Cooking Time & Prep Time
- Prep Time: 25 minutes
- Chilling Time: 4-6 hours (or overnight for best results)
- Total Time: 4 hours 25 minutes (includes minimum chilling)
Small tip: For the best texture and easiest slicing, plan to chill your icebox cake overnight. This gives the cookies plenty of time to soften and the flavors to meld beautifully.
Ingredients
This recipe makes 8-10 generous servings.
- For the Creamy Nutella Filling:
- 16 ounces (2 blocks) full-fat cream cheese, softened
- 1 cup powdered sugar (confectioners’ sugar)
- 1 teaspoon pure vanilla extract
- 1 cup Nutella chocolate hazelnut spread
- 2 cups heavy cream (cold)
- For the Oreo Layers:
- 1 package (14.3 ounces) Oreo cookies (about 36 cookies)
- ½ cup milk (any kind, for dipping)
- For Garnish (Optional):
- Extra crushed Oreo cookies
- Chocolate shavings or curls
- Fresh raspberries or strawberries
Step-by-Step Instructions
Step 1: Prepare Your Pan and Crush Some Oreos
Line an 8×8 or 9×9 inch square baking pan with parchment paper, leaving an overhang on two sides. This will make it easy to lift the cake out later. Take about 8-10 Oreo cookies and place them in a zip-top bag. Crush them into fine crumbs using a rolling pin or food processor for your topping later.
Small tip: The parchment paper overhang is your best friend for easy cake removal. Don’t skip this step!
Step 2: Beat the Cream Cheese Mixture
In a large mixing bowl, using an electric mixer, beat the softened cream cheese until it’s smooth and lump-free. Add the powdered sugar and vanilla extract. Continue beating until the mixture is light and fluffy, scraping down the sides of the bowl as needed.
Step 3: Fold in the Nutella
Gently fold the Nutella into the cream cheese mixture until it is fully incorporated and the mixture has a uniform light brown color. Be careful not to overmix; just combine until smooth. Set this creamy Nutella mixture aside for a moment.
Small tip: Ensure your cream cheese is truly softened to room temperature. This prevents lumps and makes for a smoother filling.
Step 4: Whip the Heavy Cream
In a separate, clean, and very cold mixing bowl, pour in the cold heavy cream. Using an electric mixer (with clean beaters), beat the heavy cream on medium-high speed until stiff peaks form. The cream should hold its shape when the beaters are lifted.
Small tip: Chill your mixing bowl and beaters in the freezer for 10-15 minutes before whipping the cream. This helps the cream whip up faster and firmer.
Step 5: Combine the Creamy Layers
Gently fold about one-third of the whipped cream into the Nutella cream cheese mixture to lighten it. Then, carefully fold in the remaining whipped cream until just combined. Be gentle to maintain the airiness of the whipped cream. This creates your luscious, light Nutella filling.
Step 6: Begin Assembling the Cake
Pour the ½ cup of milk into a shallow bowl. Take one Oreo cookie at a time and quickly dip both sides into the milk. Do not let it soak! Arrange a single layer of the dipped Oreos on the bottom of your prepared pan, breaking some cookies if needed to fill gaps.
Small tip: Dip the Oreos very quickly, just a second or two per side. Over-dipping will make them too soggy and difficult to handle.
Step 7: Layer the Filling and Cookies
Spread about one-third of the Nutella cream cheese filling evenly over the first layer of dipped Oreos. Repeat the process: dip another layer of Oreos in milk and place them over the filling. Add another third of the Nutella filling. Continue this pattern, ending with a final layer of Nutella filling on top.
Step 8: Chill and Garnish
Cover the pan tightly with plastic wrap. Place the icebox cake in the refrigerator for at least 4-6 hours, or preferably overnight. This chilling time allows the cookies to soften and the cake to set. Once firm, lift the cake out of the pan using the parchment paper overhang. Garnish with the reserved crushed Oreos, chocolate shavings, or fresh berries before slicing and serving.
Tips & Variations
- Gluten-Free Option: Easily make this cake gluten-free by using gluten-free sandwich cookies instead of traditional Oreos. Many brands offer delicious GF chocolate sandwich cookies that work perfectly.
- Vegan/Vegetarian Option: For a vegan version, use a plant-based cream cheese alternative, vegan heavy whipping cream (like coconut cream or a commercial vegan whipping cream), and a vegan chocolate sandwich cookie. Ensure your chocolate hazelnut spread is also vegan-friendly.
- Adding More Protein or Fruit: While it’s a dessert, you can serve it alongside a handful of fresh berries (strawberries, raspberries, blueberries) for added vitamins and fiber. For a slight protein boost, consider adding a sprinkle of chopped toasted hazelnuts to the top, which complements the Nutella flavor beautifully.
- A Hint of Spice: For an unexpected twist, add a tiny pinch (about ¼ teaspoon) of cayenne pepper or chili powder to the Nutella cream cheese mixture. It won’t make it overtly spicy, but it will add a subtle warmth that enhances the chocolate flavor.
- Flavor Swaps: Experiment with different cookie types like Biscoff cookies or chocolate chip cookies. You could also swap Nutella for a different spread like peanut butter, almond butter, or even a coffee-flavored spread for a unique taste. A few drops of mint extract in the filling could create a mint-chocolate version!
Nutritional Information
Approximate values per serving (based on 10 servings):
- Calories: 620 kcal
- Protein: 9g
- Carbohydrates: 65g
- Fat: 39g
Note: Nutritional values are estimates and may vary depending on specific brands and quantities of ingredients used.
Health Benefits
While this is a decadent treat, some of its components offer a few benefits!
Nutella, at its heart, contains hazelnuts and cocoa. Hazelnuts are a good source of healthy monounsaturated fats, which are beneficial for heart health. They also provide dietary fiber, vitamin E, and several B vitamins, as well as minerals like magnesium and manganese.
Cocoa, the base for chocolate, is rich in antioxidants called flavonoids. These compounds are known for their potential to help reduce inflammation and support cardiovascular health. A little bit of dark chocolate goodness is always a welcome addition!
Dairy products like cream cheese and heavy cream contribute calcium, which is vital for strong bones and teeth. They also provide protein, which is essential for muscle repair and growth, and vitamin A, important for vision and immune function.
Of course, this cake is also a wonderful source of pure joy and satisfaction! Enjoying a delicious dessert in moderation can be a great boost for your mood and overall well-being.
Serving Suggestions
- Serve chilled slices on their own for a simple yet elegant dessert.
- Pair with a hot cup of coffee, a glass of cold milk, or a scoop of vanilla bean ice cream.
- Garnish with fresh berries like raspberries or strawberries for a touch of freshness and color.
- This cake is perfect for potlucks, birthday parties, or any gathering where you want an impressive, easy-to-serve dessert.
Storage Tips
Store any leftover No Bake Nutella Oreo Icebox Cake tightly covered with plastic wrap in the refrigerator for up to 3-4 days. It actually tastes even better the next day as the flavors continue to meld! Yes, this cake can be frozen. Wrap individual slices or the whole cake (if well-chilled) tightly in plastic wrap, then again in aluminum foil. It will keep in the freezer for up to 1 month. To enjoy, simply thaw in the refrigerator overnight. No reheating is necessary, as this is a delightful cold dessert.
Conclusion
There you have it – the ultimate No Bake Nutella Oreo Icebox Cake! This dessert proves that you don’t need fancy baking skills or hours in the kitchen to create something truly spectacular. It’s rich, creamy, crunchy, and absolutely bursting with flavor, making it a guaranteed crowd-pleaser for any occasion.
The simplicity of this recipe is its true charm. Just a few ingredients, a bit of mixing, and the magic of the refrigerator transform humble cookies and cream into a show-stopping cake. You’ll love how easy it is to assemble and how effortlessly impressive it looks when served.
So go ahead, treat yourself and your loved ones to this incredible dessert. It’s perfect for sharing with family, bringing to a potluck, or simply enjoying a slice (or two!) on a cozy evening. Happy no-baking!


