
Introduction
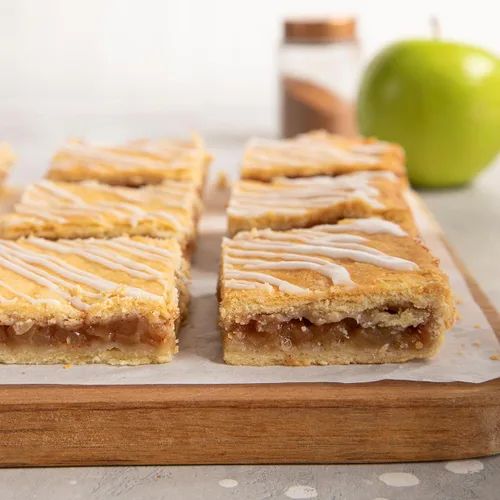
Get ready to fall in love with our Homemade Apple Bars! Imagine a buttery, flaky crust that melts in your mouth, generously filled with tender, spiced apples. It’s a classic dessert, reimagined into a convenient bar form, perfect for any time of day. These bars are bursting with natural apple sweetness and warm spices, making every bite a comforting delight.
You might think making a dessert this delicious is complicated, but I promise you, it’s surprisingly easy. We’re using simple ingredients and straightforward steps that even a beginner baker can master. Forget about complicated pie crusts; these bars come together quickly and bake up beautifully with minimal fuss. It’s the perfect recipe when you crave something homemade and special, but don’t have hours to spend in the kitchen.
So, why wait? Gather your ingredients and let’s create some baking magic together. These Homemade Apple Bars are sure to become a cherished recipe in your kitchen, bringing smiles and warmth to everyone who tries them. You’ll be so proud of the delicious results!
Cooking Time & Prep Time
- Prep Time: 35 minutes
- Cooking Time: 45 minutes
- Total Time: 80 minutes
Small tip: To save a little time, you can prepare the apple filling while the crust dough is chilling in the refrigerator. This way, everything is ready to go once the dough is chilled.
Ingredients
This recipe makes approximately 12 delicious bars.
For the Flaky Crust
- 2 ½ cups all-purpose flour, plus more for dusting
- 1 teaspoon granulated sugar
- ½ teaspoon salt
- 1 cup (2 sticks) unsalted butter, very cold and cut into ½-inch cubes
- ½ cup ice water, plus 1-2 tablespoons more if needed
For the Apple Filling
- 6 medium-sized apples (about 6-7 cups sliced), such as Granny Smith, Honeycrisp, or Fuji
- ½ cup granulated sugar (adjust to apple sweetness)
- 1 teaspoon ground cinnamon
- ¼ teaspoon ground nutmeg
- 1 tablespoon fresh lemon juice
- 2 tablespoons cornstarch
For the Simple Glaze (Optional)
- 1 cup powdered sugar
- 2-3 tablespoons milk or cream
- ½ teaspoon vanilla extract
Step-by-Step Instructions
-
Step 1: Prepare the Flaky Crust Dough
In a large bowl, whisk together the flour, granulated sugar, and salt. Add the very cold, cubed butter to the flour mixture. Use a pastry blender, two knives, or your fingertips to cut the butter into the flour until the mixture resembles coarse crumbs with some pea-sized pieces of butter remaining. This step is key for flakiness.
Small tip: Handle the dough as little as possible to keep the butter cold and prevent a tough crust.
-
Step 2: Add Ice Water to Form Dough
Gradually add the ice water, one tablespoon at a time, mixing gently with a fork until the dough just comes together. Be careful not to overmix. The dough should be shaggy but hold together when squeezed. Divide the dough into two equal portions, flatten each into a disc, wrap tightly in plastic wrap, and refrigerate for at least 30 minutes.
Small tip: If your kitchen is warm, you can chill the dough for up to 2 hours for best results.
-
Step 3: Prepare the Apple Filling
While the dough chills, peel, core, and slice your apples into thin, uniform pieces (about ¼-inch thick). In a large bowl, combine the sliced apples with granulated sugar, cinnamon, nutmeg, fresh lemon juice, and cornstarch. Toss gently until all the apples are evenly coated. The cornstarch will help thicken the filling, preventing a watery consistency.
Small tip: Using a mix of sweet and tart apples creates a more complex and balanced flavor in your bars.
-
Step 4: Preheat Oven and Prepare Pan
Preheat your oven to 375°F (190°C). Lightly grease and flour a 9×13 inch baking pan, or line it with parchment paper, leaving an overhang on the sides for easy lifting. This makes removing the bars much simpler after baking.
Small tip: Parchment paper is your best friend for easy clean-up and perfect bar removal.
-
Step 5: Assemble the Bottom Crust
On a lightly floured surface, roll out one disc of chilled dough into a 9×13 inch rectangle, roughly the size of your baking pan. Carefully transfer the rolled-out dough into the prepared baking pan, pressing it gently into the bottom and up the sides slightly. Prick the bottom crust all over with a fork.
Small tip: Rolling dough between two sheets of parchment paper can make transferring it to the pan much easier.
-
Step 6: Add the Apple Filling
Spoon the prepared apple filling evenly over the bottom crust in the baking pan. Make sure the apples are spread out from edge to edge. The filling might seem high, but the apples will cook down as they bake.
-
Step 7: Create the Top Crust
Roll out the second disc of chilled dough into a 9×13 inch rectangle. You can either place this entire sheet over the apples (cut a few vents for steam) or cut it into strips to create a beautiful lattice top. For a lattice, cut 1-inch wide strips and weave them over the apple filling. Trim any excess dough and press the edges to seal with the bottom crust.
Small tip: For a golden finish, you can brush the top crust with an egg wash (one egg beaten with a tablespoon of water) and sprinkle with a little coarse sugar before baking.
-
Step 8: Bake to Golden Perfection
Place the baking pan in the preheated oven and bake for 45-55 minutes, or until the crust is golden brown and the apple filling is bubbly and tender. If the crust starts to brown too quickly, you can loosely tent the pan with aluminum foil.
Small tip: The apples should be very soft when pierced with a knife, indicating they are fully cooked.
-
Step 9: Cool Completely
Once baked, remove the apple bars from the oven and let them cool completely in the pan on a wire rack. This is crucial for the bars to set properly and for easy cutting. Cooling can take 2-3 hours.
Small tip: Patience is key here! Cutting warm bars will result in a messy, crumbling experience.
-
Step 10: Prepare and Drizzle the Glaze (Optional)
In a small bowl, whisk together the powdered sugar, milk or cream, and vanilla extract until smooth. Add more milk if you prefer a thinner glaze, or more powdered sugar for a thicker one. Once the bars are completely cool, drizzle the glaze evenly over the top using a spoon or a whisk. Let the glaze set for about 15-20 minutes before slicing and serving.
Small tip: For a neat drizzle, transfer the glaze to a small Ziploc bag, snip off a tiny corner, and pipe it over the bars.
Tips & Variations
- Gluten-Free Option: Easily make these bars gluten-free by using a 1:1 gluten-free all-purpose flour blend in the crust. Ensure your blend contains xanthan gum, or add ½ teaspoon if it doesn’t.
- Vegan Option: To make these bars vegan, simply substitute the butter in the crust with a high-quality, plant-based vegan butter. Ensure the vegan butter is very cold for the best flaky texture. Skip the glaze or make a vegan version using plant-based milk.
- Nutty Crunch: For added texture and a boost of healthy fats, sprinkle ½ cup of chopped walnuts or pecans over the apple filling before adding the top crust. This adds a delightful crunch and nutty flavor.
- Spicy Kick: If you enjoy a bit of warmth, add a pinch of ground ginger or a tiny dash of cayenne pepper (¼ teaspoon) to the apple filling alongside the cinnamon and nutmeg. It creates a subtle, intriguing spice note.
- Streusel Topping: Instead of a full top crust or lattice, create a delicious streusel topping! Combine ½ cup flour, ¼ cup brown sugar, ¼ cup cold butter (cut into pieces), and ½ teaspoon cinnamon. Mix until crumbly and sprinkle over the apple filling before baking.
Nutritional Information
Approximate values per serving (based on 12 servings):
- Calories: 320 kcal
- Protein: 3g
- Carbohydrates: 48g
- Fat: 15g
Note: Nutritional values are estimates and may vary depending on specific ingredients and brands used.
Health Benefits
These Homemade Apple Bars offer more than just deliciousness; they bring some healthy benefits too, especially when made from scratch with fresh ingredients.
Apples: The star of our show, apples are packed with dietary fiber, which is fantastic for digestive health and helps you feel full and satisfied. They also provide a good dose of Vitamin C, an important antioxidant that supports your immune system, and various other antioxidants that help fight off free radicals in the body.
Cinnamon: This wonderful spice isn’t just for flavor! Cinnamon is known for its anti-inflammatory properties and may help regulate blood sugar levels. It adds a warm, comforting aroma and a little health boost to your dessert.
Lemon Juice: A splash of fresh lemon juice brightens the flavor of the apples and helps prevent them from browning. It’s also a good source of Vitamin C and can aid in digestion.
Homemade Goodness: By making these bars yourself, you control the amount of sugar and the quality of ingredients. This means you can reduce processed sugars and avoid artificial additives often found in store-bought desserts, making it a more wholesome treat.
Serving Suggestions
- Classic Dessert: Serve a warm bar with a scoop of vanilla bean ice cream or a dollop of freshly whipped cream for an ultimate comforting treat.
- Breakfast or Brunch: Enjoy a bar with your morning coffee or tea. It’s a wonderful, satisfying start to the day or a delightful addition to a brunch spread.
- Afternoon Snack: These bars are perfect for a pick-me-up snack in the afternoon, providing a burst of energy and flavor.
- Potlucks and Parties: Easy to transport and serve, apple bars are a fantastic dessert to bring to gatherings, picnics, or potlucks.
- Meal Prep Idea: Bake a batch on Sunday and enjoy them throughout the week as a pre-portioned dessert or snack. They travel well in lunchboxes too!
Storage Tips
Store leftover Homemade Apple Bars in an airtight container at room temperature for up to 2 days, or in the refrigerator for up to 3-4 days. For longer storage, you can freeze the bars! Wrap individual bars tightly in plastic wrap, then place them in a freezer-safe bag or container for up to 3 months. To reheat, thaw frozen bars in the refrigerator overnight, then warm in a preheated oven at 300°F (150°C) for 10-15 minutes, or briefly in the microwave until heated through.
Conclusion
There you have it – your very own batch of Homemade Apple Bars, baked with love and ready to be devoured! This recipe truly embodies comfort and simplicity, offering a delightful blend of tender, spiced apples nestled in a perfectly flaky, buttery crust. It’s the kind of dessert that brings warmth to any gathering and a smile to every face.
Don’t hesitate to try this recipe. The process is enjoyable, and the results are incredibly rewarding. You’ll be amazed at how easy it is to create such a delicious and impressive treat right in your own kitchen. Plus, the aroma of baking apples and cinnamon


