
Introduction
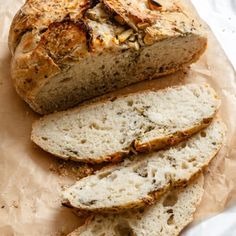
Imagine the irresistible aroma of freshly baked bread filling your home. Now, imagine achieving that without hours of kneading or complex techniques. Our Garlic and Herb No-Knead Bread is a true kitchen miracle, offering a wonderfully crusty exterior and a soft, airy interior bursting with savory garlic and fragrant herbs. It’s truly a delight for the senses and will make any meal feel special.
The beauty of this recipe lies in its simplicity. “No-knead” means exactly that – no heavy lifting, no strenuous mixing, just a few minutes of active prep time. The magic happens slowly, as the dough rises on its own, developing incredible flavor and texture with minimal effort from you. It’s perfect for busy weeknights or lazy weekends when you crave homemade goodness without the fuss.
Are you ready to impress yourself and your loved ones with a loaf of artisan-quality bread? This recipe is your ticket to baking success, even if you’re a beginner. Get ready to enjoy the most delicious, easiest bread you’ve ever made!
Cooking Time & Prep Time
- Prep Time: 15 minutes (active)
- First Rise: 12-18 hours
- Second Rise: 30-60 minutes
- Cooking Time: 45-50 minutes
- Total Time: Approximately 1 hour active time + 13-19 hours inactive time
Small tip: The long first rise is crucial for developing deep flavor, so plan your baking schedule accordingly. You can mix the dough the evening before you want to bake.
Ingredients
This recipe makes 8-10 servings (one standard loaf).
- For the Dough:
- 3 cups (360g) all-purpose flour, plus extra for dusting
- 1 ½ teaspoons fine sea salt
- ½ teaspoon instant or active dry yeast
- 1 ½ cups (360ml) warm water (around 105-115°F / 40-46°C)
- For the Flavor:
- 2 tablespoons finely minced fresh garlic (about 4-5 cloves)
- 1 tablespoon dried Italian herbs (or a mix of dried oregano, basil, rosemary, and thyme)
- 1 tablespoon olive oil, plus extra for greasing the bowl and brushing
Step-by-Step Instructions
-
Step 1: Combine Dry Ingredients
In a large mixing bowl, combine the flour, salt, and yeast. Whisk them together thoroughly to ensure even distribution. This step is important for a consistent rise and flavor throughout your bread.
Small tip: If using active dry yeast, you can proof it first by dissolving it in the warm water with a pinch of sugar for 5-10 minutes until foamy. Then add to the dry ingredients.
-
Step 2: Add Wet Ingredients and Flavorings
Pour the warm water into the bowl with the dry ingredients. Add the minced garlic and dried herbs. The garlic and herbs will infuse the dough with wonderful flavor as it rises.
-
Step 3: Mix the Dough
Using a wooden spoon or a sturdy spatula, mix everything until just combined. The dough will be shaggy and sticky, not smooth like traditional bread dough. Do not overmix; just ensure there are no dry pockets of flour.
Small tip: Resist the urge to add more flour at this stage, even if the dough seems very wet. The high hydration is key to its airy texture.
-
Step 4: First Rise (Long Fermentation)
Lightly grease the inside of the bowl with olive oil. Cover the bowl tightly with plastic wrap or a damp kitchen towel. Let the dough rise at room temperature (ideally 68-72°F / 20-22°C) for 12-18 hours. It should more than double in size and have bubbles on the surface.
Small tip: For an even deeper flavor, you can let it rise in the refrigerator for up to 24 hours, then bring it to room temperature for about an hour before proceeding.
-
Step 5: Prepare for Second Rise
Once the first rise is complete, gently scrape the dough out onto a lightly floured surface. Fold the edges of the dough towards the center a few times to create a rough ball shape. Do this gently to avoid deflating all the air.
-
Step 6: Second Rise
Place the dough seam-side down on a piece of parchment paper. You can also place it in a proofing basket (banneton) if you have one, lined with a floured cloth. Cover loosely with a clean kitchen towel and let it rest for another 30-60 minutes while you preheat your oven.
Small tip: The parchment paper will make it much easier to transfer the dough to the hot Dutch oven later.
-
Step 7: Preheat Oven and Dutch Oven
About 30 minutes before the second rise is complete, place a 5-6 quart Dutch oven (with its lid) into your oven. Preheat the oven to 450°F (230°C). Heating the Dutch oven ensures a super crispy crust.
Small tip: Make sure your Dutch oven is oven-safe up to this temperature. Cast iron is ideal for this method.
-
Step 8: Transfer and Bake (Covered)
Carefully remove the hot Dutch oven from the oven using oven mitts. Lift the dough by the parchment paper and gently lower it into the hot Dutch oven. You can score the top of the dough with a sharp knife if you wish, for a more rustic look. Cover the Dutch oven with its lid and place it back in the oven.
Small tip: Be very careful when handling the hot Dutch oven to prevent burns.
-
Step 9: Finish Baking (Uncovered)
Bake the bread with the lid on for 30 minutes. After 30 minutes, remove the lid and continue baking for another 15-20 minutes, or until the crust is deeply golden brown and sounds hollow when tapped. This uncovered baking period creates that beautiful, crispy crust.
-
Step 10: Cool the Bread
Carefully remove the bread from the Dutch oven using the parchment paper and transfer it to a wire rack to cool completely. This is a crucial step! Slicing hot bread can result in a gummy texture. Let it cool for at least 1-2 hours before slicing and serving.
Small tip: Resist the urge to cut into it too soon! Cooling allows the internal structure to set properly.
Tips & Variations
- Gluten-Free Option: Substitute the all-purpose flour with a 1:1 gluten-free baking flour blend that contains xanthan gum. You might need to adjust the water slightly, as gluten-free flours absorb liquids differently. Start with the recommended amount and add more if the dough is too dry.
- Vegan/Vegetarian Option: This recipe is naturally vegan and vegetarian! No changes needed.
- Add More Goodies: For extra texture and flavor, fold in ½ cup of shredded Parmesan cheese (if not vegan), sun-dried tomatoes, chopped Kalamata olives, or toasted walnuts during Step 3.
- Spicy Kick: Add ½ to 1 teaspoon of red pepper flakes along with the garlic and herbs for a subtle, warming heat.
- Fresh Herb Boost: If you have fresh herbs, use 2-3 tablespoons of finely chopped fresh rosemary, thyme, or oregano instead of dried. Add them in Step 2. You can also brush the top with melted butter and fresh herbs after baking for extra aroma.
Nutritional Information
Approximate values per serving (based on 8 servings):
- Calories: 220 kcal
- Protein: 7g
- Carbohydrates: 42g
- Fat: 3g
Please note: These values are approximate and may vary depending on the specific ingredients and brands used.
Health Benefits
This homemade bread offers more than just deliciousness; it comes with some great health perks too!
- Garlic Power: Garlic is a superfood known for its immune-boosting properties. It contains compounds like allicin, which have anti-inflammatory and antioxidant effects. Regular consumption of garlic may help support heart health and reduce the risk of certain illnesses.
- Herbaceous Goodness: Herbs like oregano, basil, rosemary, and thyme are packed with antioxidants. These compounds help protect your body’s cells from damage caused by free radicals. They also provide various vitamins, such as Vitamin K, and minerals like iron and calcium.
- Fiber from Flour: While this recipe uses all-purpose flour, it still contributes some dietary fiber. Fiber is essential for digestive health, helping to keep things moving smoothly and promoting a feeling of fullness. If you opt for whole wheat flour in a variation, the fiber content would be significantly higher.
- Control Your Ingredients: Making bread at home means you know exactly what goes into it. You can avoid unwanted preservatives, artificial flavors, and excessive sodium often found in store-bought breads, giving you a healthier, purer product.
Serving Suggestions
- Soup & Stew Companion: This bread is absolutely perfect for dipping into hearty soups, chili, or stews. Its crusty texture holds up beautifully, and the garlic-herb flavor complements rich broths.
- Pasta Partner: Serve warm slices alongside your favorite pasta dishes. It’s wonderful for soaking up delicious sauces like marinara or pesto.
- Cheese Board Star: Slice it thinly and arrange it on a cheese board with various cheeses, cured meats, olives, and fruit for an impressive appetizer.
- Open-Faced Sandwiches: Use thick slices as the base for open-faced sandwiches or bruschetta. Top with fresh tomatoes, mozzarella, and a drizzle of balsamic glaze.
- Garlic Bread Upgrade: For an extra garlicky treat, slice the bread, spread with a little more garlic butter, and broil for a few minutes until golden and fragrant.
Storage Tips
Store leftover bread at room temperature in an airtight container or a bread bag for 2-3 days. To keep it fresh longer, you can freeze individual slices or the whole loaf. Wrap it tightly in plastic wrap, then aluminum foil, and store in the freezer for up to 3 months. To reheat, simply pop a slice in the toaster or warm the whole loaf in a 350°F (175°C) oven for 10-15 minutes until warmed through and crusty again.
Conclusion
There’s nothing quite like the satisfaction of pulling a warm, fragrant loaf of bread from your own oven. This Garlic and Herb No-Knead Bread proves that baking delicious, artisan-quality bread doesn’t have to be complicated. With just a few simple ingredients and mostly hands-off time, you can create a truly impressive centerpiece for any meal.
So, go ahead and give this recipe a try! You’ll be amazed at how easy it is to achieve such incredible results. The rich flavors of garlic and herbs, combined with that perfect crust and tender crumb, will make this a new favorite in your kitchen. Get ready to fill your home with the comforting scent of freshly baked bread.
Bake a loaf for your family, share it with friends, or simply enjoy it all yourself. This bread is a testament to the joy of simple, homemade food, and it’s sure to bring smiles all around. Happy baking!


