
Introduction
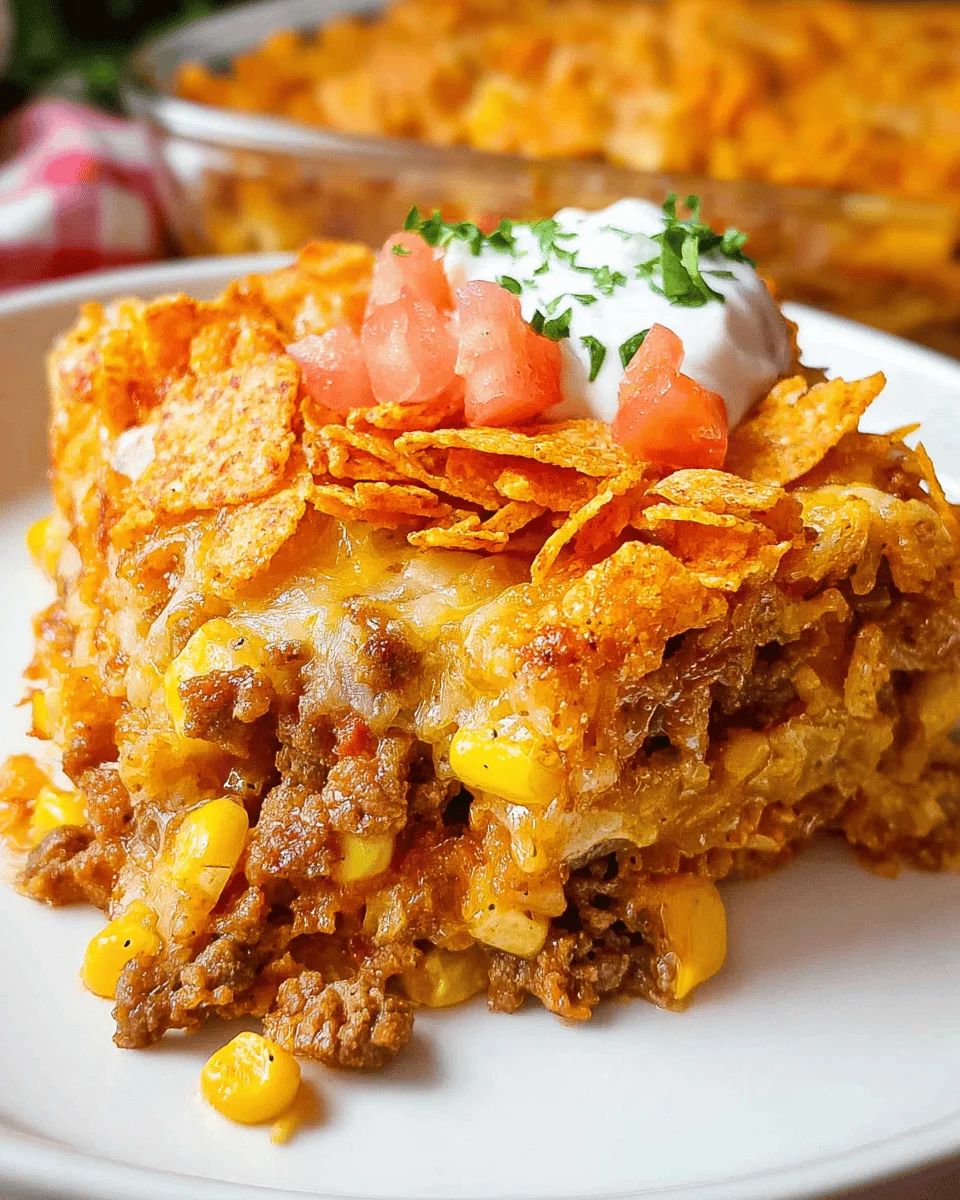
Get ready to meet your new favorite weeknight meal! This Cheesy Dorito Taco Casserole is pure comfort food magic. It takes all the delicious, zesty flavors of your favorite tacos and bakes them into an incredibly satisfying, cheesy dish. The best part? Crunchy Doritos are layered throughout, adding an irresistible texture and a burst of flavor in every single bite. It’s a true crowd-pleaser that will have everyone asking for seconds!
You’ll love how incredibly easy and quick this casserole comes together. It uses simple ingredients you likely already have in your pantry, and it requires minimal hands-on time. From browning the meat to layering everything into a baking dish, the process is straightforward and fuss-free. It’s the perfect solution for busy evenings when you want something homemade and delicious without spending hours in the kitchen.
So, why wait? This Cheesy Dorito Taco Casserole is guaranteed to become a family favorite. It’s hearty, flavorful, and wonderfully cheesy, with that iconic Dorito crunch. Gather your ingredients and get ready to create a meal that’s both fun to make and absolutely delicious to eat. You won’t regret trying this one!
Cooking Time & Prep Time
- Prep Time: 20 minutes
- Cooking Time: 25 minutes
- Total Time: 45 minutes
Small tip: To save time, you can chop any extra vegetables or grate cheese while the ground meat is browning. This helps streamline your prep!
Ingredients
Makes 6-8 servings
For the Casserole:
- 1 tablespoon olive oil
- 1 pound ground beef (or ground turkey/chicken)
- 1 medium onion, chopped
- 1 packet (1 ounce) taco seasoning mix
- 1 (15-ounce) can black beans, rinsed and drained
- 1 (15-ounce) can corn, drained
- 1 (10-ounce) can Rotel diced tomatoes with green chilies, undrained
- 1/2 cup water (or beef/chicken broth)
- 1/2 cup sour cream (or plain Greek yogurt)
- 2 cups shredded cheddar cheese, divided
- 1 (10-ounce) bag Nacho Cheese Doritos, lightly crushed
For the Optional Toppings:
- Shredded lettuce
- Diced tomatoes
- Extra sour cream or Greek yogurt
- Sliced black olives
- Sliced jalapeños
- Fresh cilantro, chopped
- Guacamole or diced avocado
Step-by-Step Instructions
-
Step 1: Preheat and Prepare
Preheat your oven to 375°F (190°C). Lightly grease a 9×13-inch baking dish. This will help prevent sticking and make cleanup easier after baking.
Small tip: Make sure your baking dish is oven-safe and large enough to hold all the layers comfortably.
-
Step 2: Brown the Meat
Heat the olive oil in a large skillet or Dutch oven over medium-high heat. Add the ground beef and chopped onion. Cook, breaking up the meat with a spoon, until the beef is fully browned and the onion is softened, about 6-8 minutes.
Drain any excess fat from the skillet. This step ensures your casserole isn’t too greasy.
-
Step 3: Season and Simmer
Stir in the taco seasoning mix, rinsed and drained black beans, drained corn, undrained Rotel, and water (or broth) into the skillet with the beef. Bring the mixture to a simmer, then reduce the heat to low. Let it cook for 5 minutes, allowing the flavors to meld together.
Remove the skillet from the heat. Stir in the sour cream and 1 cup of the shredded cheddar cheese until well combined. The cheese will melt slightly into the warm mixture, making it extra creamy.
-
Step 4: Layer the Doritos Base
Spread about half of the lightly crushed Doritos evenly over the bottom of your prepared 9×13-inch baking dish. Don’t crush them too finely; you want some good crunch! This forms the delicious base layer of your casserole.
Small tip: Gently crushing the chips by hand in the bag works perfectly.
-
Step 5: Add the Meat Mixture
Spoon the entire ground beef and cheese mixture evenly over the Dorito layer in the baking dish. Spread it out carefully with the back of a spoon or a spatula, ensuring it covers the chips from edge to edge. This creates a hearty, flavorful middle layer.
-
Step 6: Top with Cheese and More Doritos
Sprinkle the remaining 1 cup of shredded cheddar cheese over the meat mixture. Then, scatter the remaining half of the lightly crushed Doritos on top of the cheese. This top layer will get wonderfully crispy and cheesy in the oven.
Small tip: For extra crunch, you can wait to add the top layer of Doritos until the last 5-10 minutes of baking.
-
Step 7: Bake the Casserole
Place the baking dish in the preheated oven. Bake for 20-25 minutes, or until the cheese is melted and bubbly and the casserole is heated through. The top Doritos should be slightly golden and crispy.
Keep an eye on the casserole to prevent the Doritos from burning.
-
Step 8: Rest and Serve
Once baked, remove the casserole from the oven and let it rest for 5-10 minutes. This allows the casserole to set slightly, making it easier to serve. Garnish with your favorite optional toppings, such as fresh cilantro, diced tomatoes, or a dollop of extra sour cream.
Serve warm and enjoy your delicious Cheesy Dorito Taco Casserole!
Tips & Variations
- Gluten-Free Option: Ensure your taco seasoning is certified gluten-free. Most Nacho Cheese Doritos are typically gluten-free in the US (always check the label!), but you can also use gluten-free corn chips for the base.
- Vegetarian/Vegan Option: Replace the ground beef with a plant-based ground crumble. For a vegetarian version, use regular sour cream and cheese. For a vegan version, substitute with vegan sour cream and shredded vegan cheddar cheese.
- Add More Vegetables or Protein: Boost the nutrition by adding diced bell peppers, sautéed mushrooms, or a can of kidney beans to the meat mixture. You can also swap ground beef for ground chicken or turkey for a leaner protein.
- Spicy Version: Amp up the heat by adding a diced jalapeño or a pinch of cayenne pepper to the meat mixture. Use a “hot” variety of Rotel diced tomatoes, or sprinkle some red pepper flakes on top before baking.
- Flavor Twists: Experiment with different Dorito flavors like Cool Ranch or Spicy Sweet Chili for a unique twist. You can also use a blend of cheeses, such as Monterey Jack or Pepper Jack, instead of just cheddar for a richer flavor.
Nutritional Information
Approximate values per serving (based on 8 servings):
- Calories: 450-500 kcal
- Protein: 25-30g
- Carbohydrates: 35-40g
- Fat: 25-30g
Please note: These values are approximate and may vary depending on the specific brands and exact amounts of ingredients used.
Health Benefits
While this casserole is a delicious comfort food, it also packs some beneficial nutrients from its key ingredients!
Ground beef, especially leaner cuts, is an excellent source of high-quality protein, which is essential for building and repairing tissues. It also provides vital minerals like iron, important for oxygen transport, and zinc, crucial for immune function. Additionally, it contains several B vitamins, including B12, which supports nerve function and energy production.
The cheese and sour cream contribute calcium and phosphorus, which are key for strong bones and teeth. Dairy products also offer protein and Vitamin D (if fortified), supporting overall bone health and muscle function. Opting for Greek yogurt instead of sour cream can further boost protein content.
Don’t forget the vegetables! Black beans are a fantastic source of dietary fiber, which aids digestion and helps maintain healthy blood sugar levels. They also provide plant-based protein, folate, and magnesium. Corn adds more fiber and some antioxidants, while the tomatoes in Rotel contribute Vitamin C and lycopene, a powerful antioxidant.
Even the taco seasoning, often a blend of spices like chili powder, cumin, and paprika, offers more than just flavor. Many spices contain antioxidants and anti-inflammatory compounds that can contribute to overall wellness. So, while enjoying this hearty dish, you’re also getting a good mix of essential nutrients!
Serving Suggestions
- Fresh and Crunchy: Serve your casserole with a crisp green salad on the side, tossed with a light vinaigrette. This adds a refreshing contrast to the rich flavors.
- Loaded Toppings Bar: Set out a variety of toppings like shredded lettuce, diced tomatoes, sliced black olives, extra sour cream, guacamole, and fresh cilantro. Let everyone customize their own serving!
- Main Dish Marvel: This casserole is hearty enough to be a complete meal on its own. It’s perfect for a family dinner or a casual get-together with friends.
Storage Tips
Leftover Cheesy Dorito Taco Casserole can be stored in an airtight container in the refrigerator for up to 3-4 days. For best texture, it’s generally not recommended to freeze the casserole once the Doritos are incorporated, as they can become soggy upon thawing. However, you can prepare the meat mixture ahead of time and freeze it separately for up to 2-3 months. Thaw, then assemble with fresh Doritos and cheese before baking. To reheat, microwave individual servings until hot, or cover the casserole dish with foil and reheat in a 350°F (175°C) oven until warmed through, about 20-25 minutes.
Conclusion
And there you have it – a truly unforgettable Cheesy Dorito Taco Casserole! This dish is the ultimate combination of savory, cheesy, and crunchy, making it a guaranteed hit for any occasion. It’s incredibly satisfying, bursting with vibrant taco flavors, and has that irresistible crunch from the Doritos that sets it apart from any other casserole.
We know you’ll love how simple and quick it is to prepare, especially on those busy weeknights when you need a delicious meal in a flash. It’s a recipe that delivers big on flavor without requiring a lot of fuss. So, roll up your sleeves and give this amazing casserole a try; you’ll be so glad you did!
Whether you’re feeding your family, hosting friends, or just craving some serious comfort food, this Cheesy Dorito Taco Casserole is the perfect choice. Share this delightful dish and watch as smiles light up around the table. Happy cooking, and enjoy every cheesy, crunchy bite!


