
Introduction
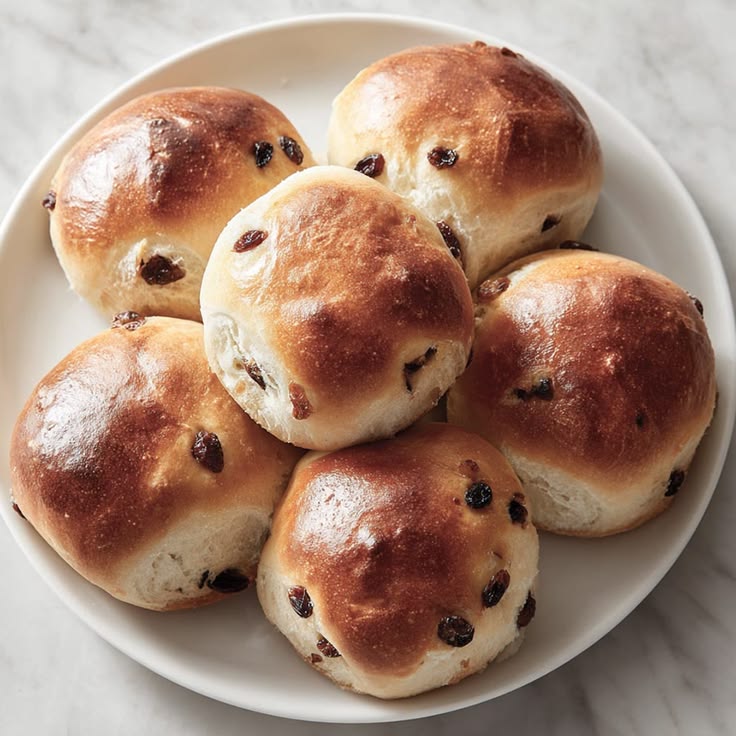
Get ready to discover a truly delightful Canadian classic: the humble yet irresistible Raisin Bun! These aren’t just any buns. They are wonderfully soft, incredibly fluffy, and generously studded with plump, juicy raisins. Each bite offers a comforting sweetness, often with a hint of warm cinnamon, making them a perfect treat any time of day.
What makes these buns even better is how surprisingly easy they are to whip up in your own kitchen. You don’t need any fancy equipment or advanced baking skills. With simple pantry staples and a straightforward process, you’ll be enjoying warm, homemade raisin buns in no time. It’s a truly rewarding baking project that yields delicious results every time.
So, whether you’re looking for a cozy breakfast, a delightful afternoon snack, or just a comforting sweet treat, these Canadian Raisin Buns are calling your name. Gather your ingredients, put on your apron, and let’s bring the warmth and deliciousness of these beloved buns right to your table!
Cooking Time & Prep Time
- Prep Time: 30 minutes (active) + 90 minutes (rising)
- Cooking Time: 18-22 minutes
- Total Time: Approximately 2 hours 20 minutes
Small tip: While the dough is rising, you can clean up your kitchen or prepare a cup of tea to enjoy with your fresh buns!
Ingredients
This recipe makes approximately 12 medium-sized Canadian Raisin Buns.
For the Dough
- 1 cup (240ml) warm milk (about 105-115°F / 40-46°C)
- 2 ¼ teaspoons (1 packet) active dry yeast
- ¼ cup (50g) granulated sugar, divided
- ½ teaspoon salt
- 1 large egg, at room temperature
- ¼ cup (56g) unsalted butter, melted and cooled slightly
- 3 to 3 ½ cups (360-420g) all-purpose flour, plus more for dusting
- 1 teaspoon ground cinnamon
- 1 cup (160g) raisins
For the Egg Wash (Optional)
- 1 large egg yolk
- 1 tablespoon milk
Step-by-Step Instructions
-
Step 1: Activate the Yeast
In a large bowl, combine the warm milk and 1 teaspoon of the granulated sugar. Sprinkle the active dry yeast over the top. Let it sit for 5-10 minutes until the mixture becomes foamy. This shows your yeast is active and ready to work!
Small tip: Ensure your milk isn’t too hot, or it will kill the yeast. Lukewarm is perfect.
-
Step 2: Combine Wet Ingredients
Once the yeast is foamy, add the remaining granulated sugar, salt, room temperature egg, and melted butter to the bowl. Whisk everything together until well combined. This creates the flavorful liquid base for your dough.
Small tip: Using room temperature egg helps the dough rise more effectively.
-
Step 3: Add Dry Ingredients
In a separate bowl, whisk together 3 cups of the all-purpose flour and the ground cinnamon. Gradually add this flour mixture to the wet ingredients, mixing with a wooden spoon until a shaggy dough forms. It will look a bit rough at this stage.
Small tip: Don’t add all the flour at once; you might not need the full amount, depending on humidity.
-
Step 4: Knead the Dough
Turn the dough out onto a lightly floured surface. Knead for about 5-7 minutes until the dough is smooth and elastic. If it’s too sticky, add a little more flour, one tablespoon at a time. The dough should spring back when gently poked.
Small tip: Resist the urge to add too much flour; a slightly sticky dough makes for softer buns.
-
Step 5: Incorporate Raisins and First Rise
Flatten the dough slightly and sprinkle the raisins over the top. Fold the dough over and knead gently for another minute or two until the raisins are evenly distributed. Place the dough in a lightly oiled bowl, turning once to coat. Cover the bowl with plastic wrap or a clean kitchen towel and let it rise in a warm place for 60-90 minutes, or until doubled in size.
Small tip: To plump up raisins, soak them in hot water for 10 minutes, then drain and pat dry before adding to the dough.
-
Step 6: Shape the Buns
Gently punch down the risen dough to release the air. Turn it out onto a lightly floured surface and divide it into 12 equal pieces. Roll each piece into a smooth, round bun. Arrange the buns on a baking sheet lined with parchment paper, leaving some space between them.
Small tip: Use a kitchen scale to ensure your buns are uniform in size for even baking.
-
Step 7: Second Rise
Cover the baking sheet loosely with plastic wrap or a clean kitchen towel. Let the buns rise in a warm place for another 30-45 minutes, or until they look puffy and almost doubled in size again. This second rise contributes to their light and airy texture.
Small tip: A slightly warm (but turned off) oven can be a good spot for dough to rise.
-
Step 8: Bake the Buns
Preheat your oven to 375°F (190°C). If using, whisk the egg yolk and milk for the egg wash. Gently brush the tops of the risen buns with the egg wash. Bake for 18-22 minutes, or until the buns are golden brown and sound hollow when tapped on the bottom.
Small tip: An internal temperature of 200-210°F (93-99°C) indicates the buns are fully baked.
-
Step 9: Cool and Enjoy
Once baked, remove the buns from the oven and transfer them to a wire rack to cool slightly. Serve them warm, perhaps with a pat of butter, jam, or simply on their own. They are truly best enjoyed fresh from the oven!
Small tip: Don’t let them cool completely on the baking sheet, as steam can make the bottoms soggy.
Tips & Variations
- Gluten-Free Option: For a gluten-free version, substitute the all-purpose flour with a 1:1 gluten-free baking flour blend. You might need to adjust the liquid slightly, as GF flours can absorb differently.
- Vegan Option: To make these buns vegan, replace the dairy milk with a plant-based milk (like almond or soy), use plant-based butter, and substitute the egg with a flax egg (1 tablespoon ground flaxseed mixed with 3 tablespoons water, let sit for 5 minutes).
- Added Texture & Nutrition: For extra crunch and nutrients, try adding ½ cup of chopped walnuts or pecans along with the raisins. You could also mix in a couple of tablespoons of oat bran for a subtle fiber boost.
- Spicy & Aromatic Version: Elevate the spice profile by adding ½ teaspoon of ground nutmeg and ¼ teaspoon of ground cloves to the flour mixture. This creates a wonderfully fragrant and warming bun, perfect for cooler weather.
- Orange Zest Delight: For a bright, citrusy twist, add 1 tablespoon of finely grated orange zest to the dough along with the raisins. The orange complements the sweetness of the raisins beautifully.
Nutritional Information
Approximate values per serving (based on 12 servings):
- Calories: 250 kcal
- Protein: 6g
- Carbohydrates: 45g
- Fat: 5g
Please note: Nutritional values may vary depending on specific brands and exact quantities of ingredients used.
Health Benefits
These Canadian Raisin Buns offer more than just deliciousness. Many of their ingredients provide beneficial nutrients.
- Raisins: These dried grapes are a natural source of energy, packed with dietary fiber which aids digestion. They also contain antioxidants, which help protect your body’s cells, and essential minerals like iron and potassium.
- Milk: A great source of calcium, which is vital for strong bones and teeth. Milk also provides protein, important for muscle repair and growth, and often contains fortified Vitamin D, crucial for calcium absorption and immune function.
- Cinnamon: This warming spice is not just for flavor! Cinnamon is known for its powerful antioxidant properties and has anti-inflammatory effects. Some studies suggest it may also help regulate blood sugar levels.
- Carbohydrates: As a primary component of these buns, carbohydrates provide your body with the necessary energy to fuel your daily activities. They are essential for brain function and sustained energy throughout the day.
Serving Suggestions
- Enjoy them warm with your morning coffee or tea for a comforting breakfast.
- Split them open and spread with a dollop of butter or your favorite fruit jam for an extra treat.
- Perfect as an afternoon snack to tide you over until dinner, especially with a glass of cold milk.
- Serve them as part of a brunch spread, alongside fresh fruit and yogurt.
Storage Tips
Store leftover Canadian Raisin Buns in an airtight container at room temperature for up to 2-3 days. For longer storage, they freeze beautifully! Wrap individual buns tightly in plastic wrap, then place them in a freezer-safe bag for up to 2-3 months. To reheat, thaw frozen buns at room temperature, then warm them in a preheated oven at 300°F (150°C) for about 5-7 minutes, or briefly in the microwave for a quick warm-up.
Conclusion
There you have it – a complete guide to baking your very own batch of irresistible Canadian Raisin Buns! These soft, sweet, and perfectly spiced buns are more than just a recipe; they’re a taste of comfort and a nod to simple, wholesome pleasures. The aroma filling your kitchen as they bake is a reward in itself, promising deliciousness to come.
Don’t be shy to dive into this baking adventure. The process is straightforward, the ingredients are simple, and the results are truly spectacular. You’ll be amazed at how easily you can create such a professional-tasting treat right at home. Plus, there’s nothing quite like the satisfaction of pulling a warm tray of homemade baked goods from your oven.
So go ahead, whip up a batch (or two!). Share these delightful Canadian Raisin Buns with your family and friends. They make a wonderful gift, a perfect potluck contribution, or simply a lovely way to show someone you care. Happy baking!


