
Introduction
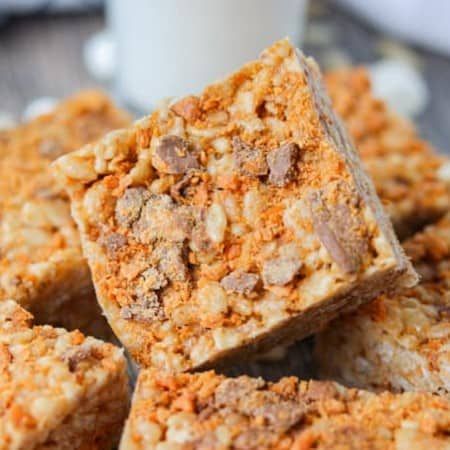
Get ready for a treat that will bring a huge smile to your face! Today, we’re diving into the wonderful world of Butterfinger Rice Krispies Treats. Imagine the classic crispy, chewy goodness you know and love, but with an irresistible twist of crunchy, peanut buttery Butterfinger candy. It’s a flavor explosion that’s both nostalgic and incredibly exciting.
The best part? This recipe is unbelievably easy and quick to make. Seriously, if you can melt butter and stir, you can make these. There’s no baking involved, just a few simple steps and common ingredients. It’s the perfect dessert for busy days, last-minute parties, or when you just need a sweet pick-me-up without a lot of fuss.
So, clear your counter, gather your ingredients, and let’s make some magic! I promise, these Butterfinger Rice Krispies Treats will become a new favorite in your home. They are simply too good not to try.
Cooking Time & Prep Time
- Prep Time: 15 minutes
- Cooking Time: 5 minutes
- Chill Time: 30 minutes
- Total Time: 50 minutes
Small tip: To make prep even faster, have all your ingredients measured and ready before you start melting anything. This is called “mise en place” and it makes cooking a breeze!
Ingredients
This recipe makes approximately 12 generous servings (or 24 smaller squares).
For the Butterfinger Rice Krispies Treats:
- 6 tablespoons unsalted butter
- 1 (10-ounce) bag mini marshmallows (about 40 large marshmallows)
- 6 cups Rice Krispies cereal
- 1 cup crushed Butterfinger candy bars (about 4 regular-sized bars)
For the Optional Drizzle (highly recommended!):
- 1/2 cup semi-sweet chocolate chips
- 1 tablespoon peanut butter
Step-by-Step Instructions
-
Step 1: Prepare Your Pan
First things first, get your pan ready. Lightly grease a 9×13-inch baking pan with butter or non-stick cooking spray. You can also line it with parchment paper, leaving an overhang on the sides. This makes lifting the treats out super easy.
Small tip: The parchment paper overhang is a game-changer for clean removal and cutting!
-
Step 2: Crush the Butterfinger Bars
Unwrap your Butterfinger candy bars. Place them in a large zip-top bag and seal it tightly, removing excess air. Use a rolling pin, meat mallet, or even the bottom of a heavy pan to crush them into small pieces. You want a mix of fine crumbs and small crunchy bits.
Small tip: Don’t crush them too finely; those small crunchy pieces add amazing texture!
-
Step 3: Melt Butter and Marshmallows
In a large, heavy-bottomed pot or Dutch oven, melt the unsalted butter over low heat. Once the butter is fully melted, add the entire bag of mini marshmallows. Stir continuously until the marshmallows are completely melted and smooth. Be patient and keep the heat low to prevent burning.
Small tip: Low heat is key here! High heat can make the marshmallows seize or become tough.
-
Step 4: Combine with Cereal
Remove the pot from the heat. Immediately add the 6 cups of Rice Krispies cereal to the melted marshmallow mixture. Stir quickly and gently with a rubber spatula until the cereal is evenly coated. Work fast, as the mixture will start to set.
Small tip: Use a sturdy spatula for this step, as the mixture gets quite sticky and thick.
-
Step 5: Fold in Crushed Butterfinger
Now for the star ingredient! Add the crushed Butterfinger candy to the cereal mixture. Fold it in gently until it’s well distributed throughout the treats. Try not to overmix, but ensure those Butterfinger bits are everywhere.
Small tip: Reserve a tablespoon or two of crushed Butterfinger for sprinkling on top later, if desired, for extra visual appeal.
-
Step 6: Press into Pan
Transfer the mixture to your prepared 9×13-inch pan. Using a buttered spatula or your lightly buttered hands, gently press the mixture evenly into the pan. Do not press too firmly, as this can make your treats dense and hard instead of delightfully chewy.
Small tip: Lightly buttering your hands or spatula prevents stickiness and helps you spread the mixture smoothly.
-
Step 7: Add Optional Drizzle (if using)
If you’re adding the chocolate and peanut butter drizzle, now is the time. In a microwave-safe bowl, combine the semi-sweet chocolate chips and peanut butter. Microwave on high for 30-second intervals, stirring after each, until smooth and melted. Drizzle this delicious mixture over the treats in the pan.
Small tip: For a neat drizzle, use a spoon or transfer the melted mixture to a small zip-top bag, snip off a corner, and pipe it over.
-
Step 8: Chill and Set
Allow the treats to cool completely at room temperature for at least 30 minutes, or place them in the refrigerator for 15-20 minutes to speed up the setting process. They need to be firm before cutting.
Small tip: Chilling helps them hold their shape better when you cut them.
-
Step 9: Cut and Serve
Once firm, use the parchment paper overhang to lift the entire slab of treats out of the pan. Place it on a cutting board. Using a sharp, buttered knife, cut the treats into squares. Serve immediately and enjoy!
Small tip: A warm knife (run under hot water and dried) cuts through the treats much more cleanly.
Tips & Variations
- Gluten-Free Option: Easily make these gluten-free by ensuring you use a certified gluten-free crispy rice cereal. Most major brands offer a gluten-free version, and Butterfinger candy bars are generally considered gluten-free, but always check the label to be safe!
- Vegan/Vegetarian Option: For a vegan version, swap traditional butter for a plant-based butter alternative and use vegan marshmallows (many brands are available now!). Note that traditional Butterfinger candy bars contain milk, so you would need to either omit the candy or find a suitable vegan peanut butter candy alternative.
- Add More Protein: Boost the protein content by stirring in 1/2 cup of chopped roasted peanuts or almonds along with the crushed Butterfinger. You could also drizzle with extra peanut butter for more protein and flavor!
- Spicy Kick: For a surprising twist, add a tiny pinch (1/8 teaspoon) of cayenne pepper to your chocolate drizzle. The subtle heat will beautifully complement the sweet and peanut buttery flavors, creating an exciting contrast.
- Other Flavor Twists: Feel free to experiment with other crushed candy bars like Snickers or Heath bars. You could also stir in 1/2 cup of chocolate chips or peanut butter chips along with the Butterfinger for an extra layer of decadence. A sprinkle of sea salt on top of the chocolate drizzle also enhances all the flavors!
Nutritional Information
Approximate values per serving (based on 12 servings):
- Calories: 280-320
- Protein: 3-5g
- Carbohydrates: 40-45g
- Fat: 12-15g
Please note that these values are approximate and can vary significantly depending on the specific brands of ingredients used and the exact portion size.
Health Benefits
While Butterfinger Rice Krispies Treats are definitely a dessert, there are a few points to consider regarding their ingredients, especially in moderation.
Crispy rice cereals are often fortified with essential vitamins and minerals. Many brands include iron, which is crucial for carrying oxygen in the blood, and B vitamins like folic acid, important for energy production and cell growth. So, you’re getting a little boost there!
Butter, when consumed in moderation, provides fat-soluble vitamins such as Vitamin A, which is vital for vision and immune function, and Vitamin E, an antioxidant. It also contains healthy fats that contribute to satiety.
The carbohydrates from the cereal and marshmallows provide a quick source of energy. This can be useful for a pre-workout snack or a quick pick-me-up during a busy day. They give your body the fuel it needs to function.
Ultimately, these treats are about enjoyment and bringing joy. Food plays a huge role in our happiness and well-being. Sometimes, the “health benefit” is simply the comfort and delight a delicious treat can bring to your day, especially when shared with loved ones.
Serving Suggestions
- Party Perfect: Cut into smaller squares and arrange on a platter for an easy, crowd-pleasing dessert at any gathering.
- Sweet Snack: Pack a square in lunchboxes or enjoy as an afternoon pick-me-up when you need a little something sweet.
- Dessert Bar Addition: Include these alongside brownies, cookies, and other treats for an impressive dessert spread.
- Thoughtful Gift: Wrap individual squares in cellophane bags with a pretty ribbon for a homemade gift that friends and family will adore.
Storage Tips
Store your Butterfinger Rice Krispies Treats in an airtight container at room temperature for up to 3-4 days. While they can be refrigerated, they tend to become a bit firmer, so bring them back to room temperature before serving for the best texture. These treats can also be frozen! Wrap individual squares tightly in plastic wrap, then place them in a freezer-safe bag or container for up to 1 month. Thaw at room temperature for about 30 minutes before enjoying. Reheating is not recommended for this type of treat, as it can make them overly soft or gummy.
Conclusion
There you have it – a truly irresistible recipe for Butterfinger Rice Krispies Treats! These delightful squares combine the best of both worlds: the comforting chewiness of a classic no-bake treat with the exciting crunch and flavor of Butterfinger candy. They are quick, simple, and guaranteed to be a hit.
Don’t wait another minute to whip up a batch of these glorious treats. Whether you’re a seasoned baker or just starting out in the kitchen, this recipe is incredibly forgiving and yields absolutely delicious results every time. It’s the perfect way to satisfy your sweet tooth with minimal effort.
So go ahead, make these today! Share them with your family, bring them to a potluck,


