
Introduction
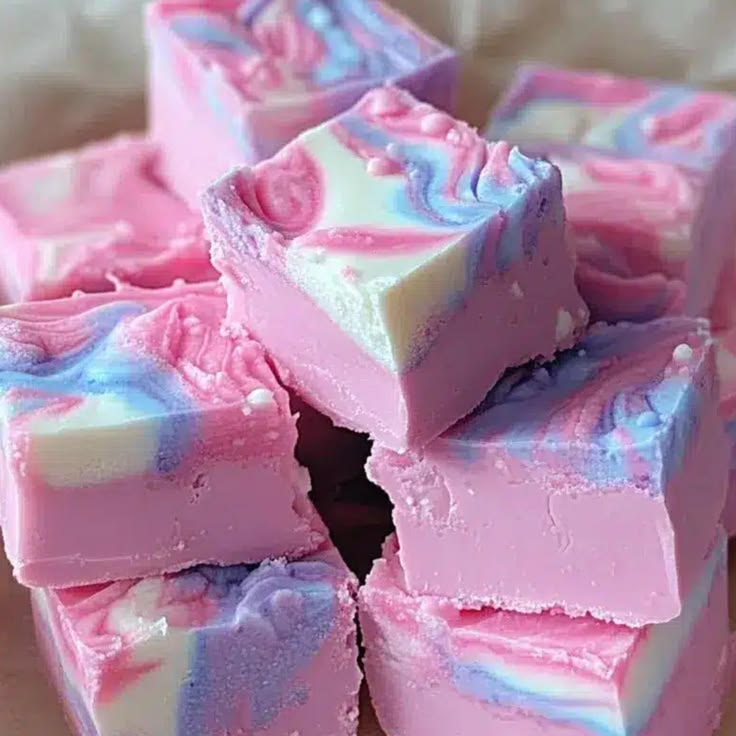
Get ready for a treat that’s as delightful to look at as it is to eat! Our Bubblegum Cloud Fudge is a whimsical, creamy confection that captures the playful spirit of childhood. Imagine a soft, melt-in-your-mouth fudge bursting with sweet bubblegum flavor and swirled with vibrant colors. It’s truly a cloud of pure joy!
The best part? This recipe is incredibly easy and quick to whip up. It’s a no-bake wonder, meaning you spend less time in the kitchen and more time enjoying your delicious creation. With just a few simple ingredients and minimal effort, you’ll have a stunning dessert that looks like it came straight from a gourmet candy shop.
Whether you’re looking for a fun party favor, a unique gift, or just a sweet escape for yourself, this Bubblegum Cloud Fudge is sure to bring a smile to anyone’s face. So, gather your ingredients and let’s make some magic!
Cooking Time & Prep Time
- Prep Time: 15 minutes
- Cooking Time: 5 minutes (active melting)
- Chilling Time: 2-3 hours
- Total Time: Approximately 2 hours 20 minutes to 3 hours 20 minutes (mostly inactive)
Small tip: Make sure you have all your ingredients measured and ready before you start. This makes the melting and mixing process super smooth and quick!
Ingredients
This recipe makes approximately 16-20 delightful pieces of fudge.
- 24 ounces (about 4 cups) good quality white chocolate chips or chopped white chocolate
- 1 (14-ounce) can sweetened condensed milk
- 1 cup marshmallow fluff (or mini marshmallows, melted)
- 1-2 teaspoons bubblegum extract (start with 1 teaspoon and add more to taste)
- Pink gel food coloring
- Blue gel food coloring
- Optional: Rainbow sprinkles for topping
Step-by-Step Instructions
-
Step 1: Prepare Your Pan
Line an 8×8 inch square baking pan with parchment paper, leaving an overhang on all sides. This will make it super easy to lift the fudge out later. Lightly grease the parchment paper with a little cooking spray or butter if you like.
Small tip: The parchment paper overhang acts like handles, so don’t skimp on it!
-
Step 2: Melt the Chocolate and Condensed Milk
In a large microwave-safe bowl, combine the white chocolate chips and sweetened condensed milk. Microwave on high for 1 minute. Stir well.
Continue microwaving in 30-second intervals, stirring thoroughly after each, until the mixture is smooth and completely melted. This usually takes about 2-3 minutes total.
-
Step 3: Stir in Marshmallow Fluff
Add the marshmallow fluff to the melted chocolate mixture. Stir vigorously until the marshmallow fluff is fully incorporated and the mixture is smooth and glossy. The heat from the chocolate will help the fluff blend in seamlessly.
Small tip: Work quickly here while the mixture is still warm to ensure everything combines without lumps.
-
Step 4: Add Flavoring and Divide
Stir in the bubblegum extract into the entire fudge mixture. Make sure it’s evenly distributed for that perfect bubblegum taste. Now, divide the fudge mixture into two separate bowls as evenly as possible.
-
Step 5: Color the Fudge
In one bowl, add a few drops of pink gel food coloring. Stir until you achieve a vibrant pink color. In the second bowl, add a few drops of blue gel food coloring and stir until you have a beautiful blue color.
Small tip: Gel food coloring gives a much richer color without adding extra liquid, so use it sparingly and add more if needed.
-
Step 6: Create the Swirl
Spoon alternating dollops of pink and blue fudge into your prepared pan. Don’t worry about being too neat; the magic is in the swirl! Once all the fudge is in the pan, take a butter knife or a skewer and gently swirl the colors together a few times. Don’t overmix, or the colors will blend too much.
-
Step 7: Chill and Set
If using, sprinkle rainbow sprinkles over the top of the fudge immediately. Gently press them down a little so they stick. Place the pan in the refrigerator for at least 2-3 hours, or until the fudge is completely firm and set.
Small tip: For faster setting, you can place it in the freezer for about 30-45 minutes, but keep an eye on it.
-
Step 8: Cut and Serve
Once the fudge is firm, use the parchment paper overhang to lift it out of the pan. Place it on a cutting board. Use a sharp knife to cut the fudge into 1-inch squares. Clean your knife between cuts for the neatest edges. Enjoy your delightful Bubblegum Cloud Fudge!
Tips & Variations
- Gluten-Free Option: This fudge is naturally gluten-free! Just double-check that your white chocolate chips and any sprinkles you use are certified gluten-free to be absolutely sure.
- Vegan Option: For a vegan version, use a high-quality vegan white chocolate, replace sweetened condensed milk with sweetened condensed coconut milk, and use vegan marshmallow fluff or melted vegan marshmallows.
- Add More Texture/Protein: While not traditional for bubblegum fudge, you can fold in finely chopped nuts like almonds or cashews for a delightful crunch and a little extra protein. For a different texture, try adding freeze-dried fruit pieces (like raspberries or strawberries) before chilling.
- Spicy Twist: If you’re feeling adventurous and want to move away from the bubblegum, try making a chili-chocolate fudge. Replace bubblegum extract with vanilla and add a pinch of cayenne pepper to the melted chocolate mixture for a surprising kick.
- Other Flavor Fun: Experiment with different extracts! Cotton candy, cake batter, or even a mix of strawberry and blue raspberry extracts could create equally fun and colorful fudges. You can also add edible glitter for an extra magical touch!
Nutritional Information
Approximate values per serving (based on 16 servings):
- Calories: 280 kcal
- Protein: 2.5 g
- Carbohydrates: 39 g
- Fat: 14 g
Please note: These values are approximate and can vary depending on the specific brands and quantities of ingredients used.
Health Benefits
While fudge is definitely a treat, there are a few small benefits to be found in its ingredients!
- Calcium from Condensed Milk: Sweetened condensed milk is a good source of calcium, which is essential for strong bones and teeth. It also plays a role in nerve function and muscle contraction.
- Energy Boost: The sugars in fudge provide a quick source of energy. This can be helpful for a rapid pick-me-up during a busy day, in moderation of course!
- Mood Enhancer: Enjoying a delicious treat like this fudge can be a wonderful mood booster. The pleasure of a sweet indulgence can contribute to mental well-being and provide a moment of joy.
- Antioxidants in Cocoa Butter: White chocolate, while not containing cocoa solids, does contain cocoa butter. Cocoa butter contains some antioxidants, which help protect your body’s cells from damage.
Serving Suggestions
- Sweet Companion: Serve a square alongside a scoop of vanilla ice cream or a warm cup of coffee or tea for an elevated dessert experience.
- Party Perfect: Arrange the colorful squares on a platter for birthday parties, baby showers, or any celebration. They’re always a hit!
- Thoughtful Gift: Package a few pieces in a decorative box or cellophane bag for a homemade gift that everyone will adore.
- Afternoon Treat: Enjoy a piece as a delightful snack during an afternoon break when you need a little sweetness.
Storage Tips
This fudge keeps beautifully! Store the Bubblegum Cloud Fudge in an airtight container in the refrigerator for up to 1-2 weeks. It can also be frozen for up to 3 months; simply wrap individual pieces tightly in plastic wrap and then place them in a freezer-safe bag or container. Thaw frozen fudge at room temperature for about 30 minutes before enjoying. No reheating is necessary; this fudge is best served cool or at room temperature.
Conclusion
There you have it – a recipe for Bubblegum Cloud Fudge that’s as enchanting as its name suggests! It’s a truly special treat that combines ease of preparation with an explosion of fun flavor and color. This fudge is perfect for adding a touch of whimsy to any day or occasion, bringing smiles and a delicious burst of nostalgia.
We encourage you to try making this delightful dessert. It’s a fantastic project for beginners and a rewarding treat for experienced bakers alike. The simple steps mean you can achieve stunning results with minimal fuss, making you feel like a confectionery wizard!
So, go ahead, whip up a batch of this vibrant fudge. Share it with your family and friends, or keep it all to yourself for those moments when you need a little extra sweetness. Happy fudging!


