
Introduction
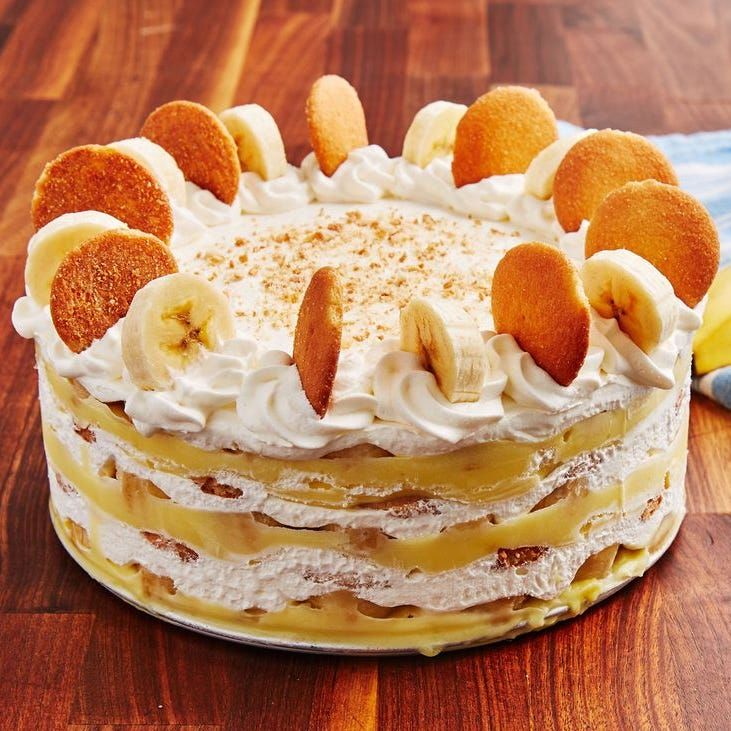
Get ready for a dessert that brings together pure comfort and effortless elegance: the Banana Pudding Icebox Cake! This delightful no-bake treat takes all the beloved flavors of classic banana pudding and transforms them into a stunning layered cake. Imagine sweet vanilla wafers, fresh slices of ripe banana, creamy pudding, and fluffy whipped cream, all stacked high and chilled to perfection. It’s a slice of pure joy!
What makes this icebox cake truly special is how incredibly easy it is to make. There’s no oven required, no complicated steps, just simple assembly. You’ll be layering delicious ingredients in mere minutes, then letting your refrigerator do all the hard work. It’s the perfect dessert for busy days, warm weather, or whenever you crave something sweet without the fuss.
Whether you’re a seasoned baker or a complete beginner, this recipe is designed for success. It’s a guaranteed crowd-pleaser that will have everyone asking for seconds. So, gather your ingredients and get ready to create a truly memorable dessert. You absolutely have to try this Banana Pudding Icebox Cake!
Cooking Time & Prep Time
- Prep Time: 35 minutes
- Cooking Time: 0 minutes (no baking required!)
- Chill Time: Minimum 4 hours (for best results, overnight)
- Total Time: Approximately 4 hours 35 minutes (including minimum chill time)
Small tip: For ultimate convenience, prepare this cake the day before you plan to serve it. An overnight chill allows all the flavors to meld beautifully and the wafers to soften perfectly.
Ingredients
This recipe makes 8-10 generous servings.
For the Pudding Base
- 2 boxes (3.4 oz / 96g each) instant vanilla pudding mix
- 4 cups (960ml) whole milk, cold
- 8 oz (226g) cream cheese, softened
- 1/2 cup (60g) powdered sugar
For the Whipped Cream
- 2 cups (480ml) heavy whipping cream, very cold
- 1 teaspoon vanilla extract
- 2 tablespoons (24g) granulated sugar (optional, for extra sweetness)
For Assembly & Garnish
- 1 box (11 oz / 312g) vanilla wafers
- 4-5 medium ripe, but firm, bananas
- Extra vanilla wafers or crushed wafers, for garnish
- Fresh banana slices, for garnish (optional)
Step-by-Step Instructions
-
Step 1: Prepare the Pudding Mixture
In a large bowl, whisk together the instant vanilla pudding mix and the cold whole milk for about 2 minutes, until thickened. Set it aside to firm up while you prepare the other components. It should be quite thick and creamy.
Small tip: Make sure your milk is very cold; it helps the pudding set faster and thicker.
-
Step 2: Create the Cream Cheese Layer
In a separate medium bowl, beat the softened cream cheese with the powdered sugar using an electric mixer until it’s smooth and lump-free. This might take a couple of minutes. Scrape down the sides of the bowl as needed.
Small tip: Ensure your cream cheese is truly softened to room temperature. This prevents lumps in your mixture.
-
Step 3: Combine Pudding and Cream Cheese
Gently fold the cream cheese mixture into the prepared vanilla pudding. Stir until it’s fully combined and you have a smooth, uniform, and wonderfully creamy pudding base. This step adds richness and tang to the pudding.
-
Step 4: Whip the Cream
In another clean, cold bowl, beat the very cold heavy whipping cream with the vanilla extract (and granulated sugar, if using) using an electric mixer. Beat on high speed until stiff peaks form. Be careful not to overbeat, or you’ll end up with butter!
Small tip: Chilling your bowl and beaters for 15 minutes before whipping cream can help it whip up faster and hold its shape better.
-
Step 5: Assemble the First Layer
Choose a 9×13 inch baking dish. Arrange a single layer of vanilla wafers on the bottom of the dish, breaking some as needed to fit. Cover the wafers with an even layer of sliced bananas. Try to get them in a single, neat layer.
Small tip: Slice your bananas about 1/4 inch thick for the best texture and coverage.
-
Step 6: Add the First Pudding Layer
Carefully spread half of the combined pudding and cream cheese mixture over the bananas. Use an offset spatula or the back of a spoon to create an even layer. Make sure it reaches all the way to the edges of the dish.
-
Step 7: Add the First Whipped Cream Layer
Gently spread half of the whipped cream over the pudding layer. Be delicate to avoid mixing the layers too much. This creates a beautiful visual and textural contrast.
-
Step 8: Repeat Layers and Chill
Repeat the layering process: add another layer of vanilla wafers, followed by the remaining banana slices. Then, spread the rest of the pudding mixture, and finally top with the remaining whipped cream. Cover the dish tightly with plastic wrap and refrigerate for at least 4 hours, or preferably overnight.
Small tip: Chilling is crucial! It allows the wafers to soften and the flavors to meld, creating that signature icebox cake texture.
-
Step 9: Garnish and Serve
Just before serving, remove the cake from the refrigerator. Garnish with additional whole or crushed vanilla wafers and fresh banana slices, if desired. Slice and serve cold. Enjoy your delicious homemade treat!
Small tip: Add fresh banana slices for garnish right before serving to prevent them from browning.
Tips & Variations
- Gluten-Free Option: Easily make this recipe gluten-free by using gluten-free vanilla wafers or other plain gluten-free cookies.
- Vegan Option: Transform this into a vegan delight! Use plant-based milk (like almond or oat milk), vegan cream cheese, and a coconut cream-based whipped topping. Ensure your vanilla wafers are also vegan-friendly.
- More Fruit or Nutrient Boost: Enhance the fruitiness by adding a thin layer of other fruits like sliced strawberries or blueberries along with the bananas. For a slight protein boost, you could swirl a thin layer of your favorite nut butter between the banana and pudding layers.
- Warm Spice Twist: For a comforting twist, add a pinch of ground cinnamon or nutmeg to your pudding mixture. This subtle spice complements the banana flavor beautifully.
- Flavor Swaps: Get creative with your pudding! Try instant chocolate, butterscotch, or even coconut pudding mix for a different flavor profile. You could also drizzle a little caramel sauce over a pudding layer for extra indulgence.
Nutritional Information
Approximate values per serving (based on 10 servings):
- Calories: 470 kcal
- Protein: 8g
- Carbohydrates: 55g
- Fat: 27g
Please note: These values are approximate and may vary depending on the specific brands and exact amounts of ingredients used.
Health Benefits
While this is a delightful dessert, it does contain some ingredients with beneficial properties:
- Bananas: These wonderful fruits are a fantastic source of potassium, which is vital for heart health and blood pressure regulation. They also provide dietary fiber, aiding digestion, and are rich in Vitamin B6 and Vitamin C.
- Dairy (Milk, Cream Cheese, Heavy Cream): Dairy products contribute calcium, which is essential for strong bones and teeth. They also provide protein for muscle repair and growth, and Vitamin D, which supports calcium absorption and immune function.
- Energy Boost: The natural sugars from bananas and carbohydrates from the wafers and pudding provide a quick source of energy, making this a satisfying treat.
- Mindful Indulgence: Enjoying a delicious homemade dessert like this can contribute to overall well-being by providing pleasure and satisfaction, especially when shared with loved ones. It’s all about balance and moderation!
Serving Suggestions
- How to Serve: This cake is best served cold, straight from the refrigerator. It pairs wonderfully with a warm cup of coffee, a glass of cold milk, or even a light fruit salad on the side to balance the richness.
- Best Occasions: The Banana Pudding Icebox Cake is perfect for potlucks, family gatherings, summer BBQs, or as a simple yet impressive dessert for a weekend treat. It’s a guaranteed crowd-pleaser!
- Make Ahead Magic: This dessert is a fantastic make-ahead option. Assemble it the day before your event, and it will be perfectly chilled and ready to serve when your guests arrive, freeing up your time.
Storage Tips:
Your Banana Pudding Icebox Cake will keep beautifully


