
Introduction
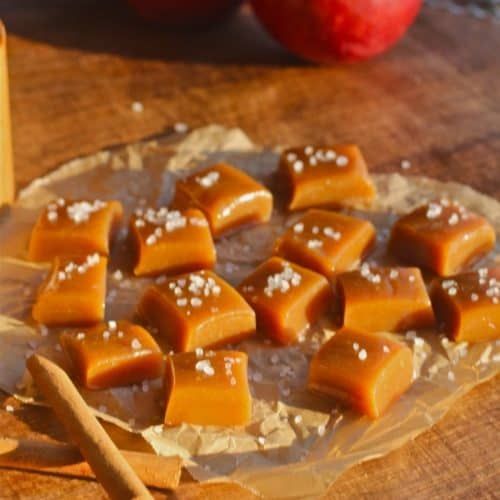
Get ready to fall in love with a truly special treat: homemade Apple Cider Caramels! These delightful candies are the perfect blend of sweet, buttery richness with a bright, tangy apple cider kick. Each chewy bite transports you to crisp autumn days, making them an irresistible indulgence for any time of year.
You might think making caramels from scratch is complicated, but I promise it’s easier than you imagine. With just a few simple ingredients and a candy thermometer, you’ll be creating these gourmet confections in your own kitchen. The process is straightforward, and the results are incredibly rewarding.
So, gather your ingredients and prepare for a sweet adventure. These Apple Cider Caramels are wonderful for gifting, sharing, or simply treating yourself. Let’s dive in and make some magic!
Cooking Time & Prep Time
Prep Time: 25 minutes
Cooking Time: 35 minutes
Total Time: 60 minutes (plus cooling time)
Small tip: Most of the prep time is for reducing the apple cider. You can do this step a day ahead to save time on the cooking day!
Ingredients
Makes approximately 64 caramels (depending on size)
For the Apple Cider Reduction
- 4 cups (960ml) fresh apple cider (not apple juice)
For the Caramel
- 1 cup (226g) unsalted butter, cut into 1-inch pieces, plus extra for greasing
- 1 cup (240ml) heavy cream
- 1 ½ cups (300g) granulated sugar
- ½ cup (100g) packed light brown sugar
- ½ cup (160ml) light corn syrup
- 1 teaspoon pure vanilla extract
- ½ teaspoon sea salt, plus extra for sprinkling (optional)
Step-by-Step Instructions
-
Step 1: Reduce the Apple Cider
Pour the apple cider into a large, heavy-bottomed saucepan. Bring it to a boil over medium-high heat. Reduce the heat to medium-low and simmer gently, stirring occasionally, until the cider has reduced to about ½ cup. This will take 20-25 minutes. Small tip: Use a wide saucepan for faster reduction.
-
Step 2: Prepare Your Pan
While the cider is reducing, lightly grease an 8×8-inch baking pan with butter. Line the pan with parchment paper, leaving an overhang on two sides. This will create “handles” to easily lift the caramels out later. Lightly butter the parchment paper as well. Small tip: Use clips to hold the parchment in place if needed.
-
Step 3: Combine Initial Caramel Ingredients
In a separate large, heavy-bottomed saucepan (at least 4-quart capacity), combine the reduced apple cider, granulated sugar, light brown sugar, and light corn syrup. Stir these ingredients together until they are well combined. Attach a candy thermometer to the side of the pan, making sure the tip doesn’t touch the bottom.
-
Step 4: Cook to First Temperature
Place the saucepan over medium heat. Bring the mixture to a boil, stirring occasionally until the sugars dissolve. Continue to cook without stirring, until the mixture reaches 240°F (116°C) on your candy thermometer. This is the “soft ball” stage. Small tip: Resist the urge to stir once boiling, as this can cause crystallization.
-
Step 5: Add Cream and Butter
Once the mixture reaches 240°F (116°C), carefully add the heavy cream and butter pieces to the saucepan. Stir continuously with a heatproof spatula or wooden spoon until all the butter has melted and the mixture is smooth. The temperature will drop when you add the cold ingredients.
-
Step 6: Cook to Final Temperature
Continue cooking the caramel, stirring frequently to prevent scorching, until the mixture reaches 248°F (120°C) on your candy thermometer. This is the “firm ball” stage. This step can take 10-15 minutes. Small tip: Stirring more frequently towards the end helps ensure even cooking and prevents sticking.
-
Step 7: Finish with Vanilla and Salt
Immediately remove the saucepan from the heat once it reaches 248°F (120°C). Carefully stir in the vanilla extract and ½ teaspoon of sea salt. Stir until they are fully incorporated into the caramel. Be cautious as the mixture is very hot.
-
Step 8: Pour and Cool
Carefully pour the hot caramel into your prepared 8×8-inch pan. Do not scrape the bottom of the pan, as this can introduce crystallized sugar. Let the caramel cool completely at room temperature for at least 4 hours, or preferably overnight, until it is firm enough to cut. Small tip: Avoid refrigerating to cool, as it can affect the texture.
-
Step 9: Cut and Wrap
Once completely cooled and firm, use the parchment paper overhangs to lift the caramel out of the pan. Place it on a clean cutting board. Lightly oil a sharp knife and cut the slab into 1-inch squares. If desired, sprinkle with a pinch of flaky sea salt. Wrap each caramel individually in small pieces of parchment paper or wax paper. Small tip: Clean your knife frequently for cleaner cuts.
Tips & Variations
- Gluten-Free Option: This recipe is naturally gluten-free! All ingredients typically used are free from gluten, making it a safe and delicious treat for those with gluten sensitivities.
- Vegan Option: To make these caramels vegan, substitute the unsalted butter with a high-quality vegan butter stick (like Miyoko’s Kitchen or Earth Balance sticks) and replace the heavy cream with full-fat canned coconut cream. Ensure your granulated sugar is certified vegan (some sugar is processed with bone char).
- Boost Flavor/Texture: Enhance your caramels by adding 1/2 cup of finely chopped toasted pecans or walnuts during Step 7. Or, for a deeper spice, add 1/2 teaspoon of ground cinnamon along with the vanilla.
- Spicy Version: For a delightful kick, add a tiny pinch (about 1/8 teaspoon) of cayenne pepper or finely ground chili powder along with the vanilla and salt. It creates a surprising and warm finish!
- Chocolate Dipped Caramels: Once your caramels are cut and firm, dip them halfway into melted dark chocolate. Place on parchment paper and let the chocolate set before wrapping for an extra decadent treat.
Nutritional Information
Approximate values per serving (based on 64 servings):
- Calories: 95 kcal
- Protein: 0.3g
- Carbohydrates: 17g
- Fat: 3g
Please note that these values are approximate and may vary depending on the specific brands and quantities of ingredients used.
Health Benefits
While these Apple Cider Caramels are certainly a treat, some of their core ingredients offer interesting benefits!
Apple cider, the star ingredient, comes from apples. Apples are known for being rich in antioxidants, particularly flavonoids, which can help protect your body’s cells from damage. They also contain dietary fiber, which supports digestive health.
Dairy products like heavy cream and butter, consumed in moderation, provide important fat-soluble vitamins such as A, D, E, and K. Vitamin A is crucial for vision and immune function, while vitamin D supports bone health and calcium absorption.
Sea salt, used in this recipe, provides essential trace minerals and electrolytes. While moderation is key, these minerals play a role in nerve function, muscle contraction, and maintaining proper fluid balance in the body.
Enjoying homemade treats like these caramels also offers the benefit of knowing exactly what goes into your food. It’s a moment of joy and mindful indulgence, which can contribute to overall well-being.
Serving Suggestions
- Sweet Gifts: Wrap individually and tie with a ribbon for beautiful homemade gifts during the holidays or for special occasions.
- Dessert Platter Star: Arrange a selection of caramels on a dessert platter alongside cookies, chocolates, and fresh fruit for a delightful spread.
- Coffee & Tea Companion: Enjoy a caramel or two with your afternoon coffee or tea. The rich sweetness pairs wonderfully with warm beverages.
- Ice Cream Topping: Gently warm a few caramels with a splash of cream to create a luscious apple cider caramel sauce. Drizzle it over vanilla ice cream for an amazing dessert!
Storage Tips
Store your wrapped Apple Cider Caramels in an airtight container at room temperature for up to 2-3 weeks. If you live in a very warm climate, you can store them in the refrigerator, but let them come to room temperature before serving for the best texture. Freezing caramels is not recommended as it can alter their texture, making them crumbly or grainy upon thawing. These caramels are best enjoyed at room temperature, so no reheating is needed!
Conclusion
There you have it – a truly irresistible recipe for Apple Cider Caramels! These golden, chewy delights are more than just candy; they’re a taste of autumn comfort, a symbol of homemade warmth, and a testament to how simple ingredients can create something truly extraordinary. The blend of sweet, buttery, and tangy flavors is simply magical.
Don’t be shy about trying your hand at candy making. With a little patience and a candy thermometer, you’ll feel like a kitchen wizard. The satisfaction of unwrapping your very own, perfectly chewy caramel is incredibly rewarding.
So go ahead, whip up a batch (or two!). Share them with your family, gift them to friends, or simply keep them all to yourself for those moments when you need a little sweet escape. Happy caramel making!


