
Introduction
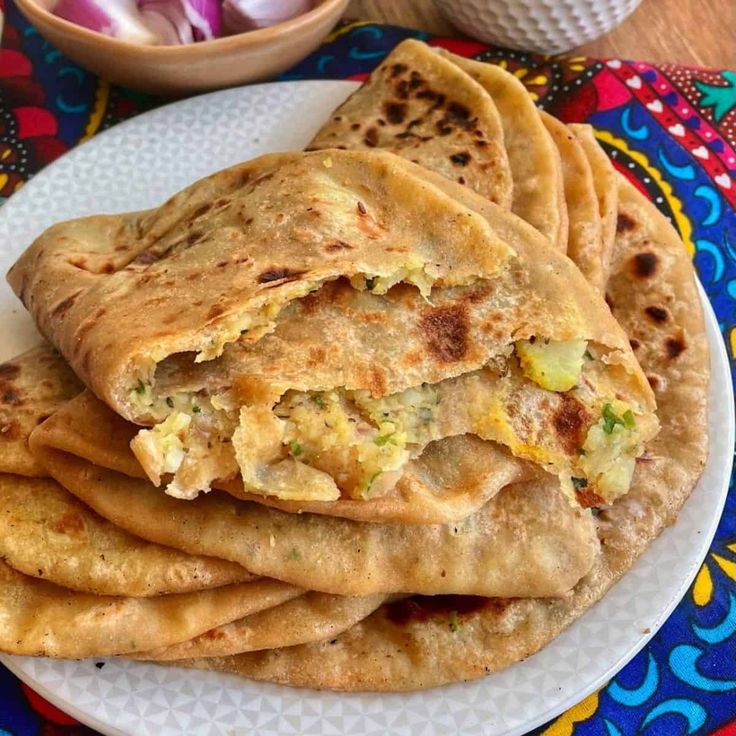
Get ready to discover a true culinary delight: Crispy Stuffed Parathas! These aren’t just any flatbreads; they’re golden, flaky, and utterly irresistible. Each bite offers a delightful crunch, giving way to a warm, savory filling that bursts with flavor. They are a beloved staple in many homes, perfect for any meal of the day.
You might think making stuffed parathas is complicated, but I promise it’s simpler than you imagine. With a few easy steps, you can create these delicious pockets of joy right in your own kitchen. The dough is basic, the filling comes together quickly, and the cooking process is straightforward. It’s a rewarding experience that yields incredibly satisfying results.
So, clear your counter, gather your ingredients, and let’s embark on this delicious journey together. You’re about to make something truly special that will impress your family and friends, or simply treat yourself to a comforting meal. Let’s get cooking!
Cooking Time & Prep Time
- Prep Time: 40 minutes
- Cooking Time: 30 minutes
- Total Time: 70 minutes
Small tip: You can prepare the filling a day in advance and store it in the refrigerator. This will significantly cut down on your prep time on cooking day!
Ingredients
Makes 8 servings
For the Dough:
- 2 cups whole wheat flour (atta)
- 1/2 teaspoon salt
- 1 tablespoon oil (plus more for kneading)
- Approximately 3/4 cup warm water (or as needed)
For the Potato & Pea Filling:
- 3 medium potatoes, boiled, peeled, and mashed
- 1/2 cup green peas, fresh or frozen (thawed)
- 1/2 cup finely chopped red onion
- 1 green chili, finely chopped (adjust to your spice preference)
- 1 tablespoon grated fresh ginger
- 1/2 teaspoon ground cumin
- 1/2 teaspoon turmeric powder
- 1/2 teaspoon red chili powder (optional)
- 1/2 teaspoon garam masala
- 1/4 cup fresh coriander leaves, chopped
- 1 teaspoon salt (or to taste)
- 2 tablespoons oil or ghee (for cooking the parathas)
Step-by-Step Instructions
-
Step 1: Prepare the Dough
In a large mixing bowl, combine the whole wheat flour and salt. Add 1 tablespoon of oil and mix it into the flour with your fingertips. Gradually add warm water, kneading continuously until you form a soft, pliable dough. It should not be sticky. Small tip: Add water slowly, a tablespoon at a time, to avoid making the dough too wet. Different flours absorb water differently.
-
Step 2: Rest the Dough
Once the dough is smooth, apply a thin layer of oil all over it. Cover the bowl with a damp cloth or plastic wrap and let it rest for at least 20-30 minutes. This resting period helps the dough become more elastic and easier to roll. Small tip: While the dough rests, you can start preparing the filling to maximize your time.
-
Step 3: Prepare the Filling
In a separate bowl, combine the mashed potatoes and thawed green peas. Add the finely chopped red onion, green chili, grated ginger, ground cumin, turmeric powder, red chili powder (if using), garam masala, and chopped fresh coriander. Season with salt to taste. Mix everything thoroughly until well combined. Small tip: Mash the potatoes well to avoid lumps, which can tear the paratha dough when rolling.
-
Step 4: Divide Dough and Filling
Divide the rested dough into 8 equal portions. Roll each portion into a smooth ball. Similarly, divide the filling into 8 equal portions and shape them into small, compact balls. This ensures even stuffing for each paratha. Small tip: Keeping the dough and filling portions uniform helps in making consistently sized parathas.
-
Step 5: Stuff the Parathas
Take one dough ball and flatten it slightly with your fingers. Using a rolling pin, roll it into a small disc, about 3-4 inches in diameter, making the edges slightly thinner than the center. Place one ball of filling in the center of the disc. Bring the edges of the dough together over the filling, pinching them to seal completely. Remove any excess dough from the top. Small tip: Ensure the filling is completely sealed inside the dough to prevent it from spilling out during rolling and cooking.
-
Step 6: Roll the Stuffed Parathas
Gently flatten the stuffed dough ball with your palm. Dust your rolling surface and the dough ball lightly with flour. Carefully roll out the stuffed dough into a round paratha, about 6-7 inches in diameter. Roll evenly, applying gentle pressure, to keep the filling distributed. Small tip: If the dough sticks, dust with a little more flour, but avoid using too much as it can make the parathas tough.
-
Step 7: Cook the Parathas
Heat a tawa (griddle) or a flat pan over medium-high heat. Once hot, place a rolled paratha on the tawa. Cook for about 30 seconds until small bubbles appear on the surface. Flip the paratha. Small tip: Don’t let the tawa get too hot, or the parathas will burn before cooking through.
-
Step 8: Fry to Golden Perfection
Apply about 1/2 teaspoon of oil or ghee to the top side of the paratha. Flip again and cook until golden brown spots appear. Apply another 1/2 teaspoon of oil or ghee to the other side and flip once more. Press gently with a spatula around the edges to help it cook evenly and puff up. Cook until both sides are golden brown and crispy. Remove from the tawa and repeat with the remaining parathas. Small tip: Pressing gently on the edges helps the paratha cook evenly and develop a beautiful crisp crust.
Tips & Variations
- Gluten-Free Option: For a gluten-free version, use a blend of gluten-free flours like rice flour, sorghum flour, and tapioca starch for the dough. You may need to adjust the water content and handle the dough more gently, as it might be less elastic.
- Vegan Option: This recipe is already vegetarian! To make it fully vegan, simply use oil instead of ghee for cooking the parathas. Coconut oil or any neutral vegetable oil works wonderfully.
- Add More Vegetables or Protein: Feel free to get creative with your filling! You can add finely grated paneer (Indian cheese) for extra protein, or finely chopped spinach, carrots, or grated radish for more vegetables. Ensure any added vegetables are well-drained to avoid a watery filling.
- Spicy Version: If you love heat, increase the amount of green chilies in the filling. You can also add a pinch more red chili powder or a dash of cayenne pepper for an extra kick. A sprinkle of freshly ground black pepper also adds a nice warmth.
- Cheese Filling: For a kid-friendly or indulgent twist, mix some grated cheddar or mozzarella cheese into the potato filling before stuffing. The melted cheese creates a delicious, gooey center!
Nutritional Information
Approximate values per serving (based on 8 servings):
- Calories: 250 kcal
- Protein: 7g
- Carbohydrates: 35g
- Fat: 9g
Note: Nutritional values may vary depending on exact ingredients and portion sizes used.
Health Benefits
Crispy Stuffed Parathas, especially when made with whole wheat flour and a vegetable-rich filling, offer several health benefits.
The primary ingredient, whole wheat flour, is a fantastic source of dietary fiber. Fiber is crucial for digestive health, helping to prevent constipation and maintain a healthy gut. It also helps in regulating blood sugar levels and can contribute to a feeling of fullness, aiding in weight management.
Potatoes, often maligned, are actually packed with nutrients. They provide a good source of potassium, which is important for heart health and blood pressure regulation. They also contain Vitamin C, an antioxidant that supports the immune system, and Vitamin B6, essential for brain development and nerve function.
Green peas, another key component of our filling, are small powerhouses of nutrition. They are rich in protein and fiber, both of which contribute to satiety and muscle health. Peas also provide essential vitamins like Vitamin K, which is vital for blood clotting, and several B vitamins, which play a role in energy metabolism.
Furthermore, the various spices used in the filling, such as turmeric, cumin, and ginger, are known for their anti-inflammatory and antioxidant properties. Turmeric, for instance, contains curcumin, a compound with potent anti-inflammatory effects. Incorporating these spices not only enhances flavor but also adds a dose of beneficial compounds to your meal.
Serving Suggestions
- Classic Accompaniments: Serve hot parathas with a dollop of plain yogurt, a side of tangy pickle (achar), or a fresh mint chutney. A pat of butter melting on top is also wonderfully indulgent!
- Complete Meal: These parathas are hearty enough to be a main course. Pair them with a simple side salad of sliced cucumbers and tomatoes for a refreshing contrast, or enjoy them alongside a light dal (lentil soup).
- Breakfast or Brunch: Stuffed parathas make an excellent, satisfying breakfast or brunch item. They are a great way to start your day with flavor and energy.
- Meal Prep Idea: Prepare a large batch of the potato and pea filling on the weekend. Store it in an airtight container in the fridge. This way, you can quickly assemble and cook fresh parathas during busy weekdays.
Storage Tips
Cooked parathas can be stored in an airtight container in the refrigerator for up to 2-3 days. For longer storage, you can freeze them. Once cooled, stack them with parchment paper in between and place them in a freezer-safe bag or container for up to 1 month. To reheat, simply warm them on a hot tawa with a little oil or ghee until crispy, or microwave briefly for a softer texture.
Conclusion
There you have it – a complete guide to making your very own batch of Crispy Stuffed Parathas! These delightful flatbreads are more than just a meal; they’re a comforting experience, offering a perfect blend of crispy texture and a flavorful, soft filling. They are incredibly versatile and can be enjoyed for breakfast, lunch, or dinner.
Don’t be intimidated by the process; each step is straightforward and rewarding. The aroma of fresh parathas cooking on the griddle is truly intoxicating, promising a delicious feast. Once you master this recipe, it will surely become a cherished favorite in your culinary repertoire.
So go ahead, give this recipe a try. Gather your loved ones around the table and share these warm, homemade parathas. They are perfect for family meals, potlucks, or simply as a special treat for yourself. Happy cooking and even happier eating!


