
Introduction
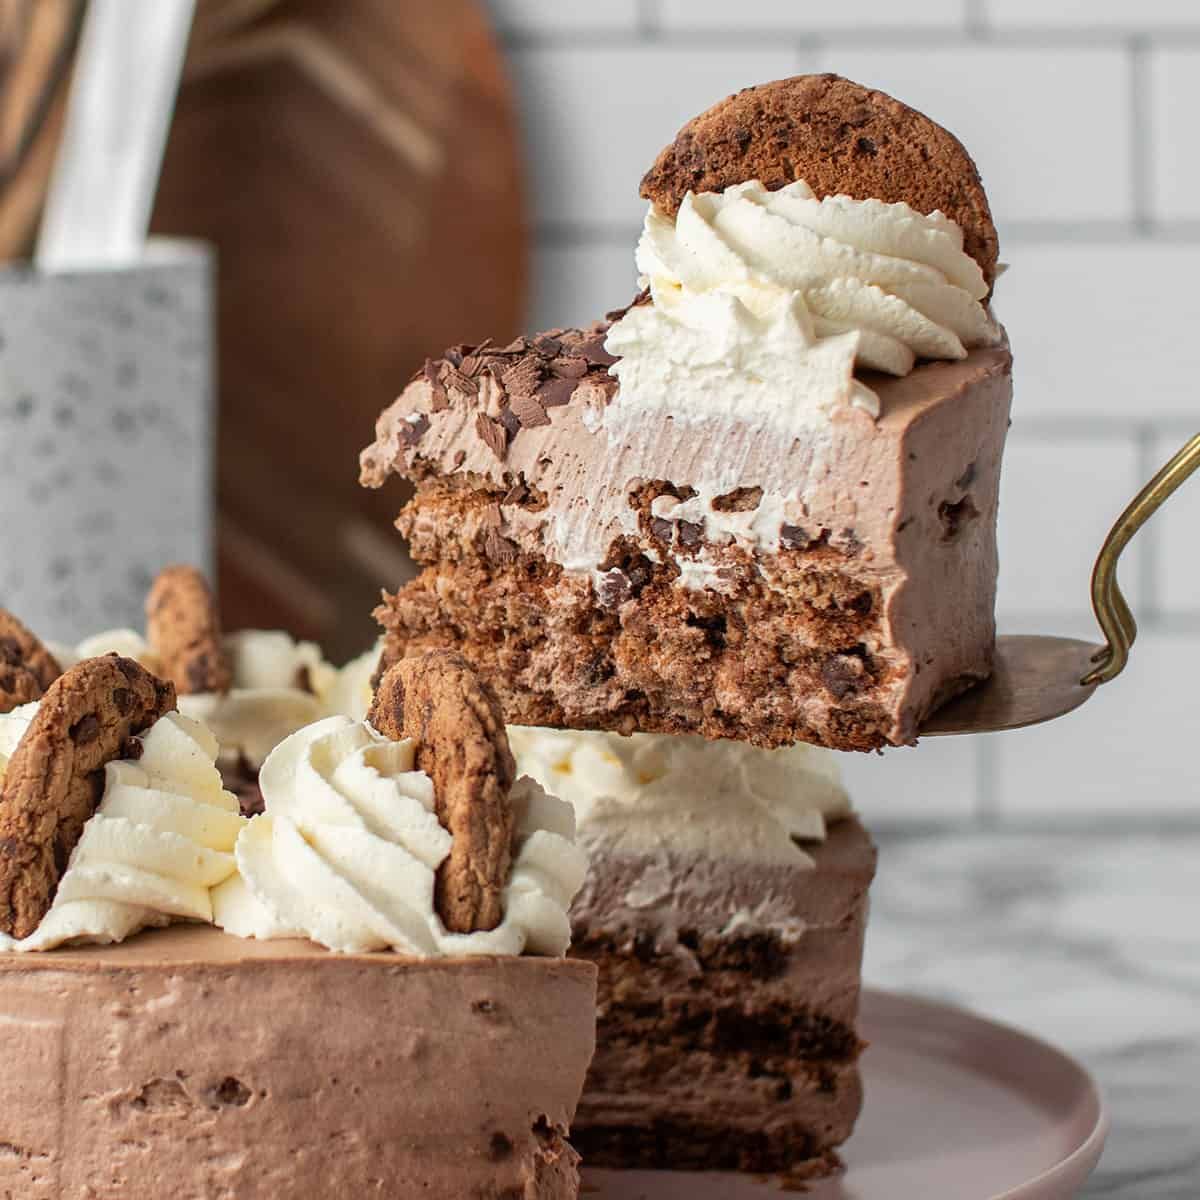
Get ready to discover your new favorite dessert! Our No Bake Mocha Icebox Cake is a true showstopper, yet incredibly simple to make. Imagine layers of crisp chocolate wafers softening into a rich, coffee-infused whipped cream, all coming together in a decadent, fudgy cake. It’s cool, creamy, and packed with that irresistible chocolate and coffee flavor combination that everyone adores.
The best part? You don’t need to turn on your oven! This recipe is all about simple assembly and letting your refrigerator do the “cooking.” With minimal effort, you can create an elegant dessert that tastes like it took hours. It’s perfect for hot summer days, busy weeknights, or anytime you crave something sweet and satisfying without the fuss.
So, if you’re looking for an easy, impressive, and utterly delicious treat, you’ve come to the right place. Dive into this recipe and prepare to amaze your taste buds and your guests. You’ll wonder why you haven’t made this delightful icebox cake sooner!
Cooking Time & Prep Time
- Prep Time: 25 minutes
- Cooking Time: 0 minutes
- Chill Time: 4 hours (minimum) to overnight
- Total Time: 4 hours 25 minutes (includes minimum chill time)
Small tip: For the best texture and flavor, plan to chill your icebox cake overnight. This gives the cookies plenty of time to soften beautifully into the cream.
Ingredients
This recipe makes 8-10 generous servings.
- 3 cups (720ml) heavy cream, very cold
- ½ cup (60g) powdered sugar
- ¼ cup (25g) unsweetened cocoa powder
- 2 teaspoons instant espresso powder (or strong instant coffee granules)
- 1 teaspoon pure vanilla extract
- 2 packages (9 ounces each, about 45-50 cookies per package) chocolate wafer cookies (like Nabisco Famous Wafers)
- Optional: Chocolate shavings or mini chocolate chips for garnish
Step-by-Step Instructions
-
Step 1: Prepare the Mocha Whipped Cream
In a large mixing bowl, combine the very cold heavy cream, powdered sugar, unsweetened cocoa powder, instant espresso powder, and vanilla extract. Using an electric mixer, beat on medium-high speed until stiff peaks form. Be careful not to overbeat, or it will become grainy.
Small tip: Chilling your mixing bowl and beaters for 10-15 minutes before starting can help the cream whip faster and achieve a better texture.
-
Step 2: Start the First Layer
Spread a thin layer (about ½ cup) of the mocha whipped cream evenly on the bottom of a 9×13 inch baking dish or an 8×8 inch square dish for a taller cake. This will be the base layer for your cookies.
-
Step 3: Arrange the First Cookie Layer
Arrange a single layer of chocolate wafer cookies over the cream. You may need to break some cookies to fit them snugly and cover the entire surface. Don’t worry about perfection; it will all soften beautifully.
-
Step 4: Continue Layering
Spread another generous layer of mocha whipped cream (about 1 to 1½ cups) over the cookies. Gently spread it to the edges. Then, repeat with another layer of chocolate wafer cookies.
Small tip: Use an offset spatula or the back of a spoon to spread the cream smoothly. Work quickly as the cream will start to warm up.
-
Step 5: Finish Layering and Top
Continue layering cookies and cream until you have used all the cookies and cream, ending with a final, thick layer of mocha whipped cream on top. You should have about 4-5 layers of cookies, depending on the size of your dish.
-
Step 6: Chill Thoroughly
Cover the baking dish tightly with plastic wrap. Place it in the refrigerator and chill for at least 4 hours, or preferably overnight. The longer it chills, the softer and more cake-like the cookies will become.
Small tip: Ensure the plastic wrap touches the surface of the cream slightly to prevent a skin from forming.
-
Step 7: Garnish and Serve
Once thoroughly chilled, remove the plastic wrap. If desired, garnish the top with chocolate shavings or mini chocolate chips. Slice the cake into individual portions and serve immediately. Enjoy your delicious, no-bake creation!
Tips & Variations
- Gluten-Free Option: Simply swap out the traditional chocolate wafer cookies for gluten-free chocolate cookies or ladyfingers. Ensure they are sturdy enough to hold their shape initially but will soften during chilling.
- Vegan/Vegetarian Option: For a vegan version, use full-fat canned coconut cream (chilled overnight, scoop out the thick cream only) instead of heavy cream. Use vegan chocolate wafer cookies, or make your own with vegan ingredients.
- Adding a Boost: While not traditional for a dessert, you could whisk 1-2 tablespoons of a neutral-flavored protein powder into the dry ingredients before whipping the cream for a slight protein boost. Alternatively, layer in some thinly sliced fresh strawberries or raspberries for a fruit and antioxidant addition.
- Spicy Version: For a subtle kick, add a tiny pinch (⅛ teaspoon) of cayenne pepper or chili powder to the dry ingredients with the cocoa and espresso. It enhances the chocolate flavor beautifully without being overtly spicy.
- Other Flavor Tips: Experiment with different extracts! A few drops of almond extract can add a sophisticated touch. For an adult version, you can add 1-2 tablespoons of coffee liqueur (like Kahlúa) or dark rum to the cream mixture.
Nutritional Information
Approximate values per serving (based on 8 servings):
- Calories: 480
- Protein: 4g
- Carbohydrates: 45g
- Fat: 34g
Please note: These values are approximate and may vary depending on the specific brands and quantities of ingredients used.
Health Benefits
While this is a dessert, some of its key ingredients offer surprising benefits!
- Cocoa Powder: Unsweetened cocoa powder is rich in flavonoids, which are powerful antioxidants. These compounds can help reduce inflammation and may improve heart health. Cocoa is also known to boost mood and cognitive function.
- Coffee/Espresso Powder: Coffee is packed with antioxidants, even in small amounts. It can help improve energy levels and focus. Moderate coffee consumption is also linked to a reduced risk of certain diseases.
- Dairy (Heavy Cream): Heavy cream provides essential fats and is a source of fat-soluble vitamins like A, D, E, and K. While high in calories, dairy products can contribute to bone health through calcium, though the amount in this dessert’s cream is less significant compared to milk.
- Vanilla Extract: Pure vanilla extract contains small amounts of antioxidants and has been traditionally used for its calming and mood-enhancing properties. It adds a wonderful depth of flavor, allowing you to use less sugar overall.
Serving Suggestions
- Classic Pairing: Serve slices with a side of fresh berries, like raspberries or strawberries, to add a touch of tartness and freshness that beautifully complements the rich mocha flavor.
- Extra Indulgence: A small scoop of vanilla bean ice cream or a dollop of extra whipped cream on the side elevates this dessert to pure decadence.
- Warm Beverage Companion: Enjoy your slice with a hot cup of coffee or a comforting mug of hot chocolate for the ultimate cozy treat.
Storage Tips
This No Bake Mocha Icebox Cake is best enjoyed within 3-4 days when stored properly. Keep it covered tightly with plastic wrap in the refrigerator to prevent it from drying out or absorbing other odors. Freezing is generally not recommended for icebox cakes, as the texture of the softened cookies and cream can become somewhat icy and grainy upon thawing. Since this is a chilled dessert, no reheating is needed; simply take it out of the fridge and serve!
Conclusion
There you have it! Our No Bake Mocha Icebox Cake is truly a dream come true for dessert lovers. It’s incredibly easy to assemble, requires no baking, and delivers a deeply satisfying blend of chocolate and coffee in every creamy, cake-like bite. This dessert proves that you don’t need fancy techniques or hours in the kitchen to create something truly spectacular.
So, why wait? Gather your ingredients this weekend and treat yourself and your loved ones to this delightful creation. The minimal effort for maximum reward makes it an absolute winner in any home kitchen. You’ll love how the simple chocolate wafers transform into a moist, cake-like texture just by chilling!
Whether you’re hosting a dinner party, planning a family get-together, or simply craving a delicious sweet treat, this No Bake Mocha Icebox Cake is sure to be a hit. It’s perfect for sharing, but we won’t tell if you keep a slice or two all to yourself. Happy dessert making!


