
Introduction
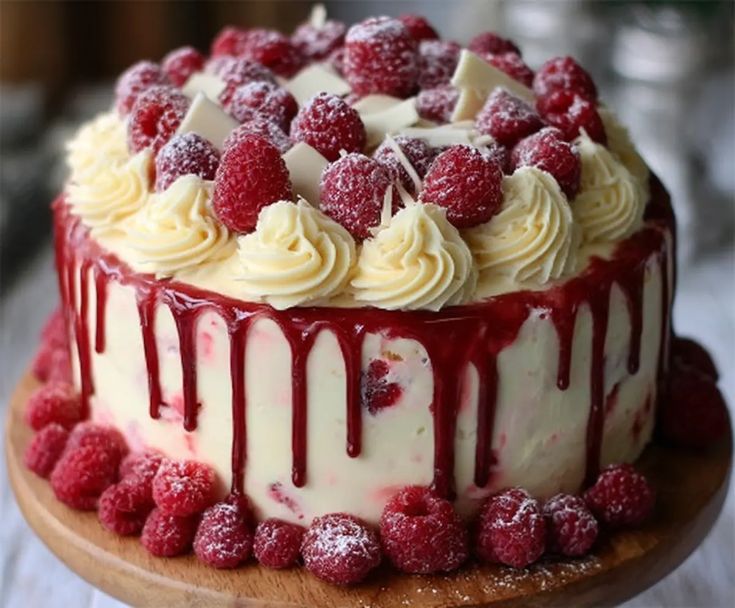
Get ready to fall in love with our White Chocolate Raspberry Dream Cake! This stunning dessert is a true showstopper, blending the creamy sweetness of white chocolate with the bright, tangy burst of fresh raspberries. It’s a beautifully balanced flavor combination that will have everyone asking for a second slice. Perfect for celebrations or simply making an ordinary day feel special.
You might think a cake this gorgeous is complicated, but I promise it’s surprisingly simple to make. We’ve broken down every step into easy-to-follow instructions, so even beginner bakers can achieve bakery-worthy results. With a few basic ingredients and a little love, you’ll create a masterpiece that looks and tastes incredibly impressive without all the fuss.
So, why wait? Gather your ingredients and prepare to bake something truly magical. This White Chocolate Raspberry Dream Cake is more than just a dessert; it’s an experience. Let’s get baking and create some delicious memories together!
Cooking Time & Prep Time
- Prep Time: 45 minutes
- Cooking Time: 30 minutes
- Cooling Time: 60 minutes (for cake layers)
- Total Time: 135 minutes (approx.)
Small tip: To save time, you can bake the cake layers the day before and store them wrapped tightly at room temperature. This makes assembly much quicker on serving day!
Ingredients
This recipe makes one beautiful 2-layer, 8-inch cake, serving 10-12 people generously.
For the White Chocolate Cake Layers:
- 2 ½ cups (300g) all-purpose flour
- 1 ½ cups (300g) granulated sugar
- 1 tablespoon baking powder
- ½ teaspoon salt
- ¾ cup (170g) unsalted butter, softened
- 1 cup (240ml) whole milk, at room temperature
- 2 large eggs, at room temperature
- 1 teaspoon pure vanilla extract
- ½ cup (85g) white chocolate chips, melted and cooled slightly
For the Raspberry Filling:
- 2 cups (250g) fresh or frozen raspberries (do not thaw if frozen)
- ½ cup (100g) granulated sugar
- 2 tablespoons cornstarch
- ¼ cup (60ml) water
- 1 tablespoon fresh lemon juice
For the White Chocolate Buttercream Frosting:
- 1 ½ cups (340g) unsalted butter, softened
- 6 cups (720g) powdered sugar, sifted
- ½ cup (120ml) heavy cream, chilled
- 1 teaspoon pure vanilla extract
- 6 ounces (170g) good quality white chocolate, melted and cooled slightly
- Pinch of salt
For Garnish (Optional):
- Fresh raspberries
- White chocolate shavings
- Fresh mint leaves
Step-by-Step Instructions
-
Step 1: Prepare Your Pans
Preheat your oven to 350°F (175°C). Grease and flour two 8-inch round cake pans. You can also line the bottoms with parchment paper for easy removal. This step ensures your beautiful cake layers won’t stick.
Small tip: For extra non-stick insurance, spray with baking spray that contains flour.
-
Step 2: Combine Dry Ingredients
In a large bowl, whisk together the all-purpose flour, granulated sugar, baking powder, and salt. Make sure there are no lumps and everything is well combined. This ensures even leavening throughout your cake.
-
Step 3: Cream Butter and Sugar
In a separate, large mixing bowl, beat the softened unsalted butter with an electric mixer until light and fluffy. Gradually add the remaining granulated sugar, beating for another 2-3 minutes until the mixture is pale and creamy. This incorporates air, making your cake tender.
Small tip: Make sure your butter is truly softened, not melted, for the best texture. It should yield easily to a gentle press.
-
Step 4: Add Wet Ingredients to Butter Mixture
Beat in the eggs, one at a time, ensuring each is fully incorporated before adding the next. Stir in the vanilla extract and the cooled melted white chocolate. Mix until just combined, being careful not to overmix.
-
Step 5: Combine Wet and Dry Mixtures
Gradually add the dry ingredients to the wet ingredients, alternating with the milk, beginning and ending with the dry ingredients (e.g., flour, milk, flour, milk, flour). Mix on low speed until just combined. Overmixing can lead to a tough cake.
Small tip: Stop mixing as soon as no streaks of flour remain. A few small lumps are better than overmixing.
-
Step 6: Bake the Cake Layers
Divide the batter evenly between the two prepared cake pans. Bake for 28-32 minutes, or until a wooden skewer inserted into the center comes out clean. Let the cakes cool in the pans for 10 minutes before inverting them onto a wire rack to cool completely. Ensure they are fully cool before frosting.
Small tip: Cooling completely is crucial! Warm cakes will melt your frosting and make assembly impossible.
-
Step 7: Prepare the Raspberry Filling
While the cakes cool, combine raspberries, sugar, cornstarch, water, and lemon juice in a medium saucepan. Cook over medium heat, stirring constantly, until the mixture thickens and comes to a boil. Reduce heat and simmer for 1-2 minutes. Remove from heat and let cool completely. The filling will thicken further as it cools.
Small tip: If using frozen raspberries, there’s no need to thaw them first. Just add them directly to the saucepan.
-
Step 8: Make the White Chocolate Buttercream
In a large mixing bowl, beat the softened butter with an electric mixer until light and fluffy, about 2-3 minutes. Gradually add the sifted powdered sugar, one cup at a time, mixing well after each addition. Add the heavy cream, vanilla extract, and a pinch of salt. Beat on high speed until light and fluffy. Finally, beat in the cooled melted white chocolate until fully incorporated and smooth.
Small tip: Sifting powdered sugar prevents lumps and ensures a super smooth buttercream.
-
Step 9: Assemble the Cake
Place one cooled cake layer on your serving plate or cake stand. Spread about half of the raspberry filling evenly over the top, leaving a small border around the edge. Pipe a dam of buttercream around the edge of the first cake layer to hold in the raspberry filling. Carefully place the second cake layer on top. Frost the entire cake with the remaining white chocolate buttercream.
Small tip: For a neat finish, use an offset spatula to smooth the frosting. A spinning cake stand makes this much easier!
-
Step 10: Garnish and Serve
Decorate your beautiful cake with fresh raspberries, white chocolate shavings, and a few mint leaves, if desired. Slice and serve immediately. Enjoy your homemade White Chocolate Raspberry Dream Cake!
Tips & Variations
- Gluten-Free Option: Simply substitute the all-purpose flour with a 1:1 gluten-free baking flour blend that contains xanthan gum. The rest of the recipe can remain the same.
- Vegan Option: Replace butter with vegan butter sticks, milk with plant-based milk (like almond or soy), and eggs with flax eggs (1 tbsp ground flaxseed + 3 tbsp water per egg, let sit 5 min). Use vegan white chocolate chips and ensure your heavy cream is a full-fat coconut cream (chilled, use the thick cream part).
- Add More Nutrients: While it’s a dessert, you can boost the nutrient profile by adding a handful of finely chopped spinach to the cake batter (it won’t affect the taste or color much!) or by serving slices with a side of mixed berries for extra vitamins and antioxidants.
- Spicy Version: For an adventurous twist, add a tiny pinch of cayenne pepper (about ¼ teaspoon) to the white chocolate cake batter. It will add a subtle warmth that complements the sweet white chocolate beautifully without making it overtly spicy.
- Lemon Zest Boost: For an even brighter flavor, add 1 tablespoon of fresh lemon zest to the cake batter and another teaspoon to the buttercream frosting. This enhances the tanginess of the raspberries.
Nutritional Information
Approximate values per serving (based on 12 servings):
- Calories: 580 kcal
- Protein: 6g
- Carbohydrates: 85g
- Fat: 26g
Note: Nutritional values may vary depending on specific brands and ingredients used.
Health Benefits
While this is a delightful treat, some of its star ingredients offer wonderful health benefits:
- Raspberries: These vibrant berries are packed with antioxidants, which help protect your body’s cells from damage. They are also an excellent source of fiber, aiding digestion, and provide a good dose of Vitamin C for immune support, and manganese for bone health.
- White Chocolate: Though often seen as just a sweet treat, white chocolate (made with cocoa butter) can provide some calcium and is a source of energy. Cocoa butter contains healthy fats that can contribute to satiety.
- Eggs: A fantastic source of high-quality protein, essential for muscle repair and growth. Eggs also contain important vitamins like B12 and D, as well as choline, which is vital for brain health.
- Milk/Dairy: Provides calcium, which is crucial for strong bones and teeth, and Vitamin D, which helps the body absorb calcium. It also offers protein and other essential vitamins and minerals.
Serving Suggestions
- Serve a slice with a hot cup of coffee or a delicate herbal tea for a perfect afternoon treat.
- Pair it with a scoop of vanilla bean ice cream or a dollop of freshly whipped cream for an extra decadent dessert experience.
- This cake is the ideal centerpiece for any celebration, from birthdays to anniversaries, and makes a fantastic dessert after a light dinner.
- For meal prep, you can bake the cake layers and make the filling ahead of time. Store them separately, then assemble and frost the cake closer to when you plan to serve it. Individual slices can be stored for easy grab-and-go treats.
Storage Tips
Store any leftover White Chocolate Raspberry Dream Cake in an airtight container in the refrigerator for up to 3-4 days. The cake can also be frozen for longer storage. To freeze, wrap individual slices or the entire cake (unfrosted is best, but frosted can work) tightly in plastic wrap, then in aluminum foil. It will keep well in the freezer for up to 2-3 months. Thaw in the refrigerator overnight before serving. To reheat, simply let it come to room temperature for the best texture, or microwave a slice for 10-15 seconds for a slightly warm, gooey treat.
Conclusion
There you have it – your very own White Chocolate Raspberry Dream Cake! This recipe delivers a truly unforgettable dessert, combining moist, tender cake with a vibrant raspberry filling and a luscious white chocolate buttercream. It’s a symphony of flavors and textures that will delight anyone who takes a bite.
Don’t be shy, give this recipe a try! You’ll be amazed at how simple it is to create such an elegant and delicious cake from scratch. The effort is minimal, but the reward is immense, resulting in a dessert that tastes like it came straight from a gourmet bakery.
Baking is all about sharing joy. So, whip up this incredible cake and share it with your family and friends. It’s the perfect way to show you care and create sweet memories together. Happy baking!


