
Introduction
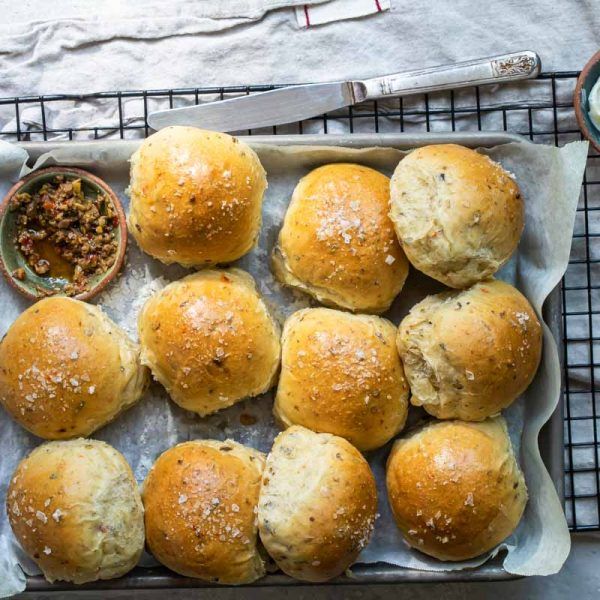
Imagine a warm, fluffy bread roll, golden-brown and fragrant, perfect for dipping into soup or slathering with your favorite spread. These Wheat Flour and Olive Oil Bread Rolls are exactly that – a simple pleasure that brings comfort to any meal. They boast a lovely, tender crumb with a hint of nutty flavor from the wheat flour and a delightful richness from the olive oil. They are truly a staple you’ll want to make again and again.
What makes these rolls so special is how easy they are to create right in your own kitchen. You don’t need any fancy equipment or advanced baking skills. With just a few basic ingredients and a little patience for the dough to rise, you’ll have a batch of these wholesome rolls ready to enjoy. It’s a wonderfully rewarding process, even for beginner bakers, and the aroma filling your home is an added bonus!
So, whether you’re looking for the perfect accompaniment to your dinner, a delightful addition to your breakfast table, or just a simple, satisfying snack, these bread rolls are for you. Gather your ingredients and get ready to experience the joy of homemade bread. Let’s bake some deliciousness together!
Cooking Time & Prep Time
- Prep Time: 25 minutes (active mixing, kneading, shaping)
- Cooking Time: 18 minutes
- Total Time: 2 hours 45 minutes (includes rising time)
Small tip: The “Total Time” includes the important rising periods for the dough. Don’t rush these steps, as they are key to light and airy rolls!
Ingredients
This recipe makes 12 delicious bread rolls.
- For the Dough:
- 3 cups (360g) whole wheat flour
- 1 cup (120g) all-purpose flour (or use 4 cups whole wheat flour for a denser roll)
- 1 tablespoon active dry yeast
- 1 teaspoon granulated sugar (to activate yeast)
- 1 ½ teaspoons fine sea salt
- 1 ½ cups warm water (105-115°F / 40-46°C)
- ¼ cup extra virgin olive oil, plus more for greasing
Step-by-Step Instructions
-
Step 1: Activate the Yeast
In a large mixing bowl, combine the warm water and granulated sugar. Sprinkle the active dry yeast over the top. Let it sit for 5-10 minutes until it becomes foamy. This shows the yeast is alive and ready to work!
Small tip: Ensure your water isn’t too hot, or it will kill the yeast. Lukewarm is perfect!
-
Step 2: Combine Wet and Dry Ingredients
Once the yeast is foamy, pour in the ¼ cup of olive oil. In a separate bowl, whisk together the whole wheat flour, all-purpose flour, and salt. Gradually add the dry flour mixture to the wet ingredients, mixing with a wooden spoon or your hands until a shaggy dough forms.
Small tip: Start with a spoon, then switch to your hands for better control as the dough comes together.
-
Step 3: Knead the Dough
Turn the dough out onto a lightly floured surface. Knead for 8-10 minutes until the dough is smooth, elastic, and no longer sticky. It should bounce back slightly when poked.
Small tip: If the dough is too sticky, add a tiny bit more flour, a tablespoon at a time. If it’s too dry, add a teaspoon of water.
-
Step 4: First Rise
Lightly grease a clean bowl with olive oil. Place the kneaded dough in the bowl, turning it once to coat the top. Cover the bowl with plastic wrap or a clean kitchen towel. Let it rise in a warm place for 60-90 minutes, or until it has doubled in size.
Small tip: A slightly warm oven (turned off, with the light on) or a sunny spot on your counter can be a great place for rising dough.
-
Step 5: Shape the Rolls
Gently punch down the risen dough to release the air. Turn it out onto a lightly floured surface. Divide the dough into 12 equal pieces. Shape each piece into a smooth, round roll by tucking the edges underneath and rolling it between your palm and the counter.
Small tip: Use a kitchen scale to ensure your rolls are evenly sized for consistent baking.
-
Step 6: Second Rise
Lightly grease a baking sheet or line it with parchment paper. Arrange the shaped rolls on the baking sheet, leaving about 2 inches between them. Cover loosely with plastic wrap or a clean towel. Let them rise again for 30-45 minutes, or until visibly puffy.
Small tip: Don’t let them over-proof during the second rise, or they might collapse in the oven. They should look puffy but not stretched.
-
Step 7: Preheat and Bake
While the rolls are on their second rise, preheat your oven to 375°F (190°C). Once the oven is preheated and the rolls are puffy, place the baking sheet in the oven. Bake for 15-20 minutes, or until the rolls are golden brown on top and sound hollow when tapped on the bottom.
Small tip: For an extra golden crust, you can brush the tops of the rolls with a little olive oil or an egg wash before baking.
-
Step 8: Cool and Serve
Remove the baked rolls from the oven and transfer them to a wire rack to cool slightly. Serve them warm with butter, jam, or alongside your favorite meal. Enjoy your freshly baked, wholesome bread!
Small tip: Resist the urge to cut into them immediately; cooling allows the internal structure to set properly.
Tips & Variations
- Gluten-Free Option: For a gluten-free version, substitute the wheat flour with a high-quality gluten-free bread flour blend. You may need to add a binder like xanthan gum (1 teaspoon per cup of flour) and adjust water slightly, as gluten-free flours absorb liquids differently.
- Naturally Vegan: This recipe is already naturally vegan! It uses no animal products, making it perfect for plant-based diets.
- Add More Vegetables or Protein: Incorporate finely chopped roasted garlic, sun-dried tomatoes, or fresh herbs like rosemary or thyme into the dough during the kneading stage. For protein, a sprinkle of nutritional yeast can add a cheesy flavor without dairy.
- Spicy Version: Add ½ teaspoon of red pepper flakes or a pinch of cayenne pepper to the flour mixture for a subtle kick. You could also mix in some finely chopped jalapeños (deseeded) with the olive oil before kneading.
- Flavor Tip: For an enhanced savory flavor, sprinkle a little flaky sea salt on top of the rolls just before baking. You can also add a tablespoon of sesame seeds or poppy seeds for extra texture.
Nutritional Information
Approximate values per serving (based on 12 servings):
- Calories: 205 kcal
- Protein: 7g
- Carbohydrates: 35g
- Fat: 6g
Please note: These values are approximate and may vary depending on the specific brands and quantities of ingredients used.
Health Benefits
These Wheat Flour and Olive Oil Bread Rolls offer several wonderful health benefits, thanks to their star ingredients.
Whole wheat flour is a fantastic source of dietary fiber. Fiber is crucial for digestive health, helping to keep things moving smoothly and preventing constipation. It can also contribute to a feeling of fullness, which might help with weight management, and can even help regulate blood sugar levels.
Beyond fiber, whole wheat flour is packed with essential nutrients. It provides B vitamins, which are vital for energy production and brain function. You’ll also find minerals like magnesium, iron, and zinc, all playing key roles in various bodily processes, from bone health to immune support.
Extra virgin olive oil is a cornerstone of the Mediterranean diet and a true superfood. It’s rich in monounsaturated fatty acids, particularly oleic acid, which are known for their heart-healthy benefits. These healthy fats can help reduce bad cholesterol levels and lower the risk of heart disease.
Olive oil also contains powerful antioxidants, such as polyphenols. These compounds help protect your body’s cells from damage caused by free radicals, potentially reducing inflammation and the risk of chronic diseases. It’s a flavorful way to add beneficial fats to your diet.
Serving Suggestions
- Serve warm with a pat of butter, a drizzle of extra virgin olive oil, or your favorite jam for breakfast or brunch.
- These rolls are excellent alongside hearty soups, stews, or chili, perfect for soaking up all the delicious broths and sauces.
- Slice them horizontally and use them as mini sandwich bases for lunch, filled with cheese, deli meats, or roasted vegetables.
- Enjoy them as a side dish with almost any dinner, from roasted chicken to pasta dishes, adding a comforting touch to your meal.
- For meal prep, bake a batch on Sunday and enjoy fresh rolls throughout the week. They make a great grab-and-go snack or addition to packed lunches.
Storage Tips: Store leftover bread rolls in an airtight container or bag at room temperature for up to 3-4 days. For longer storage, these rolls freeze beautifully! Once completely cooled, place them in a freezer-safe bag and freeze for up to 3 months. To reheat, thaw at room temperature, then warm in a preheated oven at 350°F (175°C) for 5-10 minutes, or microwave briefly until warm and soft.
Conclusion
There’s nothing quite like the satisfaction of baking your own bread, and these Wheat Flour and Olive Oil Bread Rolls truly deliver. They are wonderfully wholesome, boasting a delightful texture and a subtle, rich flavor that makes them incredibly versatile. From the simple act of kneading the dough to the incredible aroma that fills your kitchen, every step is a joy.
Don’t be intimidated by baking with yeast; this recipe is designed to be straightforward and forgiving. You’ll be amazed at how easily you can create these delicious, homemade rolls. The effort is minimal, but the reward of a warm, fresh-baked roll is immense and utterly incomparable to store-bought options.
So go ahead, give this recipe a try! Bake a batch for your next family dinner, share them with friends, or simply enjoy them all to yourself. These Wheat Flour and Olive Oil Bread Rolls are more than just food; they’re a little piece of comfort, made with love right in your own kitchen. Happy baking!


