
Introduction
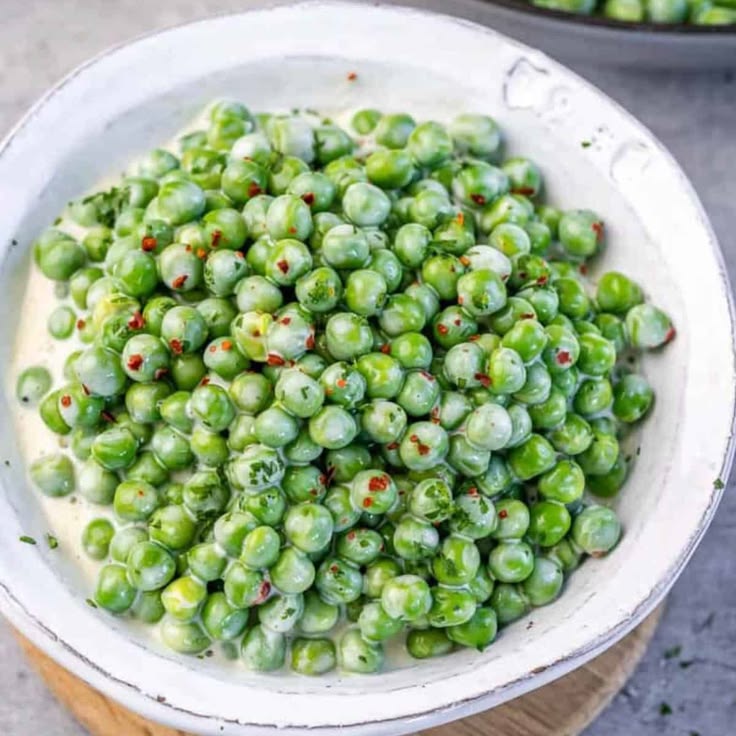
Get ready to discover a truly delightful side dish that’s a staple on many holiday tables: Thanksgiving Peas! This recipe takes humble green peas and transforms them into something incredibly creamy, savory, and utterly irresistible. With tender peas, sweet pearl onions, and crispy bacon bits nestled in a rich, velvety sauce, it’s a comforting classic that adds a pop of vibrant green and incredible flavor to any meal.
The best part? This dish is surprisingly easy and quick to make. You’ll be using simple ingredients, many of which you might already have in your pantry or freezer. It comes together in under 30 minutes, making it a perfect last-minute addition to your holiday spread or a fantastic weeknight side. No complicated techniques or long cooking times here, just pure, simple deliciousness.
Whether you’re looking for a new family favorite or a reliable side dish to impress your guests, these Thanksgiving Peas are sure to become a cherished part of your culinary repertoire. It’s a dish that brings smiles and comfort with every spoonful. So, let’s gather our ingredients and get cooking!
Cooking Time & Prep Time
- Prep Time: 15 minutes
- Cooking Time: 20 minutes
- Total Time: 35 minutes
Small tip: To save a few minutes on prep, you can chop the bacon and onions ahead of time. Or, look for pre-cooked bacon pieces in the store!
Ingredients
This recipe makes approximately 6-8 servings.
For the Creamy Peas
- 1 pound (16 ounces) frozen green peas, do not thaw
- 4-6 slices thick-cut bacon, diced
- 10 ounces frozen pearl onions, do not thaw, or 1 small yellow onion, finely diced
- 2 tablespoons unsalted butter
- 1 tablespoon all-purpose flour
- 1 cup whole milk or half-and-half
- ½ cup chicken or vegetable broth
- ½ teaspoon salt, or to taste
- ¼ teaspoon black pepper, or to taste
- Pinch of freshly grated nutmeg (optional, but highly recommended!)
For Garnish (Optional)
- 2 tablespoons fresh parsley, chopped
Step-by-Step Instructions
-
Step 1: Cook the Bacon
Place a large skillet or Dutch oven over medium heat. Add the diced bacon and cook until crispy and golden brown. This usually takes about 7-9 minutes. Remove the cooked bacon with a slotted spoon and set it aside on a plate lined with paper towels. Leave about 1 tablespoon of bacon fat in the skillet for flavor.
Small tip: Don’t overcrowd the pan when cooking bacon; cook in batches if necessary to ensure it crisps up properly.
-
Step 2: Sauté the Onions
Add the frozen pearl onions (or diced fresh onion) to the skillet with the reserved bacon fat. Cook over medium heat, stirring occasionally, until the onions are tender and lightly golden, about 5-7 minutes. If using frozen pearl onions, they will release some water initially; continue cooking until the liquid evaporates.
Small tip: If using fresh onions, cook them until they are translucent and very soft for the best texture in the final dish.
-
Step 3: Make the Roux
Push the onions to one side of the skillet. Add the 2 tablespoons of butter to the empty side and let it melt. Once melted, sprinkle the 1 tablespoon of flour over the butter. Whisk constantly for 1 minute to create a smooth paste, or roux. This will thicken your sauce beautifully.
Small tip: Cooking the flour for a minute helps to cook out the raw flour taste, ensuring a smoother, more palatable sauce.
-
Step 4: Build the Creamy Sauce
Gradually whisk in the milk or half-and-half into the roux, making sure there are no lumps. Then, slowly whisk in the chicken or vegetable broth. Stir everything together, incorporating the onions into the liquid. Bring the sauce to a gentle simmer, stirring frequently, until it thickens slightly, about 3-5 minutes.
Small tip: Use a whisk to ensure your sauce is lump-free. If it gets too thick, you can always add a splash more broth or milk.
-
Step 5: Stir in the Peas and Season
Add the frozen green peas directly into the simmering sauce. Stir well to combine. Continue to cook for another 3-5 minutes, or until the peas are heated through and tender-crisp. You don’t want to overcook the peas, as they can become mushy.
Small tip: Taste the sauce before adding the peas, then again after the peas are heated, to adjust seasoning perfectly.
-
Step 6: Finish and Serve
Stir in the reserved crispy bacon bits, salt, black pepper, and the optional pinch of nutmeg. Give everything a final stir. Transfer the Thanksgiving Peas to a serving dish, garnish with fresh chopped parsley if desired, and serve immediately. Enjoy this comforting side dish!
Small tip: A squeeze of fresh lemon juice at the end can brighten up all the flavors, if you like a little tang.
Tips & Variations
- Gluten-Free Option: To make this recipe gluten-free, simply omit the all-purpose flour. Instead, create a cornstarch slurry by whisking 1 tablespoon of cornstarch with 2 tablespoons of cold water. Add this slurry to the simmering sauce after you’ve added the milk and broth, whisking until thickened.
- Vegan or Vegetarian Option: For a delicious plant-based version, skip the bacon entirely. Instead, start by sautéing the onions in 2 tablespoons of olive oil or vegan butter. Use a plant-based milk (like unsweetened almond or soy milk) and vegetable broth. For a smoky flavor, add a pinch of smoked paprika to the sauce.
- Add More Vegetables or Protein: Feel free to customize! You can add other quick-cooking vegetables like diced carrots, sliced mushrooms, or corn along with the peas. For extra protein, stir in some cooked, shredded chicken or diced ham at the same time you add the peas.
- Spicy Version: If you love a little kick, add a pinch of red pepper flakes along with the onions, or stir in a dash of your favorite hot sauce with the milk and broth. This adds a subtle warmth that complements the creamy sauce beautifully.
- Cheesy Delight: For an even richer flavor, stir in ¼ cup of grated Parmesan cheese or sharp white cheddar cheese just before serving. The cheese will melt into the warm sauce, adding a wonderful depth of flavor.
Nutritional Information
Approximate values per serving (based on 6 servings):
- Calories: 230
- Protein: 10g
- Carbohydrates: 18g
- Fat: 14g
Please note: Nutritional values are estimates and may vary depending on specific brands and exact ingredient amounts used.
Health Benefits
This Thanksgiving Peas recipe isn’t just delicious; it also packs some great health benefits from its key ingredients!
Green Peas: These little powerhouses are full of goodness. They are an excellent source of dietary fiber, which aids digestion and helps maintain a healthy gut. Peas also provide a good amount of Vitamin K, crucial for bone health and blood clotting, and Vitamin C, an antioxidant that boosts your immune system.
Onions: Whether you choose pearl onions or a standard yellow onion, they contribute important nutrients. Onions are rich in antioxidants, which help protect your cells from damage, and also contain Vitamin C and B vitamins. They add flavor without adding many calories.
Dairy (Milk/Half-and-Half): The milk in this recipe provides essential calcium, which is vital for strong bones and teeth. Many dairy products are also fortified with Vitamin D, another nutrient important for bone health and immune function. Using whole milk or half-and-half adds healthy fats in moderation.
While bacon and butter contribute to the wonderful flavor, they can be enjoyed in moderation as part of a balanced diet. This dish offers a delicious way to include a serving of nutrient-dense vegetables in your meal.
Serving Suggestions
- Classic Holiday Side: These creamy peas are the perfect accompaniment to traditional holiday roasts like turkey, ham, prime rib, or roasted chicken. They add a lovely green contrast and a rich flavor.
- Everyday Meal Companion: Don’t save them just for holidays! Serve these peas alongside simple weeknight meals such as pan-seared chicken breast, baked salmon, or pork chops.
- Mix-Ins: Stir the finished peas into cooked rice or quinoa for a more substantial side. They can also be gently folded into a simple pasta dish with a little extra broth for a quick meal.
- Comfort Food Main: For a cozy lunch or light dinner, spoon the creamy peas over a slice of toasted crusty bread, perhaps topped with a fried or poached egg.
Storage Tips
Leftover Thanksgiving Peas can be stored in an airtight container in the refrigerator for up to 3-4 days. Yes, you can freeze them! While the sauce might separate slightly upon thawing, the flavor will still be great. Freeze in an airtight, freezer-safe container for up to 2-3 months. To reheat, gently warm on the stovetop over low heat, stirring frequently, adding a splash of milk or broth if the sauce seems too thick. You can also microwave them in short bursts, stirring in between, until heated through.
Conclusion
There you have it – a truly special recipe for Thanksgiving Peas that is bound to become a favorite in your home. This dish proves that simple ingredients can create extraordinary flavors. The combination of tender peas, sweet onions, crispy bacon, and a rich, creamy sauce is pure comfort in a bowl. It’s a versatile side that fits perfectly into any meal, from festive holiday feasts to cozy weeknight dinners.
So, why not give these Thanksgiving Peas a try? You’ll be amazed at how quickly and easily this delicious side comes together. It’s a wonderful way to add a touch of elegance and warmth to your table without any stress.
Gather your loved ones, make a big batch of these creamy peas, and enjoy the smiles and compliments that are sure to follow. Happy cooking, and happy eating!


