
Introduction
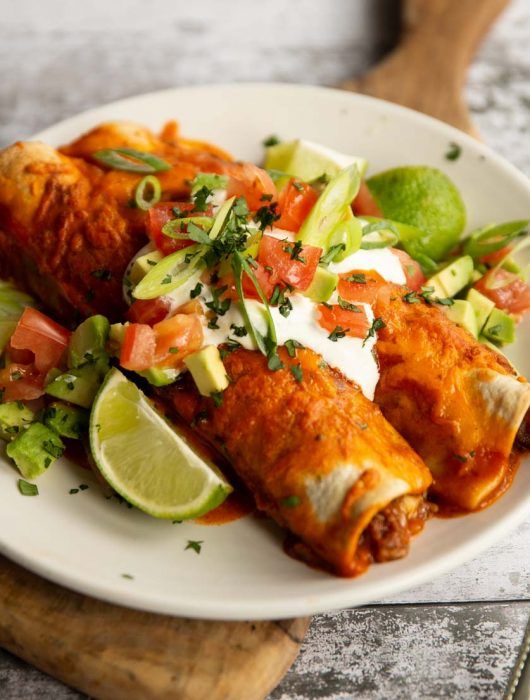
Get ready for a flavor fiesta with these incredible Spicy Ground Beef Enchiladas! This dish is a true celebration of comforting flavors, featuring tender ground beef seasoned with a kick of spice, all rolled up in soft tortillas and smothered in rich enchilada sauce and melted cheese. It’s a hearty, satisfying meal that brings warmth and joy to any table, making it a perfect family favorite.
You might think enchiladas are complicated, but I promise you, this recipe is surprisingly easy and quick to put together. We’re using simple ingredients and straightforward steps, so even if you’re new to cooking, you’ll feel like a pro. The beauty of this dish is how much flavor you can build with minimal fuss, making it ideal for a weeknight dinner or a relaxed weekend gathering.
So, why wait? Roll up your sleeves, gather your ingredients, and let’s create some culinary magic. These Spicy Ground Beef Enchiladas are waiting to become your new go-to comfort food. Your taste buds (and your family!) will thank you!
Cooking Time & Prep Time
- Prep Time: 25 minutes
- Cooking Time: 25 minutes
- Total Time: 50 minutes
Small tip: To speed things up, chop your onion and garlic while the ground beef is browning. This way, you save precious minutes!
Ingredients
This recipe makes 6 servings.
For the Spicy Beef Filling:
- 1 tablespoon olive oil
- 1 pound lean ground beef (80/20 or 90/10)
- 1 medium yellow onion, finely chopped
- 2 cloves garlic, minced
- 1 tablespoon chili powder
- 1 teaspoon ground cumin
- ½ teaspoon dried oregano
- ¼ teaspoon cayenne pepper (or more, to taste)
- ½ teaspoon salt
- ¼ teaspoon black pepper
- 2 tablespoons tomato paste
- ½ cup beef broth
- 1 (4-ounce) can diced green chiles, undrained
For the Enchiladas:
- 12 corn tortillas (6-inch)
- 2 ½ cups red enchilada sauce (one 19-ounce can, or homemade)
- 2 cups shredded Mexican cheese blend (Cheddar, Monterey Jack, Colby)
For Garnish (Optional):
- Fresh cilantro, chopped
- Sour cream or Greek yogurt
- Diced avocado
- Sliced jalapeños
Step-by-Step Instructions
Step 1: Get Ready to Cook
Preheat your oven to 375°F (190°C). Lightly grease a 9×13 inch baking dish with cooking spray or a little olive oil. This will prevent the enchiladas from sticking and make cleanup easier.
Small tip: Having your baking dish ready before you start assembling makes the process smoother.
Step 2: Cook the Beef
Heat the olive oil in a large skillet or Dutch oven over medium-high heat. Add the ground beef and cook, breaking it up with a spoon, until it’s fully browned. Drain any excess fat from the skillet. This step ensures your filling isn’t greasy.
Step 3: Build the Flavorful Filling
Add the chopped onion to the skillet with the cooked beef. Cook for about 5 minutes, until the onion softens. Stir in the minced garlic, chili powder, cumin, oregano, cayenne pepper, salt, and black pepper. Cook for another minute, until fragrant. Then, stir in the tomato paste, beef broth, and diced green chiles. Bring the mixture to a simmer and cook for 5-7 minutes, allowing the liquid to reduce slightly and the flavors to meld. Remove from heat.
Small tip: Let the spices toast for a moment before adding liquids; this really brings out their aroma and flavor.
Step 4: Soften the Tortillas
Pour about ½ cup of the enchilada sauce into a shallow dish. Briefly warm the corn tortillas to make them pliable and prevent tearing. You can do this by wrapping them in a damp paper towel and microwaving for 30-60 seconds, or by quickly dipping each tortilla into the warm enchilada sauce for a few seconds. Do not oversoak them.
Small tip: Warming the tortillas is crucial! Cold tortillas will crack when rolled.
Step 5: Assemble the Enchiladas
Dip each warmed tortilla into the shallow dish of enchilada sauce, coating both sides. Lay the tortilla flat. Spoon about ¼ cup of the beef filling down the center of each tortilla. Sprinkle a little shredded cheese over the filling. Tightly roll up the tortilla and place it seam-side down in your prepared baking dish. Repeat with the remaining tortillas and filling, arranging them snugly in the dish.
Step 6: Bake to Perfection
Once all the enchiladas are rolled and placed in the baking dish, pour the remaining enchilada sauce evenly over the top. Make sure to cover all the tortillas. Sprinkle the remaining shredded cheese generously over the sauce. Cover the baking dish loosely with aluminum foil. Bake for 20 minutes, then remove the foil and bake for another 5-10 minutes, or until the cheese is melted and bubbly and the enchiladas are heated through.
Small tip: Removing the foil for the last few minutes helps the cheese get beautifully golden brown.
Step 7: Garnish and Serve
Carefully remove the enchiladas from the oven. Let them rest for 5 minutes before serving. This allows the cheese to set a bit and prevents the enchiladas from falling apart. Garnish with fresh cilantro, a dollop of sour cream or Greek yogurt, and diced avocado, if desired. Serve hot and enjoy!
Tips & Variations
- Gluten-Free Option: This recipe is naturally gluten-free if you use corn tortillas. Just double-check that your store-bought enchilada sauce is certified gluten-free, as some brands may contain wheat thickeners.
- Vegan or Vegetarian Option: For a delicious plant-based version, swap the ground beef for a mixture of black beans, corn, and sautéed bell peppers. You can also use a plant-based ground “meat” alternative. Replace the cheese with a dairy-free shredded cheese blend and ensure your enchilada sauce is vegan.
- Add More Vegetables or Protein: Feel free to sneak in more veggies! Diced bell peppers, corn, or zucchini can be added to the beef filling. For extra protein, consider adding a can of drained black beans or pinto beans to the beef mixture. Cooked, shredded chicken is also a fantastic alternative to ground beef.
- Make it Extra Spicy: If you love heat, increase the amount of cayenne pepper to ½ teaspoon or more. You can also add a finely diced jalapeño or serrano pepper to the beef mixture with the onions and garlic. A dash of your favorite hot sauce over the top before serving adds another layer of fire!
- Smoky Flavor Boost: For a deeper, smoky flavor, add ½ teaspoon of smoked paprika to the beef filling along with the other spices. You can also use chipotle powder for a smoky heat.
Nutritional Information
Approximate values per serving (based on 6 servings):
- Calories: 560
- Protein: 38g
- Carbohydrates: 42g
- Fat: 28g
Please note: These values are approximate and may vary depending on the specific brands and exact quantities of ingredients used.
Health Benefits
These Spicy Ground Beef Enchiladas aren’t just delicious; they also offer some great health benefits from their wholesome ingredients.
Ground Beef: Lean ground beef is an excellent source of high-quality protein, which is essential for muscle repair and growth. It also provides important micronutrients like iron, vital for oxygen transport in the blood, and B vitamins (B12, niacin, B6), which play key roles in energy metabolism and nerve function.
Onions and Garlic: These aromatic powerhouses are more than just flavor enhancers. Onions are rich in antioxidants, like quercetin, which can help reduce inflammation. Garlic contains allicin, a compound known for its immune-boosting and heart-healthy properties.
Spices: The chili powder, cumin, oregano, and cayenne pepper in this dish are packed with antioxidants. Chili powder and cayenne, in particular, contain capsaicin, which can help boost metabolism and has anti-inflammatory effects. Cumin aids digestion, and oregano is a good source of vitamins K and E.
Corn Tortillas: Unlike flour tortillas, corn tortillas are naturally gluten-free and provide a good amount of dietary fiber. Fiber is crucial for digestive health, helps regulate blood sugar levels, and can contribute to a feeling of fullness, aiding in weight management.
Serving Suggestions
- Classic Sides: Serve these enchiladas with a side of fluffy Mexican rice and creamy refried beans for a complete and traditional meal.
- Fresh & Light: Balance the richness with a crisp green salad tossed with a simple vinaigrette, or a refreshing corn and black bean salsa.
- Ultimate Comfort: Don’t forget the guacamole and extra salsa! These fresh additions add a burst of flavor and texture that perfectly complements the warm enchiladas.
- Meal Prep Magic: Assemble the enchiladas in your baking dish, cover tightly with foil, and refrigerate for up to 24 hours before baking. Just add an extra 10-15 minutes to the baking time if baking from cold.
Storage Tips
Leftover Spicy Ground Beef Enchiladas can be stored in an airtight container in the refrigerator for 3-4 days. They also freeze beautifully! Wrap individual servings or the entire dish tightly in plastic wrap and then aluminum foil. They can be frozen for up to 2-3 months. To reheat, thaw overnight in the fridge if frozen, then bake in the oven at 350°F (175°C) until heated through and bubbly, about 20-30 minutes, or microwave individual servings until warm.
Conclusion
There you have it – a recipe for Spicy Ground Beef Enchiladas that is sure to become a cherished favorite in your kitchen. This dish is a true testament to how simple ingredients can come together to create something incredibly satisfying and bursting with flavor. The blend of savory beef, spicy kick, rich sauce, and gooey cheese makes every bite an absolute delight.
Don’t hesitate to give this recipe a try. It’s perfect for a cozy weeknight meal, a lively family dinner, or even a casual get-together with friends. You’ll be amazed at how easy it is to achieve such a delicious and impressive result. Plus, the customization options mean you can truly make it your own!
So go ahead, gather your loved ones, and share the warmth and deliciousness of these homemade enchiladas. Food tastes even better when shared, and this dish is definitely one that brings smiles and happy memories. Enjoy every flavorful bite!


