
Introduction
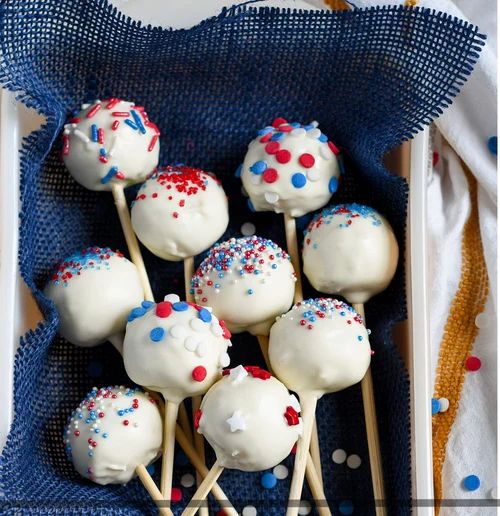
Get ready to add a burst of patriotic fun to your summer gatherings with these delightful Red White Blue Cake Pops! These little spheres of joy are made from crumbled cake mixed with frosting, then dipped in colorful candy melts and adorned with festive sprinkles. They are not just incredibly cute; each bite is a moist, sweet treat that will bring smiles to everyone’s faces. Perfect for picnics, BBQs, or any celebration, they are a true showstopper.
You might think cake pops are complicated, but they are surprisingly easy and quick to make! We’ll use a simple cake base and a few easy steps to transform it into these adorable, bite-sized desserts. The beauty of cake pops is that they’re a fantastic way to use up leftover cake, making them a smart and delicious choice for any home baker.
So, gather your ingredients and let’s create some magic! These Red White Blue Cake Pops are guaranteed to be the star of your next summer party. Your friends and family will be so impressed, and you’ll love how simple they are to whip up.
Cooking Time & Prep Time
- Prep Time: 45 minutes (includes chilling time for cake balls)
- Cooking Time: 30 minutes (for baking the cake)
- Total Time: 75 minutes
Small tip: You can bake the cake a day ahead to save time on the day you plan to assemble the cake pops. Just store it covered at room temperature.
Ingredients
This recipe makes approximately 24-30 cake pops, depending on the size you roll them.
For the Cake Base
- 1 box (15.25 oz) white or vanilla cake mix (plus ingredients listed on box, usually eggs, oil, water)
For the Cake Pop Mixture
- 1 can (16 oz) vanilla frosting
For the Coating and Decoration
- 12 oz red candy melts
- 12 oz blue candy melts
- 12 oz white candy melts or white chocolate chips
- 24-30 lollipop sticks (6-inch)
- Red, white, and blue sprinkles, nonpareils, or sanding sugar
- Optional: 1 tablespoon shortening or coconut oil (for thinning candy melts if needed)
Step-by-Step Instructions
-
Step 1: Bake the Cake
Prepare the white or vanilla cake mix according to the package directions. Use a 9×13 inch baking pan. Bake as directed until a toothpick inserted into the center comes out clean. Let the cake cool completely in the pan on a wire rack. This is very important for the next step.
Small tip: A fully cooled cake crumbles better and won’t make your frosting melt.
-
Step 2: Crumble the Cake
Once the cake is completely cool, crumble it into a large bowl. Use your hands to break it down into very fine crumbs. Make sure there are no large chunks left. The finer the crumbs, the smoother your cake pops will be.
-
Step 3: Mix with Frosting
Add the entire can of vanilla frosting to the crumbled cake. Mix thoroughly with your hands until well combined. The mixture should be moist enough to hold its shape when pressed together, but not overly sticky. It should feel like playdough.
Small tip: Start with about 3/4 of the frosting and add more if needed. Some cakes absorb more frosting than others.
-
Step 4: Roll the Cake Balls
Scoop out about 1.5 tablespoons of the cake mixture for each cake pop. Roll it firmly between your palms to form smooth, uniform balls. Place the rolled cake balls on a parchment-lined baking sheet.
-
Step 5: Chill the Cake Balls
Cover the baking sheet with plastic wrap. Place the cake balls in the refrigerator to chill for at least 30 minutes. This step helps the cake balls firm up, making them easier to dip and preventing them from falling apart.
Small tip: Chilling for an hour or even longer (up to overnight) can make dipping much easier.
-
Step 6: Melt the Candy Melts
While the cake balls are chilling, prepare your candy melts. Melt each color (red, white, blue) in separate microwave-safe bowls. Heat in 30-second intervals, stirring well after each, until smooth and fully melted. If the candy melts are too thick, stir in a teaspoon of shortening or coconut oil until you reach a smooth, dippable consistency.
Small tip: Do not overheat the candy melts, as they can seize and become unusable. Low and slow is the key.
-
Step 7: Insert Sticks and Dip
Take the chilled cake balls out of the fridge. Dip the tip of a lollipop stick about half an inch into one of the melted candy colors. Immediately insert the stick into the center of a cake ball, pushing it about halfway through. Repeat for all cake balls, using different colors for the stick dip if you like.
Small tip: The candy melt on the stick acts as “glue” to secure the cake ball.
-
Step 8: Dip the Cake Pops
Working quickly, dip each cake pop into the melted candy, covering the entire cake ball. Gently tap the stick against the edge of the bowl to remove excess coating. Do this over the bowl so extra candy drips back in. Do not swirl or stir too much, as this can cause the cake pop to fall off the stick.
-
Step 9: Decorate and Set
Immediately after dipping, while the coating is still wet, sprinkle with your festive red, white, and blue sprinkles. Place the decorated cake pop upright in a styrofoam block or a tall glass to dry and set completely. Repeat with all cake pops, using different colors of candy melts for a varied look.
Small tip: Have all your sprinkles ready before you start dipping, so you can decorate immediately.
-
Step 10: Final Chill (Optional)
Once all cake pops are dipped and decorated, you can place them back in the refrigerator for about 10-15 minutes to fully set the candy coating. This ensures they are firm and ready to serve.
Tips & Variations
- Gluten-Free Option: Simply use your favorite gluten-free white or vanilla cake mix and ensure your frosting is also gluten-free. The rest of the recipe remains the same!
- Vegan or Vegetarian Option: Use a vegan cake mix (many are accidentally vegan, just check ingredients), replace eggs with a flax egg or other vegan egg replacer, and use a plant-based oil. For frosting, choose a vegan vanilla frosting. The candy melts will need to be dairy-free; many brands offer vegan options.
- Adding a Fruity Twist: For a touch of natural freshness, you can finely grate a small amount of lemon or orange zest into the cake and frosting mixture. Or, for a beautiful garnish, press a tiny fresh blueberry or raspberry onto the top of the cake pop while the coating is still wet.
- Flavor Twist: Instead of plain vanilla frosting, try cream cheese frosting for a tangy contrast. You could also add a teaspoon of almond extract or a few drops of peppermint extract to the frosting mixture for a different flavor profile.
- Kid-Friendly Decorating: Set up a “decorating station” with different colors of sprinkles, edible glitter, and even small candy stars. Let kids dip and decorate their own cake pops (with supervision for hot candy melts!).
Nutritional Information
Approximate values per serving (based on 24 servings):
- Calories: 250 kcal
- Protein: 2g
- Carbohydrates: 35g
- Fat: 12g
Note: These values are approximate and can vary significantly depending on the specific brands and types of cake mix, frosting, and candy melts used.
Health Benefits
While cake pops are a treat, making them at home gives you control over the ingredients. You can choose higher quality components and avoid artificial preservatives often found in store-bought desserts.
These cake pops are a wonderful way to bring joy and celebration into your life. The act of baking itself can be a stress-reliever, fostering creativity and providing a sense of accomplishment. Sharing homemade treats also strengthens social bonds and creates lasting memories.
If you opt for natural food colorings or add real fruit garnishes like blueberries or raspberries, you’re incorporating a touch of antioxidants and vitamins. Blueberries, for example, are packed with Vitamin C and K.
When enjoyed in moderation as part of a balanced diet, these festive cake pops can be a delightful and guilt-free indulgence, especially during special occasions.
Serving Suggestions
- Serve these Red White Blue Cake Pops chilled, straight from the fridge. They are perfect as a grab-and-go dessert for any summer party or picnic.
- Arrange them artfully on a platter or in a decorative vase as a centerpiece that doubles as dessert. They stand out beautifully!
- These are best enjoyed as a standalone dessert or as part of a larger dessert buffet. They are not typically used as a main or side dish.
- For meal prep, these are great! Make a big batch and have them ready for upcoming events or as a special treat throughout the week.
Storage Tips
Store your finished cake pops in an airtight container in the refrigerator for up to 5-7 days. The candy coating helps keep them fresh. You can also freeze cake pops for up to 1 month. To freeze, place them in a single layer on a baking sheet until solid, then transfer to a freezer-safe bag or container. Thaw them in the refrigerator overnight before serving. Reheating is not recommended for cake pops; they are best enjoyed chilled or at room temperature.
Conclusion
There you have it – a simple, fun, and incredibly delicious way to celebrate summer with these festive Red White Blue Cake Pops! They are the perfect blend of moist cake, sweet frosting, and a delightful candy shell, all wrapped up in a patriotic package. Their bite-sized nature makes them irresistible, and their vibrant colors make them a feast for the eyes.
Don’t be intimidated by the steps; each one is straightforward, and the result is truly rewarding. You’ll love the process of creating these charming treats, and your guests will adore eating them. It’s a wonderful project for a sunny afternoon, bringing a touch of homemade goodness to your table.
So go ahead, give this recipe a try! Gather your loved ones, share these beautiful cake pops, and make some sweet memories together. Happy baking, and enjoy your delicious summer celebrations!


