
Introduction
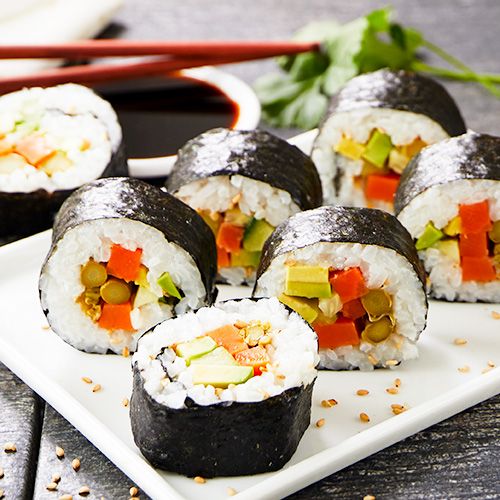
Are you ready for a flavor adventure that’s delightfully unexpected and incredibly satisfying? Get ready to meet “Pickle Sushi”! This isn’t your traditional raw fish roll. Instead, we’re taking the beloved briny crunch of pickles and pairing it with creamy, fresh ingredients, all wrapped up in perfect sushi rice and nori. It’s a unique, tangy, and refreshing twist on a classic that will surprise and delight your taste buds!
The best part? Pickle Sushi is wonderfully easy to make at home. There’s no complicated fish preparation, and the ingredients are readily available. If you’ve ever been intimidated by making sushi, this recipe is your perfect starting point. It’s quick, fun, and forgiving, making it an ideal project for a weeknight dinner or a weekend gathering.
So, ditch your sushi takeout menu for a night and roll up your sleeves! This recipe will guide you through every step to create your own delicious Pickle Sushi. Get ready to impress your friends and family with this innovative and incredibly tasty dish. Let’s get rolling!
Cooking Time & Prep Time
- Prep Time: 25 minutes
- Cooking Time: 20 minutes (for rice)
- Total Time: 45 minutes
Small tip: You can cook the sushi rice up to an hour ahead of time. This will help it cool down to the perfect temperature for rolling and save you a few minutes when you’re ready to assemble.
Ingredients
This recipe makes 4 generous sushi rolls, serving 2-4 people as a light meal or appetizer.
For the Sushi Rice
- 1 cup short-grain sushi rice
- 1 ¼ cups cold water (for cooking rice)
- 2 tablespoons rice vinegar
- 1 tablespoon granulated sugar
- ½ teaspoon salt
For the Fillings
- 4 sheets nori (seaweed wraps)
- 4 dill pickle spears, patted very dry and sliced into thin strips
- 4 ounces cream cheese, softened
- ½ medium cucumber, peeled and cut into thin matchsticks
- 1 small carrot, peeled and cut into thin matchsticks
- ½ ripe avocado, sliced thinly
For Serving
- Soy sauce or tamari
- Pickled ginger
- Wasabi (optional)
Step-by-Step Instructions
-
Step 1: Prepare the Sushi Rice
First, rinse your sushi rice under cold running water in a fine-mesh sieve until the water runs clear. This removes excess starch. Transfer the rinsed rice and 1 ¼ cups cold water to a medium saucepan. Bring to a boil, then reduce heat to low, cover, and simmer for 15 minutes. Remove from heat and let stand, covered, for another 10 minutes.
Small tip: Do not lift the lid during cooking or resting! This keeps the steam inside for perfectly cooked rice.
-
Step 2: Season the Sushi Rice
While the rice rests, whisk together the rice vinegar, sugar, and salt in a small bowl until the sugar and salt dissolve. Once the rice has rested, transfer it to a large, shallow non-metallic bowl or baking dish. Pour the vinegar mixture evenly over the hot rice. Using a rice paddle or wooden spoon, gently fold and cut the rice to mix in the seasoning. Fan the rice with a piece of cardboard or a hand fan while mixing to cool it quickly. This gives it a shiny finish. Continue fanning until the rice is lukewarm.
Small tip: The rice should be lukewarm, not hot or cold. This helps it stick together and makes it easier to roll.
-
Step 3: Prepare Your Fillings
While the rice cools, prepare your fillings. Pat the pickle spears very dry with paper towels. Slice them into thin strips, about ¼ inch thick. Cut the cucumber and carrot into thin, uniform matchsticks. Slice the avocado thinly. Make sure all your fillings are ready and within reach for easy assembly.
Small tip: Drying the pickles thoroughly is crucial! Excess moisture can make your sushi soggy and harder to roll.
-
Step 4: Set Up Your Rolling Station
Lay a bamboo sushi rolling mat on a clean work surface. Place a sheet of nori, shiny side down, on top of the mat. Have a small bowl of water nearby for wetting your hands. Also, have a sharp knife ready for slicing the finished rolls.
Small tip: Covering your bamboo mat with plastic wrap before placing the nori can make cleanup much easier and prevent rice from sticking.
-
Step 5: Assemble the Sushi Roll
Dip your hands in the bowl of water to prevent the rice from sticking. Take about ¾ cup of the seasoned sushi rice and spread it evenly over the nori sheet, leaving about a 1-inch strip bare along the top edge of the nori. Press gently to create a thin, even layer.
Small tip: Don’t press the rice too hard, or it will become gummy. A gentle, even spread is key.
-
Step 6: Add the Fillings
Spread about 1 tablespoon of softened cream cheese in a line across the center of the rice. Arrange a few strips of pickle, cucumber matchsticks, carrot matchsticks, and avocado slices on top of the cream cheese. Don’t overfill, or your roll will be difficult to close.
Small tip: Create a colorful and textural line with your fillings for a beautiful cross-section when sliced.
-
Step 7: Roll the Sushi
Using the bamboo mat, lift the edge closest to you and begin to roll the nori tightly over the fillings, pressing down gently to compact the roll. Continue rolling, pulling the mat away from you as you go, until you reach the bare strip of nori at the top. Moisten this bare edge with a little water to seal the roll. Gently squeeze the roll with the mat to ensure it’s firm and holds its shape.
Small tip: Practice makes perfect with rolling! Don’t worry if your first roll isn’t perfect; it will still taste delicious.
-
Step 8: Slice and Serve
Transfer the rolled sushi to a cutting board. Dip your sharp knife in water before each cut to prevent sticking and get clean slices. Cut the roll in half, then cut each half into 3-4 pieces, creating 6-8 pieces per roll. Repeat for the remaining nori sheets and fillings. Arrange the “Pickle Sushi” on a platter and serve immediately with soy sauce, pickled ginger, and wasabi if desired.
Small tip: A slightly damp, very sharp knife is your best friend for clean sushi cuts. Wipe the blade clean between rolls.
Tips & Variations
- Gluten-Free Option: Ensure your soy sauce is certified gluten-free (use tamari) and check that your nori sheets and rice vinegar are also gluten-free.
- Vegan/Vegetarian Option: This recipe is already vegetarian! To make it vegan, simply substitute the cream cheese with a plant-based cream cheese alternative or a generous smear of hummus.
- Add More Vegetables or Protein: Feel free to experiment with other crunchy veggies like bell peppers, radish, or even blanched asparagus. For a protein boost, add strips of smoked tofu, imitation crab, or grilled chicken, ensuring they are thinly sliced and well-drained.
- Spicy Version: Mix a dash of sriracha or a pinch of chili flakes into your cream cheese for a spicy kick. You could also add a thin slice of fresh jalapeño to the filling.
- Flavor Boosters: Try adding a sprinkle of everything bagel seasoning on top of the rice before adding the fillings for an extra layer of savory flavor and crunch. You can also use bread and butter pickles for a sweeter, tangier profile.
Nutritional Information
Approximate values per serving (based on 4 servings):
- Calories: 340 kcal
- Protein: 9g
- Carbohydrates: 55g
- Fat: 10g
Please note: These values are approximate and may vary depending on the specific brands and quantities of ingredients used.
Health Benefits
Pickle Sushi is more than just a tasty treat; it offers some wonderful health benefits too!
- Digestive Health from Pickles: Dill pickles, especially fermented ones, can be a source of probiotics. These beneficial bacteria are great for gut health and can aid in digestion.
- Healthy Fats from Avocado: Avocado is packed with monounsaturated fats, which are heart-healthy and can help lower bad cholesterol levels. It also provides essential vitamins like K, C, B6, and E.
- Fiber-Rich Vegetables: Cucumber and carrots contribute valuable dietary fiber, which is important for digestive regularity and can help you feel full and satisfied. Carrots are also an excellent source of Vitamin A, crucial for good vision.
- Energy from Rice: Sushi rice provides carbohydrates, giving your body the energy it needs to power through your day. It’s a clean and effective fuel source.
Serving Suggestions
- Perfect Appetizer: Serve Pickle Sushi as a unique and refreshing appetizer at your next dinner party. It’s a conversation starter!
- Light Lunch or Dinner: Pair it with a simple miso soup or a side of edamame for a complete and satisfying light meal.
- Picnic Favorite: These rolls travel well! Pack them for a picnic or a portable lunch to enjoy outdoors.
- Meal Prep Idea: While best eaten fresh, you can prepare the rice and chop all your vegetables ahead of time. Store them separately in airtight containers in the fridge, then assemble the rolls just before serving.
Storage Tips
Pickle Sushi is best enjoyed fresh, ideally within a few hours of making it. If you have leftovers, store them in an airtight container in the refrigerator for up to 1 day. The rice can dry out and the nori can become chewy if stored longer. Freezing sushi is not recommended, as it significantly alters the texture of the rice and fillings. Do not reheat sushi; it should be served at room temperature or slightly chilled.
Conclusion
There you have it – your very own homemade Pickle Sushi! This dish is a true testament to how simple ingredients can come together to create something truly special and memorable. Its tangy, creamy, and crunchy textures are a joy to eat, and the ease of preparation makes it a go-to recipe for any occasion.
We hope you feel inspired to give this unique sushi a try. Don’t be afraid to get creative with your fillings and make it your own. The process of making sushi, even this simpler version, is a fun and rewarding culinary experience that you’ll want to revisit again and again.
So, gather your ingredients, roll up some deliciousness, and share your Pickle Sushi creations with your loved ones. It’s a dish that’s sure to bring smiles and happy taste buds all around. Happy rolling!


