
Introduction
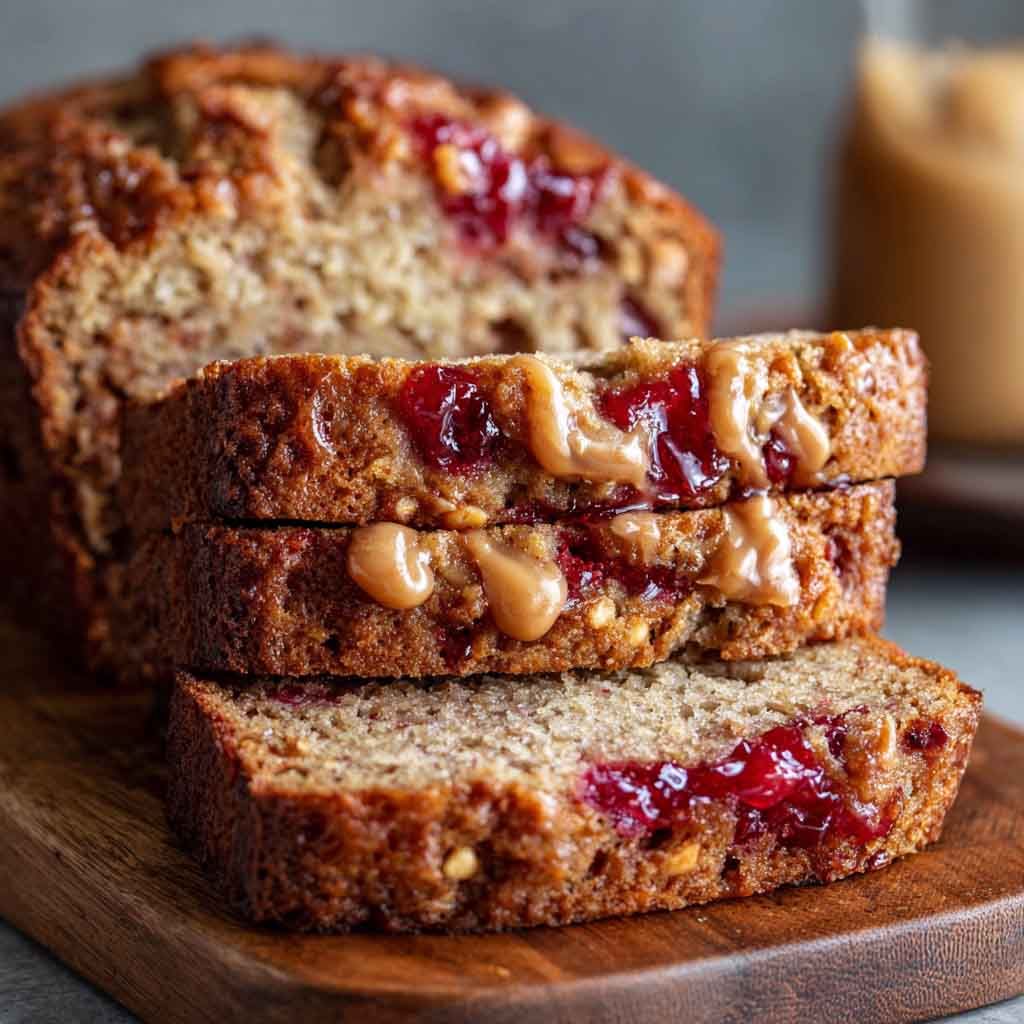
Get ready to rediscover a classic childhood favorite in a whole new way! Our Peanut Butter Jelly Bread takes everything you love about that iconic sandwich and bakes it into a moist, delicious loaf. Imagine a tender, lightly sweet bread swirled with creamy peanut butter and bright, fruity jelly. It’s pure comfort in every slice.
This recipe is wonderfully simple to make. You don’t need any fancy equipment or special skills. Just a few basic pantry staples and a little bit of mixing will get you started. It’s a quick bread, which means no yeast, no kneading, and no long rising times. Perfect for a spur-of-the-moment baking craving!
Whether you’re looking for a delightful breakfast treat, a comforting afternoon snack, or a unique dessert, this Peanut Butter Jelly Bread is sure to become a new family favorite. It’s incredibly satisfying and brings a smile to everyone’s face. So, tie on your apron and let’s make some magic!
Cooking Time & Prep Time
- Prep Time: 25 minutes
- Cooking Time: 45-50 minutes
- Total Time: 70-75 minutes
Small tip: Gathering all your ingredients and measuring them out before you start mixing, known as “mise en place,” will make the entire process smoother and more enjoyable.
Ingredients
This recipe makes 1 loaf (approximately 10-12 slices).
- For the Bread:
- 1 ½ cups (180g) all-purpose flour
- ¾ cup (150g) granulated sugar
- 1 ½ teaspoons baking powder
- ½ teaspoon salt
- ½ cup (120ml) milk (whole or 2%)
- 1 large egg, room temperature
- ¼ cup (60ml) vegetable oil (or melted unsalted butter)
- 1 teaspoon vanilla extract
- For the Swirl:
- ½ cup (128g) creamy peanut butter
- ½ cup (160g) your favorite fruit jelly or jam (strawberry, grape, or raspberry work wonderfully)
Step-by-Step Instructions
-
Step 1: Preheat Oven & Prep Pan
Preheat your oven to 350°F (175°C). Lightly grease and flour a 9×5 inch loaf pan, or line it with parchment paper, leaving an overhang on the long sides for easy lifting. This prevents sticking and makes cleanup a breeze.
Small tip: Parchment paper is your best friend for easy removal of the loaf!
-
Step 2: Combine Dry Ingredients
In a large mixing bowl, whisk together the flour, granulated sugar, baking powder, and salt. Make sure there are no lumps and everything is well combined. This ensures even rising and flavor throughout the bread.
-
Step 3: Combine Wet Ingredients
In a separate medium bowl, whisk together the milk, large egg, vegetable oil, and vanilla extract. Whisk until the mixture is smooth and the egg is fully incorporated. Room temperature ingredients blend more easily.
-
Step 4: Mix Wet into Dry
Pour the wet ingredients into the dry ingredients. Stir gently with a spatula or wooden spoon until just combined. Be careful not to overmix; a few small lumps are perfectly fine. Overmixing can lead to a tough bread.
Small tip: Stop mixing as soon as you no longer see streaks of dry flour.
-
Step 5: Prepare Peanut Butter for Swirl
In a small microwave-safe bowl, microwave the ½ cup of creamy peanut butter for about 15-20 seconds. This will make it softer and easier to dollop and swirl. It should be warm and slightly runny.
-
Step 6: Assemble the Loaf
Pour about half of the bread batter into your prepared loaf pan. Spread it evenly to create the first layer. This will be the base for your delicious swirls.
-
Step 7: Add Peanut Butter and Jelly Swirls
Dollop half of the softened peanut butter over the batter in the pan. Then, dollop half of your chosen jelly over the peanut butter. Gently swirl them into the batter using a knife or a skewer. Repeat with the remaining batter, peanut butter, and jelly on top. Create beautiful patterns with your swirls!
Small tip: Don’t over-swirl, or your distinct layers will blend too much. Just a few gentle passes are perfect.
-
Step 8: Bake the Bread
Place the loaf pan in the preheated oven. Bake for 45-50 minutes, or until a wooden skewer inserted into the center comes out clean. The top should be golden brown and firm to the touch. Baking times can vary, so keep an eye on it.
-
Step 9: Cool and Serve
Once baked, remove the loaf from the oven and let it cool in the pan for about 10-15 minutes. Then, carefully lift it out using the parchment paper overhang and transfer it to a wire rack to cool completely before slicing. This prevents it from getting soggy and makes for cleaner cuts.
Tips & Variations
- Gluten-Free Option: Easily make this bread gluten-free by swapping the all-purpose flour for a 1:1 gluten-free baking flour blend. Make sure your blend contains xanthan gum for the best texture.
- Vegan Option: To make this recipe vegan, use a plant-based milk (like almond or soy milk) instead of dairy milk. Replace the egg with a “flax egg” (1 tablespoon ground flaxseed mixed with 3 tablespoons water, let sit for 5 minutes). Ensure your peanut butter and jelly are vegan-friendly.
- Add More Protein or Fiber: Boost the protein by stirring ½ cup of chopped roasted peanuts into the batter before pouring. For extra fiber, consider using half whole wheat flour and half all-purpose flour, or stir in 2 tablespoons of chia seeds.
- Spicy Kick: For a surprising twist, add a tiny pinch (⅛ teaspoon) of cayenne pepper to your peanut butter before swirling. This adds a subtle warmth that complements the sweetness beautifully.
- Flavor Variations: Experiment with different nut butters like almond butter or cashew butter. Try other jams like apricot or blueberry for a fresh flavor profile. You can also add ½ cup of mini chocolate chips to the batter for a chocolatey treat!
Nutritional Information
Approximate values per serving (based on 10 servings):
- Calories: 310 kcal
- Protein: 7g
- Carbohydrates: 40g
- Fat: 15g
Please note that nutritional values may vary depending on the specific brands and quantities of ingredients used.
Health Benefits
This delightful Peanut Butter Jelly Bread offers more than just great taste!
Peanut butter is a fantastic source of plant-based protein, which is essential for building and repairing tissues in your body. It also provides healthy monounsaturated and polyunsaturated fats. These fats are good for heart health and help you feel full and satisfied.
Beyond protein and healthy fats, peanut butter is packed with important vitamins and minerals. It contains Vitamin E, a powerful antioxidant, and B vitamins like niacin, which are crucial for energy production. You’ll also find magnesium and potassium, vital for muscle function and blood pressure regulation.
While jelly adds sweetness, fruit-based jellies can contribute some natural fruit sugars and a small amount of vitamins, depending on the fruit. It offers a quick source of energy, perfect for a morning boost or an afternoon pick-me-up.
Overall, this bread provides a good balance of carbohydrates for energy, protein for satiety, and healthy fats. It’s a comforting treat that can fit into a balanced diet when enjoyed in moderation.
Serving Suggestions
- Serve warm slices with a tall glass of cold milk or a hot cup of coffee for a perfect breakfast or brunch.
- Enjoy a slice as a satisfying afternoon snack to curb those hunger pangs between meals.
- Turn it into a dessert by serving a warm slice with a scoop of vanilla ice cream or a dollop of whipped cream.
- This bread is wonderful on its own, but you can also lightly toast a slice and spread a little extra peanut butter or jelly on top for an extra layer of flavor.
- Meal Prep Ideas: Bake a loaf on the weekend, let it cool completely, then slice it and wrap individual slices in plastic wrap or foil. Store them in an airtight container for quick, grab-and-go breakfasts or snacks throughout the week.
Storage Tips: Store any leftover Peanut Butter Jelly Bread in an airtight container at room temperature for up to 3-4 days. For longer storage, you can freeze individual slices or the whole loaf (wrapped tightly in plastic wrap and then foil) for up to 3 months. To reheat, thaw frozen slices at room temperature or in the refrigerator overnight, then warm in a microwave for 15-30 seconds or in a toaster oven until heated through.
Conclusion
There you have it – a truly special Peanut Butter Jelly Bread recipe that brings all the joy of a classic sandwich into a delightful, bakeable form. It’s incredibly moist, perfectly sweet, and those swirls of peanut butter and jelly are simply irresistible. This bread is more than just a treat; it’s a taste of nostalgia and pure comfort.
We absolutely encourage you to give this recipe a try. It’s so straightforward, even beginner bakers will feel like pros. The aroma filling your kitchen as it bakes is a reward in itself! Plus, it’s a fantastic way to use up those jars of peanut butter and jelly in your pantry.
Imagine sharing warm slices with your family and friends. It’s perfect for breakfast, a coffee break, or a sweet ending to any meal. This Peanut Butter Jelly Bread is sure to become a cherished recipe in your home. Happy baking!


