
Introduction
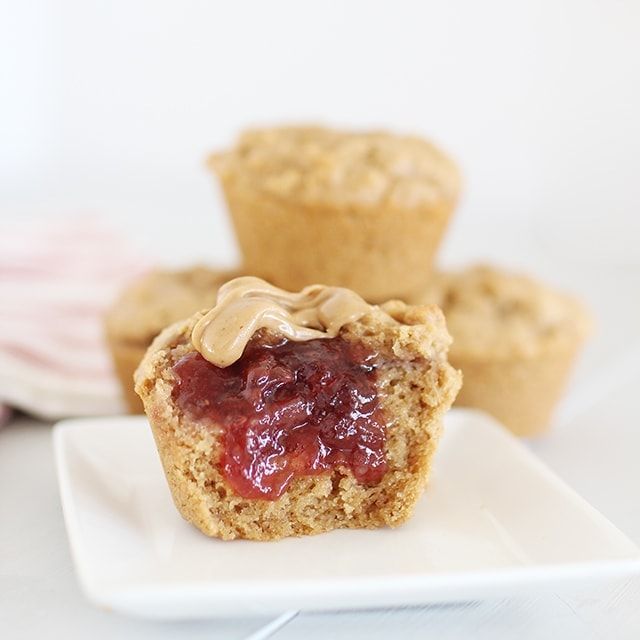
Get ready to rediscover a childhood classic in a delicious new way! Our Peanut Butter and Jelly Muffins take everything you love about the iconic sandwich and bake it into a fluffy, flavorful treat. Imagine soft, tender muffins bursting with rich peanut butter goodness and sweet, fruity swirls of your favorite jelly. It’s pure comfort in every bite.
This recipe is wonderfully simple to make, perfect for bakers of all skill levels. You’ll use everyday pantry ingredients and a straightforward method that comes together quickly. These muffins are a fantastic choice for a quick breakfast, a satisfying snack, or a delightful addition to any brunch spread. They truly bring a smile to everyone’s face!
So, grab your apron and let’s bring this nostalgic flavor to life in your kitchen. You’re just a few easy steps away from enjoying these irresistible Peanut Butter and Jelly Muffins. Your taste buds will thank you!
Cooking Time & Prep Time
- Prep Time: 20 minutes
- Cooking Time: 20 minutes
- Total Time: 40 minutes
Small tip: Gather all your ingredients and measure them out before you start mixing. This makes the whole process much smoother and quicker!
Ingredients
This recipe makes 12 delicious muffins.
- For the Dry Ingredients:
- 2 cups (240g) all-purpose flour
- ½ cup (100g) granulated sugar
- 2 teaspoons baking powder
- ½ teaspoon salt
- For the Wet Ingredients:
- ¾ cup (180ml) milk (any kind works!)
- ¼ cup (60ml) vegetable oil (or other neutral oil like canola)
- 1 large egg
- 1 teaspoon vanilla extract
- For the Peanut Butter & Jelly Swirl:
- ½ cup (120g) creamy peanut butter
- ¼ cup (60g) jelly or jam of your choice (strawberry, grape, or raspberry are wonderful!)
Step-by-Step Instructions
-
Step 1: Preheat and Prepare
Preheat your oven to 400°F (200°C). Line a 12-cup muffin tin with paper liners, or lightly grease and flour the cups. This ensures your muffins won’t stick.
Small tip: Using paper liners makes cleanup a breeze and helps the muffins pop out easily.
-
Step 2: Combine Dry Ingredients
In a large bowl, whisk together the all-purpose flour, granulated sugar, baking powder, and salt. Make sure there are no lumps and everything is well combined. This step ensures even distribution of your leavening agents.
-
Step 3: Mix Wet Ingredients
In a separate medium bowl, whisk together the milk, vegetable oil, large egg, and vanilla extract. Whisk until the egg is fully incorporated and the mixture is smooth. This creates a uniform liquid base for your muffins.
-
Step 4: Combine Wet and Dry
Pour the wet ingredients into the dry ingredients. Stir gently with a spatula or wooden spoon until just combined. Be careful not to overmix; a few lumps are perfectly fine and actually lead to tender muffins.
Small tip: Overmixing can develop the gluten in the flour, resulting in tough muffins. Stop mixing as soon as you no longer see streaks of dry flour.
-
Step 5: Fold in Peanut Butter
Add the creamy peanut butter to the muffin batter. Fold it in gently, creating swirls of peanut butter throughout the batter. You want to see distinct streaks of peanut butter, not a fully blended mixture.
-
Step 6: Fill Muffin Cups
Divide the muffin batter evenly among the 12 prepared muffin cups. Each cup should be about two-thirds full. Use an ice cream scoop for easy and consistent portioning.
-
Step 7: Add Jelly Swirl
Spoon about 1 teaspoon of your chosen jelly or jam on top of each muffin cup. Use a toothpick or a small knife to gently swirl the jelly into the batter. Don’t overdo the swirling; you want lovely pockets of jam.
Small tip: If your jelly is very thick, you can warm it slightly in the microwave for 10-15 seconds to make it easier to swirl.
-
Step 8: Bake to Perfection
Bake for 18-22 minutes, or until the muffins are golden brown and a toothpick inserted into the center comes out clean. The tops should spring back when lightly touched. Keep an eye on them as ovens can vary.
-
Step 9: Cool and Enjoy
Once baked, remove the muffin tin from the oven and let the muffins cool in the tin for 5 minutes. Then, transfer them to a wire rack to cool completely. This prevents the bottoms from getting soggy. Enjoy them warm or at room temperature!
Tips & Variations
- Gluten-Free Option: Simply swap the all-purpose flour for a 1:1 gluten-free baking flour blend. Ensure your blend contains xanthan gum for the best texture.
- Vegan Option: Replace the milk with any plant-based milk (almond, soy, or oat milk work great). For the egg, use a “flax egg” (1 tablespoon ground flaxseed mixed with 3 tablespoons water, let sit for 5 minutes).
- Boosted Nutrition: Stir in a handful of chia seeds or chopped nuts (like peanuts or walnuts) into the batter with the peanut butter for extra protein and healthy fats. You can also add ½ cup of grated zucchini or carrots for hidden veggies!
- Warm Spice Kick: For a cozy twist, add ½ teaspoon of ground cinnamon or a pinch of nutmeg to your dry ingredients. This enhances the comforting flavors beautifully.
- Chocolate Lover’s Dream: Fold in ½ cup of mini chocolate chips along with the peanut butter. Peanut butter and chocolate are a match made in heaven!
Nutritional Information
Approximate values per serving (based on 12 servings):
- Calories: 290 kcal
- Protein: 7g
- Carbohydrates: 38g
- Fat: 13g
Please note: These values are approximate and may vary depending on the specific brands and types of ingredients used.
Health Benefits
Our Peanut Butter and Jelly Muffins offer more than just delicious taste; they also bring some great health benefits from their key ingredients.
Peanut butter is a fantastic source of plant-based protein, which helps keep you feeling full and supports muscle health. It also provides healthy monounsaturated and polyunsaturated fats, beneficial for heart health. You’ll also find essential nutrients like magnesium, phosphorus, and Vitamin E in peanut butter, which support bone health, energy production, and act as antioxidants.
While jelly or jam does contain sugar, it also contributes some benefits from the fruit it’s made from. Fruit provides vitamins, minerals, and antioxidants, which help protect your body’s cells from damage. Choosing a jam with real fruit pieces can boost these benefits even further.
Milk, if you’re using dairy, is a great source of calcium for strong bones and teeth, and Vitamin D, which helps your body absorb that calcium. It also adds more protein to these tasty muffins. If using plant-based milk, many varieties are fortified with similar vitamins and minerals.
Overall, these muffins can be a satisfying treat that delivers a good mix of protein, healthy fats, and some essential micronutrients. They are a much more wholesome option than many store-bought baked goods.
Serving Suggestions
- Breakfast Boost: Enjoy a warm muffin with your morning coffee or tea for a quick and satisfying start to your day.
- Afternoon Snack: These are perfect for a pick-me-up snack to curb those hunger pangs between meals.
- Brunch Star: Serve them alongside fresh fruit, yogurt, and scrambled eggs for a delightful brunch spread.
- School Lunch Treat: Pack one in a lunchbox for a fun and delicious surprise that kids will adore.
- Dessert Delight: Warm them slightly and serve with a scoop of vanilla ice cream for a simple, comforting dessert.
Storage Tips: Store your Peanut Butter and Jelly Muffins in an airtight container at room temperature for up to 2-3 days. For longer storage, keep them in the refrigerator for up to 5 days. These muffins also freeze beautifully! Wrap individual muffins tightly in plastic wrap, then place them in a freezer-safe bag or container for up to 3 months. To reheat, simply microwave for 20-30 seconds, or warm in a preheated oven at 300°F (150°C) for about 5-7 minutes until heated through.
Conclusion
There you have it – a truly delightful and incredibly easy recipe for Peanut Butter and Jelly Muffins! These muffins are a testament to how simple ingredients can come together to create something truly special. They capture the nostalgic flavors of a classic sandwich in a tender, moist, and utterly irresistible baked good. They are perfect for any time of day and guaranteed to bring a smile.
We encourage you to try this recipe in your kitchen. It’s a wonderful project for a weekend morning, and the aroma alone will make your home feel warm and inviting. Don’t be afraid to experiment with your favorite jams or add-ins; make it your own!
Once you bake a batch, share these comforting treats with your family and friends. They’re perfect for breakfast, a quick snack, or a thoughtful gift. Enjoy the simple pleasure of homemade goodness!


