
Introduction
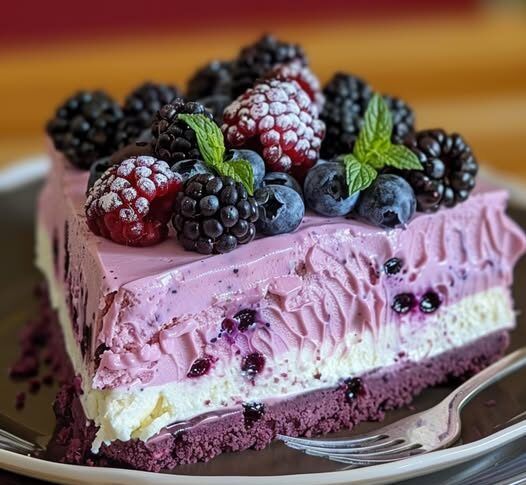
Get ready for a truly delightful treat that requires absolutely no oven time! Our No Bake Black Forest Berry Cheesecake is a creamy, dreamy dessert that combines the rich, chocolatey notes of a Black Forest cake with the vibrant sweetness of mixed berries, all nestled in a luscious cheesecake filling. It’s a symphony of flavors and textures that will impress everyone.
The best part? This cheesecake is incredibly easy to make. There’s no complicated baking, no water baths, and no cracking worries. With just a few simple steps and some chilling time, you can create a show-stopping dessert that tastes like it came from a gourmet bakery. It’s perfect for busy days or when you want something special without the fuss.
So, whether you’re celebrating a special occasion or simply craving something wonderfully sweet, this recipe is for you. It’s a fantastic way to enjoy a classic flavor combination in a fresh, accessible way. Let’s dive in and make some magic in your kitchen today!
Cooking Time & Prep Time
- Prep Time: 30 minutes
- Cooking Time: 0 minutes (no baking required!)
- Chilling Time: 4 hours (minimum)
- Total Time: 4 hours 30 minutes
Small tip: For best results, prepare this cheesecake the day before you plan to serve it. An overnight chill truly makes it perfect!
Ingredients
This recipe makes 8 generous servings.
For the Cookie Crust
- 2 cups (about 200g) digestive biscuits or graham crackers, finely crushed
- 1/2 cup (113g) unsalted butter, melted
- 2 tablespoons granulated sugar
For the Black Forest Berry Swirl
- 1 cup mixed berries (fresh or frozen, such as cherries, raspberries, blueberries)
- 1/4 cup granulated sugar
- 1 tablespoon lemon juice
- 1 tablespoon cornstarch mixed with 2 tablespoons cold water (slurry)
- 1/4 cup good quality cocoa powder, unsweetened
- 2 tablespoons hot water
For the Cheesecake Filling
- 24 oz (3 blocks) full-fat cream cheese, softened
- 1 1/2 cups powdered sugar, sifted
- 1 teaspoon pure vanilla extract
- 1/4 cup whole milk
- 1 1/2 cups heavy cream, very cold
For the Garnish
- 1/2 cup heavy cream
- 1 tablespoon powdered sugar
- 1/2 teaspoon vanilla extract
- Fresh mixed berries
- Chocolate shavings or curls
Step-by-Step Instructions
-
Prepare the Crust
In a medium bowl, combine the finely crushed biscuits, melted butter, and 2 tablespoons of granulated sugar. Mix until everything is well combined and resembles wet sand. Press this mixture firmly into the bottom of a 9-inch springform pan. Use the back of a spoon or a flat-bottomed glass to ensure an even, compact layer. Place the crust in the refrigerator to chill while you prepare the filling.
Small tip: For extra firm crust, bake it for 8-10 minutes at 350°F (175°C) before chilling, then let it cool completely. This is optional for no-bake.
-
Make the Berry Swirl
In a small saucepan, combine the mixed berries, 1/4 cup granulated sugar, and lemon juice. Bring to a simmer over medium heat, stirring occasionally, until the berries soften and release their juices, about 5-7 minutes. Stir in the cornstarch slurry and cook for another minute until thickened. Remove from heat and let cool slightly.
Small tip: If using frozen berries, there’s no need to thaw them first. Just add them directly to the saucepan.
-
Prepare the Chocolate Paste
In a small bowl, whisk together the cocoa powder and 2 tablespoons of hot water until a smooth, thick paste forms. Set aside. This will give us that lovely Black Forest chocolate flavor without adding extra liquid to the cheesecake.
Small tip: Ensure there are no lumps in your cocoa paste for a smooth swirl later.
-
Whip the Heavy Cream
In a large bowl, using an electric mixer with the whisk attachment, beat the cold heavy cream on high speed until stiff peaks form. Be careful not to overbeat, or it will turn into butter. Gently set this aside.
Small tip: Use a very cold bowl and whisk attachment for the best results when whipping cream. You can chill them in the freezer for 10-15 minutes beforehand.
-
Make the Cheesecake Base
In another large bowl, using the paddle attachment or clean whisk attachment, beat the softened cream cheese on medium speed until smooth and creamy, about 2-3 minutes. Add the sifted powdered sugar and vanilla extract, beating until just combined and no lumps remain. Pour in the milk and mix until smooth.
Small tip: Make sure your cream cheese is truly at room temperature. This prevents lumps and ensures a silky smooth filling.
-
Combine Filling Ingredients
Gently fold the whipped heavy cream into the cream cheese mixture in two additions. Use a spatula and a light hand to maintain the airiness of the whipped cream. Mix until just combined and no streaks of cream cheese remain.
Small tip: Overmixing at this stage can deflate the cream and make your cheesecake less fluffy.
-
Assemble the Cheesecake
Pour about half of the cheesecake filling over the chilled crust in the springform pan. Dollop spoonfuls of the berry swirl and chocolate paste over this layer. Swirl gently with a knife or skewer to create a beautiful marbled effect. Add the remaining cheesecake filling, then repeat with the rest of the berry swirl and chocolate paste, swirling again.
Small tip: Don’t over-swirl! A few gentle passes are all you need to create a lovely pattern.
-
Chill the Cheesecake
Cover the springform pan loosely with plastic wrap. Place the cheesecake in the refrigerator to chill for at least 4 hours, or preferably overnight, until it is firm and set. This is crucial for the cheesecake to hold its shape.
Small tip: A longer chill means a firmer, easier-to-slice cheesecake. Patience is key!
-
Garnish and Serve
Once the cheesecake is fully chilled, carefully remove it from the springform pan. In a small bowl, whip the 1/2 cup heavy cream with 1 tablespoon powdered sugar and 1/2 teaspoon vanilla extract until soft peaks form. Pipe or dollop whipped cream around the edge of the cheesecake. Decorate with fresh mixed berries and chocolate shavings or curls. Slice and serve immediately.
Small tip: To get clean slices, dip your knife in hot water and wipe it clean between each cut.
Tips & Variations
- Gluten-Free Option: Easily make this gluten-free by using gluten-free digestive biscuits or graham crackers for the crust. The rest of the ingredients are naturally gluten-free.
- Vegan or Vegetarian Option: For a vegan version, use a plant-based cream cheese alternative, coconut cream (chilled overnight, use only the thick cream part) instead of heavy cream, vegan butter, and vegan-friendly biscuits for the crust.
- Add More Protein: Stir 1-2 scoops of unflavored or vanilla protein powder into the cream cheese mixture along with the powdered sugar. It won’t significantly alter the taste but will boost the protein content.
- Spicy Version: For a subtle kick, add a pinch of cayenne pepper (1/8 teaspoon) to the cocoa paste. The hint of spice will enhance the chocolate flavor beautifully without making it overtly hot.
- Nutty Crust: Add 1/4 cup of finely chopped toasted almonds or pecans to your biscuit crust mixture for an extra layer of flavor and crunch.
- Different Fruit: Feel free to swap out the mixed berries for just cherries (classic Black Forest!), raspberries, or even a combination of peaches and blueberries in the swirl.
Nutritional Information
Approximate values per serving (based on 8 servings):
- Calories: 680 kcal
- Protein: 9g
- Carbohydrates: 65g
- Fat: 45g
Please note: These values are approximate and may vary depending on the specific brands and exact amounts of ingredients used.
Health Benefits
While this is a decadent dessert, it still offers some wonderful benefits from its star ingredients.
Berries, like those used in our delicious swirl, are packed with antioxidants. These powerful compounds help fight free radicals in your body, supporting overall cellular health. They are also a great source of Vitamin C, which is crucial for immune function and healthy skin, and fiber, which aids in digestion.
Cocoa powder, the heart of our Black Forest flavor, is another antioxidant powerhouse. It contains flavonoids that have been linked to heart health benefits, including improved blood flow and reduced blood pressure. Choosing unsweetened cocoa powder maximizes these benefits.
Cream cheese provides a source of calcium, which is essential for strong bones and teeth. It also offers some protein, contributing to satiety and muscle maintenance. While it’s a higher fat ingredient, full-fat dairy can provide important fat-soluble vitamins.
Enjoying a treat like this can also contribute to mental well-being! The simple act of creating and sharing a delicious dessert can be a wonderful stress reliever and a source of joy. Balance is key, and an occasional indulgence can be part of a healthy lifestyle.
Serving Suggestions
- Serve slices chilled and fresh, allowing the creamy texture to shine on its own.
- Pair with a hot cup of coffee or a glass of dessert wine for a sophisticated after-dinner treat.
- For a truly indulgent experience, a small scoop of vanilla bean ice cream on the side is divine.
- This cheesecake makes a fantastic centerpiece for any celebration, from birthdays to holiday gatherings.
Storage Tips
Store any leftover No Bake Black Forest Berry Cheesecake in an airtight container in the refrigerator for up to 3-4 days. It is best enjoyed fresh, but it holds up well. Freezing is generally not recommended for no-bake cheesecakes as the texture can become watery and grainy upon thawing. If you must freeze, wrap individual slices tightly in plastic wrap and then foil; thaw in the refrigerator overnight. Reheating is not necessary as this is a chilled dessert.
Conclusion
There you have it! A stunning, incredibly delicious No Bake Black Forest Berry Cheesecake that’s surprisingly simple to create. The combination of the crumbly crust, the smooth, rich cheesecake, and the delightful swirls of chocolate and berries is truly irresistible. It’s a dessert that tastes complex but comes together with ease, making it perfect for any occasion.
We encourage you to give this recipe a try. You’ll be amazed at how quickly you can whip up such an impressive treat. It’s a fantastic way to satisfy your sweet tooth without ever turning on the oven, leaving your kitchen cool and your taste buds happy.
So go ahead, gather your ingredients, and create this creamy delight. Share it with your family and friends; they’ll thank you for bringing such a joyous dessert into their lives. Happy no-baking!


