
Introduction
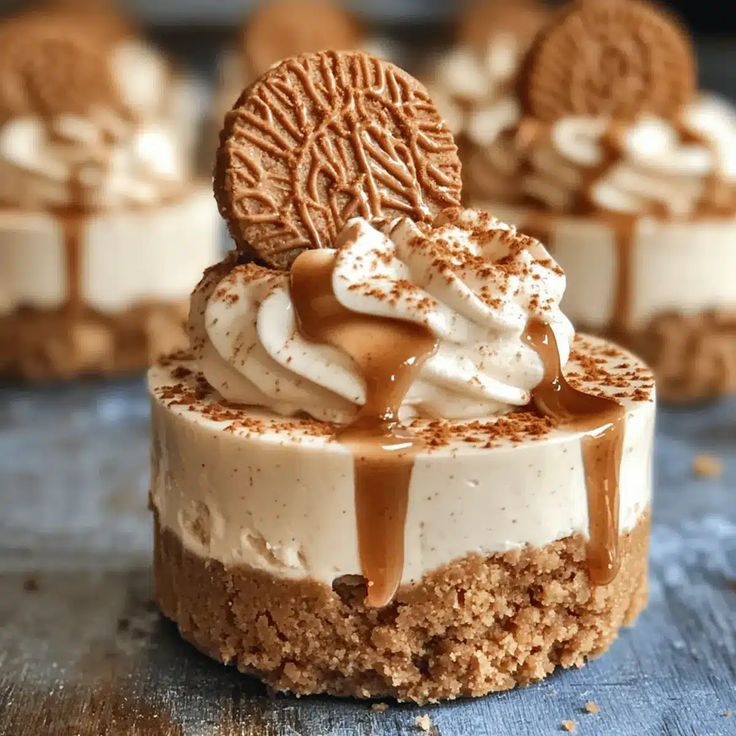
Get ready to discover a dessert that’s pure magic: Mini Biscoff Cheesecakes! These delightful treats are a dream come true for anyone who loves the warm, spiced caramel notes of Biscoff cookies. Each bite offers a crunchy cookie crust, a creamy, luscious Biscoff-infused filling, and a dreamy drizzle of more Biscoff spread on top. They’re individual portions of pure joy, perfect for sharing or savoring all by yourself.
The best part? These mini cheesecakes are incredibly simple to make and require absolutely no baking! That’s right, no oven needed. With just a few common ingredients and a bit of chill time, you can whip up a batch of these irresistible delights. They’re quick enough for a weeknight craving but elegant enough for any special occasion.
So, if you’re ready to impress your taste buds and treat your loved ones, let’s dive into this recipe. You’ll be amazed at how easy it is to create such a show-stopping dessert. Prepare to fall in love with the ultimate no-bake indulgence!
Cooking Time & Prep Time
- Prep Time: 30 minutes
- Chill Time: 4 hours (minimum)
- Total Time: 4 hours 30 minutes
Small tip: The chill time is crucial for the cheesecakes to set properly, so don’t rush it! Overnight chilling is even better for the best texture.
Ingredients
This recipe makes 12 mini cheesecakes.
For the Biscoff Crust
- 150g (about 25-30) Biscoff Lotus biscuits (speculoos cookies)
- 60g (1/4 cup) unsalted butter, melted
For the Creamy Biscoff Filling
- 250g (8 oz) full-fat cream cheese, softened
- 100g (1/2 cup) Biscoff Lotus spread (smooth), at room temperature
- 50g (1/4 cup) powdered sugar (icing sugar), sifted
- 1 teaspoon pure vanilla extract
- 150ml (2/3 cup) heavy cream (double cream), very cold
For the Topping & Garnish
- 50g (1/4 cup) Biscoff Lotus spread (smooth), melted slightly
- 6-8 extra Biscoff Lotus biscuits, crushed (optional, for garnish)
Step-by-Step Instructions
-
Step 1: Prepare Your Muffin Tin
Line a 12-cup standard muffin tin with paper liners. This will make it super easy to remove your mini cheesecakes later. Set the lined tin aside for now.
Small tip: Use good quality paper liners or even silicone liners for easy release.
-
Step 2: Make the Biscoff Crust
Place the Biscoff biscuits into a food processor and pulse until they form fine crumbs. If you don’t have a food processor, you can put them in a zip-top bag and crush them with a rolling pin. Transfer the crumbs to a medium bowl.
Small tip: Ensure crumbs are fine so the crust holds together well.
-
Step 3: Combine Crust Ingredients
Pour the melted butter over the Biscoff crumbs. Mix well with a spoon or your hands until all the crumbs are moistened and resemble wet sand. This butter is what will bind your crust together.
Small tip: Don’t skip mixing thoroughly; every crumb needs to be coated.
-
Step 4: Press the Crust into Liners
Divide the Biscoff crust mixture evenly among the 12 prepared muffin liners. Use the back of a spoon or your fingertips to firmly press the mixture down into the bottom of each liner. Pressing firmly helps create a sturdy base.
Small tip: Use a small flat-bottomed glass or a tart tamper to get a really compact and even crust.
-
Step 5: Chill the Crust
Place the muffin tin with the pressed crusts into the refrigerator while you prepare the filling. Chilling helps the crust firm up and prevents it from crumbling when you add the filling.
Small tip: Even 10-15 minutes in the fridge makes a difference.
-
Step 6: Prepare the Cream Cheese Mixture
In a large mixing bowl, beat the softened cream cheese with an electric mixer until it’s smooth and creamy. Add the Biscoff spread, sifted powdered sugar, and vanilla extract. Beat again until everything is well combined and lump-free.
Small tip: Make sure your cream cheese and Biscoff spread are at room temperature to prevent lumps and ensure a smooth filling.
-
Step 7: Whip the Heavy Cream
In a separate, clean bowl, pour the very cold heavy cream. Beat with an electric mixer on medium-high speed until stiff peaks form. Be careful not to overbeat, or it might curdle.
Small tip: A cold bowl and cold cream help the cream whip faster and achieve better volume.
-
Step 8: Fold in the Whipped Cream
Gently fold the whipped cream into the Biscoff cream cheese mixture. Use a spatula and a light hand, folding until just combined. You want to keep as much air in the mixture as possible for a light, fluffy filling.
Small tip: Overmixing here will deflate the cream, making your filling less airy.
-
Step 9: Fill the Cheesecake Cups
Spoon the creamy Biscoff filling evenly over the chilled crusts in each muffin liner. Smooth the tops with the back of a spoon or an offset spatula. Fill them almost to the top.
Small tip: For extra neatness, you can pipe the filling using a piping bag with a large round tip.
-
Step 10: Chill Until Set
Place the muffin tin back into the refrigerator and chill for at least 4 hours, or preferably overnight. This is essential for the cheesecakes to firm up and hold their shape.
Small tip: Resist the urge to peek! Patience will be rewarded with perfectly set cheesecakes.
-
Step 11: Add the Biscoff Topping
Once the cheesecakes are fully set, gently melt the remaining 50g of Biscoff spread. You can do this in the microwave in 15-second intervals, stirring in between, or in a small saucepan over low heat. Drizzle the melted Biscoff spread over the top of each mini cheesecake.
Small tip: If the spread is too thick, add a tiny bit of neutral oil (like canola or vegetable oil) to thin it slightly for easier drizzling.
-
Step 12: Garnish and Serve
If desired, sprinkle some extra crushed Biscoff biscuits over the top of each cheesecake for added texture and visual appeal. Carefully remove the cheesecakes from the muffin tin by lifting the paper liners. Serve immediately and enjoy your irresistible creation!
Small tip: You can peel off the paper liners just before serving for a cleaner look.
Tips & Variations
- Gluten-Free Option: Simply swap out the regular Biscoff Lotus biscuits for gluten-free speculoos cookies (many brands now offer these!). Ensure all other ingredients are certified gluten-free.
- Vegan Option: This recipe can be made vegan by using dairy-free cream cheese, a plant-based Biscoff spread (check ingredients, most Biscoff spreads are naturally vegan), vegan butter, and a plant-based whipping cream (like coconut cream or a specific vegan whipping cream).
- Fruity Twist: While not a vegetable or protein addition, you can add a layer of fresh berries (raspberries or sliced strawberries) on top of the Biscoff drizzle for a fresh, tart contrast. A sprinkle of chopped nuts like pecans or walnuts would also add healthy fats and protein.
- Spiced Version: For an extra warming kick, add 1/4 teaspoon of ground ginger or a pinch of cardamom to the cream cheese filling along with the vanilla. This will enhance the existing spice notes of the Biscoff.
- Chocolate Lover’s Delight: Drizzle melted dark chocolate over the Biscoff topping, or mix 1 tablespoon of cocoa powder into the cream cheese filling for a chocolate-Biscoff fusion.
Nutritional Information
Approximate values per serving (based on 12 servings):
- Calories: 350 kcal
- Protein: 4g
- Carbohydrates: 30g
- Fat: 24g
Note: These values are approximate and may vary depending on the specific brands and exact quantities of ingredients used.
Health Benefits
While these mini cheesecakes are certainly a treat, they do offer a few surprising elements that contribute to a balanced diet, especially when enjoyed mindfully.
The cream cheese provides a source of calcium, which is essential for strong bones and teeth. It also contains protein, which is vital for muscle repair and overall body function. Choosing full-fat cream cheese also means you’re getting some fat-soluble vitamins.
Biscoff cookies and spread, while a source of sugar, are made with spices like cinnamon. Cinnamon is known for its antioxidant properties and has been studied for its potential to help regulate blood sugar levels, offering a tiny benefit in a sweet package.
Making desserts at home, like these mini cheesecakes, gives you full control over the ingredients. You can choose high-quality butter and cream, avoiding artificial additives often found in store-bought options. This means you know exactly what you’re eating.
Ultimately, the biggest health benefit here is the joy and satisfaction of indulging in a delicious homemade treat. Enjoying food you love in moderation is crucial for mental well-being and a positive relationship with eating. These mini cheesecakes are perfect for a mindful moment of delight.
Serving Suggestions
- Dessert Platter Star: Serve these mini cheesecakes as part of a varied dessert platter, alongside fresh fruit, small cookies, or chocolate truffles.
- Coffee Break Companion: They are absolutely perfect with a hot cup of coffee, espresso, or a spiced chai latte. The flavors complement each other beautifully.
- Party Perfection: Their individual size makes them ideal for parties, potlucks, or picnics. No need for plates and forks, just grab and enjoy!
- Brunch Treat: Surprise your brunch guests by offering these as a sweet treat alongside savory dishes. They add a touch of elegance to any spread.
Storage Tips
These Mini Biscoff Cheesecakes keep wonderfully in the refrigerator. Store them in an airtight container for up to 3-4 days. For longer storage, you can freeze them! Place the cheesecakes (without the topping drizzle) on a baking sheet until frozen solid, then transfer them to an airtight freezer-safe container or bag. They will keep for up to 1 month. Thaw them in the refrigerator overnight before adding the melted Biscoff topping and serving. There’s no need to reheat them; they are best enjoyed chilled.
Conclusion
There you have it – the recipe for truly irresistible Mini Biscoff Cheesecakes! These little wonders are a testament to how easy and rewarding no-bake desserts can be. With their crunchy Biscoff crust, velvety smooth Biscoff filling, and extra drizzle on top, they truly offer a delightful experience in every bite. They are the perfect blend of convenience and gourmet taste.
Don’t wait another moment to bring this incredible dessert into your kitchen. Imagine the smiles on your family’s faces, or the impressed murmurs from your friends when you serve these. They are simple enough for a beginner but impressive enough for any gathering. Give this recipe a try; you won’t regret it!
So go ahead, gather your ingredients, follow these easy steps, and create some magic. These mini cheesecakes are sure to become a cherished favorite, perfect for sharing joy, one delicious bite at a time. Happy baking (or rather, no-baking)!


