
Introduction
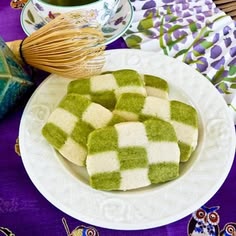
Get ready to bake something truly magical! Today, we’re diving into the delightful world of Matcha Checkerboard Cookies. Imagine a cookie that’s not just incredibly delicious but also a feast for the eyes. These beauties feature a stunning two-tone pattern, combining the earthy, vibrant notes of matcha green tea with classic, sweet vanilla. Each bite offers a delicate crunch and a wonderfully balanced flavor that’s simply irresistible.
You might think such an intricate cookie would be tricky to make, but I promise you, it’s much easier than it looks! The process involves making two simple doughs, chilling them, and then assembling them into a fun checkerboard design. It’s a fantastic project for a relaxed afternoon, and the steps are straightforward, making it perfect for bakers of all skill levels. Plus, the rewarding outcome is well worth every moment spent in the kitchen.
So, why not treat yourself and your loved ones to these unique and charming cookies? They are perfect for gifting, impressing guests, or simply enjoying with a cup of tea or coffee. Let’s gather our ingredients and get ready to create some edible art. You’ll be so proud of the beautiful and tasty results!
Cooking Time & Prep Time
- Prep Time: 45 minutes (active) + 2 hours (chilling)
- Cooking Time: 12-15 minutes per batch
- Total Time: Approximately 3 hours (including chilling)
Small tip: The chilling times are essential for achieving crisp, well-defined cookies. Don’t rush these steps!
Ingredients
This recipe makes approximately 24-30 cookies.
For the Dough
- 2 ½ cups (300g) all-purpose flour
- 1 teaspoon baking powder
- ¼ teaspoon salt
- 1 cup (226g) unsalted butter, softened
- ¾ cup (150g) granulated sugar
- 1 large egg
- 1 teaspoon vanilla extract
For the Matcha Flavor
- 1 ½ tablespoons high-quality matcha powder (culinary grade is fine)
Step-by-Step Instructions
-
Step 1: Whisk Dry Ingredients
In a medium bowl, whisk together the all-purpose flour, baking powder, and salt. Set this mixture aside for now. This ensures all the dry ingredients are evenly distributed before adding them to the wet.
Small tip: Sifting the flour can help prevent lumps and make the dough smoother.
-
Step 2: Cream Butter and Sugar
In a large bowl, using an electric mixer, cream together the softened unsalted butter and granulated sugar until the mixture is light and fluffy. This usually takes about 2-3 minutes. Make sure to scrape down the sides of the bowl often.
Small tip: Softened butter should yield slightly to pressure but not be melted or greasy.
-
Step 3: Add Egg and Vanilla
Beat in the large egg and vanilla extract into the creamed butter and sugar mixture. Continue mixing until everything is well combined and smooth. The mixture might look a little curdled at first, but keep mixing until it comes together.
-
Step 4: Combine Wet and Dry Mixtures
Gradually add the dry ingredient mixture to the wet mixture, mixing on low speed until just combined. Be careful not to overmix the dough, as this can make the cookies tough. Stop mixing as soon as no dry streaks of flour remain.
Small tip: Overmixing develops gluten, which is great for bread, but not for tender cookies.
-
Step 5: Divide and Flavor the Dough
Divide the dough in half. Leave one half as is for the vanilla portion. To the other half, add the matcha powder and mix until the matcha is fully incorporated and the dough is uniformly green. You can do this by hand or with the mixer on low speed.
Small tip: Use a spatula to gently fold in the matcha for best results, ensuring no green streaks.
-
Step 6: Chill the Doughs
Shape each dough half into a flat rectangle, wrap them separately in plastic wrap, and refrigerate for at least 1 hour. Chilling makes the dough easier to handle and prevents the cookies from spreading too much during baking.
Small tip: Flattening the dough into a rectangle now will make rolling it out later much simpler.
-
Step 7: Roll Out the Doughs
On a lightly floured surface, roll out each chilled dough rectangle to about ⅛-inch thickness. Aim for two rectangles of roughly the same size, approximately 8×6 inches. Trim the edges to make them neat and even.
Small tip: Use a ruler to help achieve precise, even rectangles, which will make assembly easier.
-
Step 8: Cut Dough Strips
Cut each rolled-out dough rectangle into evenly sized strips, about 1-inch wide. You should get about 6-8 strips from each color. Neatly stack the strips to prepare for assembly.
Small tip: A pizza cutter or a sharp knife works best for clean cuts.
-
Step 9: Assemble the Checkerboard Logs
To assemble, take one strip of vanilla dough and one strip of matcha dough. Lightly brush one side of a vanilla strip with water (this acts as a glue) and press a matcha strip against it. Then, take another vanilla strip, brush with water, and press it against the matcha strip. You’ll create a layered “log” with alternating colors. Repeat, but for the next layer, start with matcha, then vanilla, then matcha, to create the checkerboard pattern. Gently press the layers together to seal.
Small tip: Don’t use too much water; just a tiny dab to help the strips adhere.
-
Step 10: Shape and Chill Again
Carefully press and shape the assembled dough log into a neat, square prism. You can gently roll it on a flat surface or press it with a ruler to achieve sharp edges. Wrap the finished log tightly in plastic wrap and chill for at least 1 hour, or until very firm. This second chill is crucial for clean slices.
Small tip: For perfectly square cookies, you can gently press the log into a square-shaped container before wrapping and chilling.
-
Step 11: Slice and Prepare for Baking
Preheat your oven to 350°F (175°C). Line baking sheets with parchment paper. Once the dough log is firm, unwrap it and slice it into ¼-inch thick cookies. Place the sliced cookies about 1 inch apart on the prepared baking sheets.
Small tip: Use a sharp, thin knife for clean cuts. If the dough crumbles, it needs to chill longer.
-
Step 12: Bake and Cool
Bake the cookies for 12-15 minutes, or until the edges are lightly golden. The matcha cookies might not show much browning, so watch the vanilla sections. Let the cookies cool on the baking sheets for a few minutes before transferring them to a wire rack to cool completely. Enjoy your beautiful Matcha Checkerboard Cookies!
Small tip: Cookies will be soft when hot but firm up as they cool.
Tips & Variations
- Gluten-Free Option: Simply substitute the all-purpose flour with your favorite 1:1 gluten-free baking flour blend. Ensure your blend contains xanthan gum for best texture.
- Vegan or Vegetarian Option: For a vegan version, replace the unsalted butter with a high-quality vegan butter substitute, and use a “flax egg” (1 tablespoon ground flaxseed mixed with 3 tablespoons water, let sit for 5 minutes) instead of the chicken egg.
- Added Protein/Nutty Flavor: Replace ¼ cup of the all-purpose flour with almond flour for a slightly nuttier flavor and a boost of protein. You could also finely chop some pistachios and gently fold them into the matcha dough for added texture and color.
- Spicy Twist: For a subtle warmth, add a tiny pinch (⅛ teaspoon) of ground ginger or cardamom to the matcha dough along with the matcha powder. This complements the earthy notes beautifully.
- Chocolate Checkerboard: Instead of matcha, use 2-3 tablespoons of unsweetened cocoa powder for a classic chocolate and vanilla checkerboard. Adjust to your desired chocolate intensity.
Nutritional Information
Approximate values per serving (based on 28 servings):
- Calories: 120 kcal
- Protein: 1.5g
- Carbohydrates: 15g
- Fat: 6g
Note: These values are approximate and may vary depending on the specific brands and quantities of ingredients used.
Health Benefits
These delightful cookies offer more than just a treat for your taste buds, thanks primarily to the star ingredient, matcha!
Matcha green tea is a powerhouse of antioxidants, especially catechins like EGCG. These compounds help combat free radicals in the body, which can reduce cellular damage and support overall health. Drinking or eating matcha is a great way to boost your antioxidant intake.
Beyond antioxidants, matcha contains L-theanine, an amino acid unique to tea. L-theanine promotes a state of calm alertness, helping to reduce stress and improve focus without the jitters often associated with coffee. It can contribute to a more balanced mood.
While cookies are a treat, the butter provides fat-soluble vitamins like A, D, E, and K2, which are important for bone health, vision, and immune function. Eggs contribute high-quality protein and essential vitamins like B12 and D.
Enjoying these cookies in moderation allows you to savor the unique flavors and benefit from the wholesome properties of matcha, making them a more mindful indulgence.
Serving Suggestions
- Serve these beautiful cookies alongside a warm cup of traditional green tea or a fragrant herbal infusion.
- They make a delightful accompaniment to your morning coffee or as an afternoon pick-me-up.
- Arrange them on a platter for a special occasion, holiday gathering, or as a thoughtful homemade gift for friends and family.
- Crumble a few over a scoop of vanilla ice cream for a unique dessert experience.
Storage Tips
Store your baked Matcha Checkerboard Cookies in an airtight container at room temperature for up to 5-7 days. If you want to prepare ahead, the unbaked dough logs can be wrapped tightly in plastic wrap and stored in the refrigerator for up to 3 days, or frozen for up to 1 month. If freezing, thaw the log slightly in the fridge before slicing and baking. Baked cookies can also be frozen in an airtight container for up to 2 months; simply thaw at room temperature before enjoying. Reheating is not typically necessary for these cookies.
Conclusion
There you have it – a recipe for creating truly stunning and delicious Matcha Checkerboard Cookies! These cookies are a celebration of flavor and artistry, blending the vibrant, earthy notes of matcha with the comforting sweetness of vanilla in a visually captivating design. They are so much fun to make, and the process, while requiring a little patience for chilling, is incredibly rewarding.
Don’t be shy about trying this recipe. The steps are broken down to be simple and enjoyable, and the result


