
Introduction
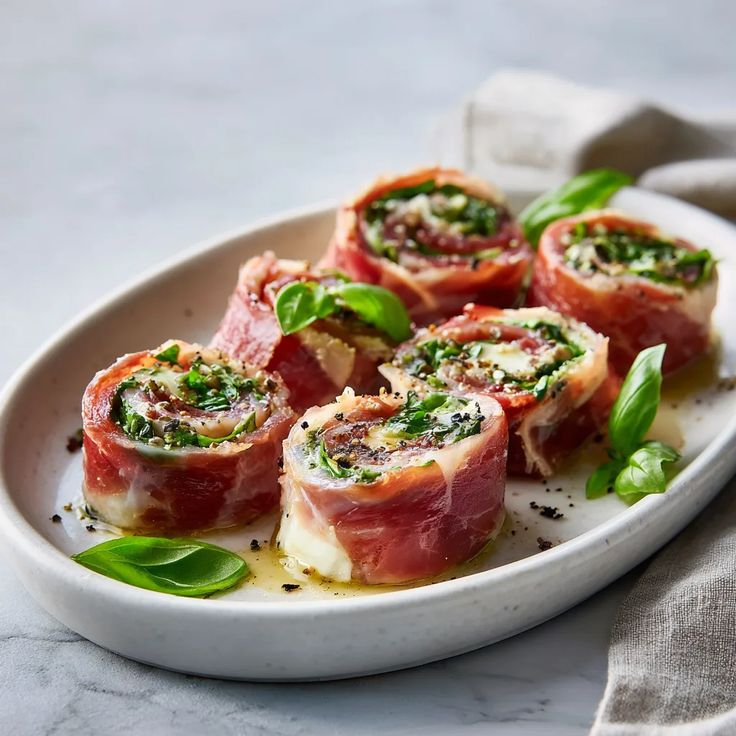
Get ready for a culinary adventure that will surprise and delight your taste buds! Today, we’re diving into the wonderful world of Italian Charcuterie Sushi Rolls. Imagine all the savory goodness of a classic Italian charcuterie board, but beautifully rolled up into bite-sized “sushi” pieces. It’s a vibrant, flavorful, and incredibly fun dish that brings a sophisticated twist to any gathering.
This recipe is a true game-changer because it’s completely no-cook and comes together in a flash. Forget about ovens or stovetops! You’ll be layering delicious Italian deli meats, creamy cheese, fresh greens, and tangy sun-dried tomatoes, then rolling them up like traditional sushi. It’s easy enough for a weeknight treat but elegant enough for a special occasion. Plus, the presentation is absolutely stunning, making it a guaranteed conversation starter.
So, if you’re looking for an innovative appetizer, a light lunch, or a show-stopping party snack that requires minimal effort but delivers maximum flavor, you’ve found it! Gather your ingredients and let’s roll into making these irresistible Italian Charcuterie Sushi Rolls. You’re going to love how simple and satisfying this recipe is!
Cooking Time & Prep Time
- Prep Time: 30 minutes
- Cooking Time: 0 minutes
- Total Time: 30 minutes
Small tip: To make prep even quicker, lay out all your ingredients on the counter before you start. This “mise en place” will help you assemble the rolls smoothly!
Ingredients
This recipe makes approximately 4-6 servings (about 20-24 rolls).
- For the Rolls:
- 8 ounces thinly sliced Prosciutto (about 16-20 slices)
- 8 ounces thinly sliced Genoa Salami (about 16-20 slices, or a mix of salami varieties like Soppressata)
- 6 ounces thinly sliced Provolone cheese (about 12-15 slices)
- For the Creamy Filling:
- 8 ounces cream cheese, softened
- 1/4 cup finely chopped sun-dried tomatoes (oil-packed, drained)
- 2 tablespoons finely chopped fresh basil
- 1 tablespoon finely chopped fresh chives
- 1/2 teaspoon garlic powder
- 1/4 teaspoon black pepper
- Pinch of salt (optional, as meats are salty)
- For the Freshness & Garnish:
- 2 cups fresh arugula or baby spinach
- 1/4 cup pitted Kalamata olives, thinly sliced
- 2 tablespoons balsamic glaze, for drizzling (optional)
Step-by-Step Instructions
-
Step 1: Prepare the Creamy Filling
In a medium bowl, combine the softened cream cheese, finely chopped sun-dried tomatoes, fresh basil, fresh chives, garlic powder, and black pepper. Mix everything together until it’s well combined and smooth. Taste and add a tiny pinch of salt if you think it needs it, but remember the meats will be salty.
Small tip: Make sure your cream cheese is truly softened to room temperature. This makes it much easier to mix and spread evenly.
-
Step 2: Lay Out Your “Nori” Base
On a clean cutting board or a large piece of parchment paper, arrange your sliced prosciutto or salami to create a rectangle. You want to overlap the slices slightly, forming a cohesive “sheet” that’s roughly 8×10 inches. This will be the outer layer of your sushi roll.
Small tip: Use parchment paper for easier rolling and cleanup. You can even use a sushi rolling mat if you have one, covered with plastic wrap.
-
Step 3: Add the Provolone Layer
Carefully place the provolone cheese slices over the prosciutto/salami layer. Overlap them slightly to create another even sheet. Make sure the cheese doesn’t extend beyond the meat base, leaving a small border.
Small tip: If your cheese slices are too wide, trim them slightly to fit neatly within your meat base.
-
Step 4: Spread the Cream Cheese Mixture
Evenly spread a thin layer of your prepared cream cheese filling over the provolone cheese. Leave about a 1-inch border along one of the longer edges. This will help seal the roll later.
Small tip: Use an offset spatula or the back of a spoon for the smoothest spread. Don’t go too thick with the cream cheese, a thin layer is perfect.
-
Step 5: Add Freshness and Flavor
Sprinkle the fresh arugula (or baby spinach) over the cream cheese layer. Then, scatter the thinly sliced Kalamata olives on top. These layers add wonderful texture and a burst of fresh flavor to your rolls.
Small tip: Don’t overfill! A moderate amount of greens and olives will ensure your roll is easy to manage and slice.
-
Step 6: Carefully Roll It Up
Starting from the long edge closest to you (the one without the 1-inch cream cheese border), begin to tightly roll the layers away from you. Use the parchment paper to help you lift and tuck as you go. Roll it as tightly as you can without tearing the meat.
Small tip: Go slow and steady! The tighter you roll, the more compact and easy to slice your “sushi” will be.
-
Step 7: Chill and Firm Up
Once rolled, wrap the log tightly in plastic wrap. Place it in the refrigerator for at least 30 minutes to an hour. This chilling time is crucial as it helps the roll firm up, making it much easier to slice cleanly.
Small tip: You can prepare the roll a few hours ahead of time and keep it chilled until you’re ready to serve.
-
Step 8: Slice and Serve
Remove the chilled log from the refrigerator and unwrap it. Using a very sharp knife, slice the roll into 1-inch thick “sushi” pieces. Arrange them beautifully on a serving platter. Drizzle with balsamic glaze just before serving, if desired.
Small tip: For the cleanest cuts, wipe your knife with a damp cloth between each slice.
Tips & Variations
- Gluten-Free Option: This recipe is naturally gluten-free! Just be sure to double-check the labels on your deli meats and cream cheese to ensure no hidden gluten-containing ingredients.
- Vegan or Vegetarian Option: For a plant-based version, swap the deli meats for thinly sliced grilled eggplant or zucchini planks, or use plant-based “deli” slices. Replace provolone with vegan cheese slices and cream cheese with a vegan cream cheese alternative. Add roasted red peppers or marinated artichoke hearts for extra flavor.
- Add More Veggies or Protein: Boost the nutrition by adding thinly sliced bell peppers (red or yellow), finely chopped spinach, or even a layer of finely shredded carrots. For extra protein, consider adding a thin layer of cooked, shredded chicken breast or hard-boiled egg slices.
- Spicy Version: If you love a kick, mix a pinch of red pepper flakes into the cream cheese mixture. You can also use a spicy salami or add a thin layer of hot giardiniera (Italian pickled vegetables) for a zesty, fiery punch.
- Flavor Twists: Experiment with different cheeses like fresh mozzarella, goat cheese, or even a sharp cheddar. Try adding other herbs like fresh oregano or thyme to the cream cheese. A layer of pesto or tapenade can also add a delightful new dimension!
Nutritional Information
Approximate values per serving (based on 4 servings):
- Calories: 295-320 kcal
- Protein: 18-22 g
- Carbohydrates: 6-8 g
- Fat: 22-25 g
Please note that these values are approximate and may vary depending on the specific brands and exact quantities of ingredients used.
Health Benefits
- Arugula: This peppery green is a powerhouse of nutrients. It’s rich in vitamins K, A, and C, which are essential for bone health, vision, and immune function. Arugula also contains beneficial antioxidants that help protect your cells from damage.
- Sun-Dried Tomatoes: These concentrated flavor bombs are packed with lycopene, a powerful antioxidant known for its potential heart health benefits. They also provide vitamins C and K, and a good amount of fiber.
- Olives: Kalamata olives are a great source of healthy monounsaturated fats, which are good for heart health. They also contain antioxidants and anti-inflammatory compounds, contributing to overall wellness.
- Protein from Meats and Cheese: Prosciutto, salami, and provolone cheese provide a significant amount of protein, which is vital for building and repairing tissues, making enzymes and hormones, and supporting muscle growth. Protein also helps you feel full and satisfied.
- Fresh Herbs: Basil and chives aren’t just for flavor; they also offer a host of health benefits. Basil is known for its anti-inflammatory and antioxidant properties, while chives provide vitamins K and C, and support bone health.
Serving Suggestions
- Perfect Appetizer: These rolls are fantastic as a starter for any meal or as a sophisticated snack for parties and gatherings. Arrange them beautifully on a platter with extra olives or cherry tomatoes.
- Light Lunch: Pair a few of these charcuterie sushi rolls with a simple side salad dressed with vinaigrette, or some crusty Italian bread, for a satisfying and light lunch.
- Brunch Delight: Serve them alongside fresh fruit, a frittata, or mini quiches for an elegant brunch spread that’s sure to impress.
- Meal Prep Idea: You can prepare the cream cheese filling a day or two in advance and store it in the fridge. Assemble the rolls the morning of your event or even the night before, keeping them tightly wrapped and chilled until serving time.
Storage Tips: Leftover Italian Charcuterie Sushi Rolls should be stored in an airtight container in the refrigerator. They will keep well for 2-3 days. Freezing is not recommended, as the textures of the meat, cheese, and cream cheese will change significantly upon thawing. These rolls are best served chilled or at cool room temperature, so no reheating is necessary!
Conclusion
And there you have it – a truly unique, incredibly delicious, and surprisingly simple dish: Italian Charcuterie Sushi Rolls! This recipe is a testament to how creative you can get with classic flavors, transforming a traditional charcuterie board into a fun, bite-sized experience. It’s vibrant, packed with savory goodness, and a feast for both the eyes and the palate.
Whether you’re hosting a dinner party, looking for a quick and impressive appetizer, or simply want to try something new for lunch, these rolls are an absolute winner. The combination of salty cured meats, creamy herbed cheese, fresh greens, and tangy sun-dried tomatoes creates a flavor profile that is both comforting and exciting.
So go ahead, give this recipe a try! You’ll be amazed at how easy it is to make and how much everyone will love it. Share these delightful rolls with your family and friends, and watch their faces light up with every delicious bite. Happy rolling!


