
Introduction
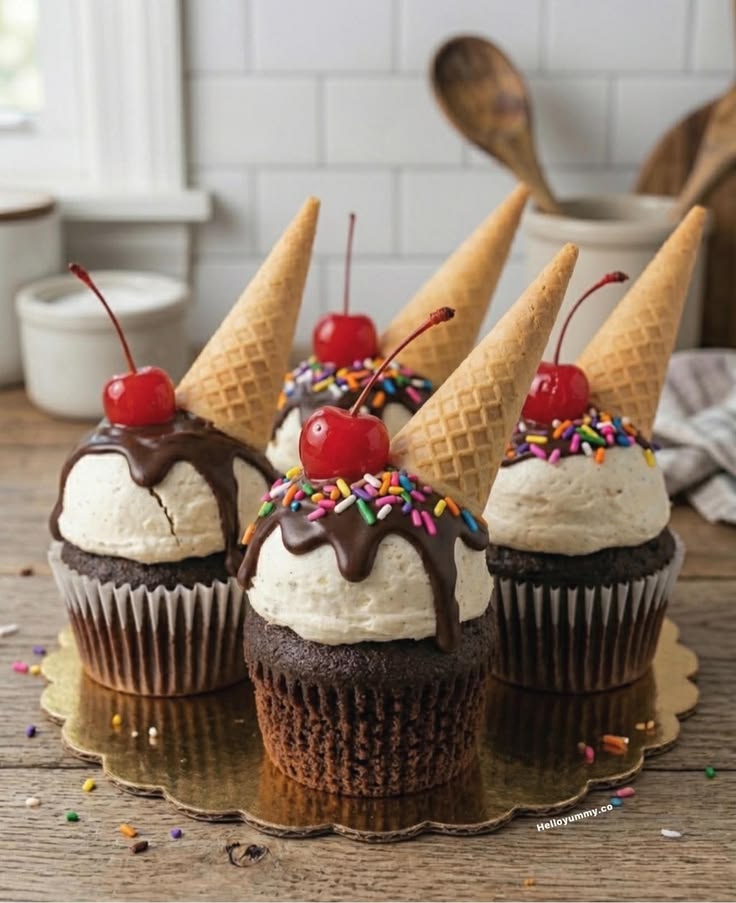
Get ready for a treat that’s as delightful to look at as it is to eat! Imagine a classic cupcake, but instead of a paper liner, it’s baked right inside a crispy ice cream cone. Then, it’s topped with a swirl of colorful frosting, looking exactly like a scoop of your favorite ice cream. These Ice Cream Cone Cupcakes are pure joy, combining the best of two beloved desserts into one whimsical package.
This recipe is surprisingly simple to make, perfect for bakers of all skill levels. You’ll use your favorite cupcake batter and transform it into something truly special with minimal extra effort. It’s a fantastic way to impress guests, delight children, or just bring a smile to your own face. Plus, there are no messy wrappers to deal with – just eat the whole delicious thing!
So, gather your ingredients and get ready for some fun in the kitchen. These Ice Cream Cone Cupcakes are perfect for parties, celebrations, or just a sweet afternoon indulgence. Let’s make some magic together!
Cooking Time & Prep Time
- Prep Time: 30 minutes
- Cooking Time: 20 minutes
- Total Time: 50 minutes
Small tip: To make your baking process smooth, measure out all your ingredients before you start mixing. This is called “mise en place” and it saves a lot of time and stress!
Ingredients
This recipe makes 12 delicious Ice Cream Cone Cupcakes.
For the Cupcakes:
- 12 flat-bottom ice cream cones (sugar cones or wafer cones work best)
- 1 ½ cups all-purpose flour
- 1 teaspoon baking powder
- ½ teaspoon baking soda
- ¼ teaspoon salt
- ½ cup (1 stick) unsalted butter, softened
- 1 cup granulated sugar
- 2 large eggs, at room temperature
- 1 teaspoon vanilla extract
- ¾ cup buttermilk (or ¾ cup milk + 1 tablespoon lemon juice/vinegar, let sit for 5 minutes)
For the Buttercream Frosting:
- 1 cup (2 sticks) unsalted butter, softened
- 4 cups powdered sugar, sifted
- 2-3 tablespoons milk or heavy cream
- 1 teaspoon vanilla extract
- Food coloring (optional, gel colors work best for vibrant shades)
For Decoration:
- Rainbow sprinkles
- Maraschino cherries (with stems, optional)
Step-by-Step Instructions
-
Prepare Your Workspace and Oven
Preheat your oven to 350°F (175°C). Line a 12-cup muffin tin with aluminum foil, creating a small cup in each opening. This will help hold the ice cream cones upright and stable during baking. Place one flat-bottom ice cream cone into each foil cup.
Small tip: Make sure your cones are flat-bottomed so they stand up straight. If they aren’t perfectly stable, you can crumple a bit more foil around the base to secure them.
-
Combine Dry Ingredients
In a medium bowl, whisk together the flour, baking powder, baking soda, and salt. Make sure there are no lumps and the ingredients are evenly distributed. Set this bowl aside for a moment.
-
Cream Wet Ingredients
In a large bowl, using an electric mixer, beat the softened butter and granulated sugar together until light and fluffy. This usually takes about 2-3 minutes. Scrape down the sides of the bowl as needed to ensure everything is well combined.
-
Add Eggs and Vanilla
Beat in the eggs one at a time, mixing well after each addition. Then, stir in the vanilla extract. The mixture should look creamy and well-emulsified at this point.
-
Alternate Wet and Dry Ingredients
Gradually add the dry ingredient mixture to the wet ingredients, alternating with the buttermilk. Start and end with the dry ingredients. Mix on low speed until just combined; be careful not to overmix, as this can make your cupcakes tough.
Small tip: Overmixing develops gluten too much, which can lead to dense cupcakes. Mix just until no streaks of flour remain.
-
Fill the Cones and Bake
Carefully spoon or pipe the cupcake batter into each prepared ice cream cone. Fill each cone about two-thirds full. Place the muffin tin with the filled cones into the preheated oven and bake for 18-22 minutes, or until a wooden skewer inserted into the center of a cupcake comes out clean.
Small tip: Filling the cones too high can cause the batter to overflow during baking. Two-thirds full is just right!
-
Cool Completely
Once baked, remove the cupcakes in their cones from the oven. Let them cool in the muffin tin for about 10 minutes before carefully transferring them to a wire rack to cool completely. They must be entirely cool before frosting.
-
Prepare the Buttercream Frosting
While the cupcakes cool, make your frosting. In a large bowl, beat the softened butter with an electric mixer until creamy, about 2 minutes. Gradually add the sifted powdered sugar, one cup at a time, mixing well after each addition. Add 2 tablespoons of milk or cream and the vanilla extract. Beat on high speed until light and fluffy. If the frosting is too thick, add more milk a teaspoon at a time until it reaches your desired consistency. If using, mix in food coloring until you achieve your desired shade.
Small tip: Sifting powdered sugar is crucial for a smooth, lump-free frosting. Gel food coloring gives brighter colors without thinning the frosting too much.
-
Frost and Decorate
Once the cupcakes are completely cool, transfer the buttercream frosting to a piping bag fitted with a large star tip (like a 1M or 2D). Pipe a generous swirl of frosting on top of each cupcake cone, making it look like a scoop of ice cream. Finish with a sprinkle of rainbow sprinkles and, if desired, a maraschino cherry on top.
Small tip: If you don’t have a piping bag, you can use a Ziploc bag with the corner snipped off, or simply spread the frosting with a knife for a rustic look.
Tips & Variations
- Gluten-Free Option: Easily make these gluten-free by swapping the all-purpose flour for a 1:1 gluten-free baking flour blend. Ensure your baking powder and baking soda are also gluten-free.
- Vegan/Vegetarian Option: For a vegan version, use a plant-based butter substitute, a flax egg (1 tbsp ground flaxseed + 3 tbsp water per egg), and plant-based milk (like almond or soy milk) for both the cupcakes and the frosting. Ensure your sprinkles are vegan-friendly.
- “Hidden Veggie” or Protein Boost: For a subtle addition, finely grate about ½ cup of zucchini or carrots into the batter (like in carrot cake) for added moisture and a tiny nutritional boost. For a protein kick, you could experiment with adding a scoop of unflavored protein powder to the frosting, adjusting liquid as needed, or using a cream cheese frosting for a slightly higher protein content.
- Spicy Version: For a fun twist, try adding a pinch of cayenne pepper (¼ teaspoon) to chocolate cupcake batter for a subtle chili-chocolate kick. You could also infuse your frosting with a tiny bit of chili powder for an adventurous flavor.
- Flavor Fun: Experiment with different cake flavors! Use chocolate cake mix or add cocoa powder for chocolate cone cupcakes. Try a lemon zest and juice in the batter for a zesty treat. For the frosting, add fruit purees, coffee extract, or a different flavored extract like almond or peppermint for endless possibilities.
Nutritional Information
Approximate values per serving (based on 12 servings):
- Calories: 420 kcal
- Protein: 4g
- Carbohydrates: 60g
- Fat: 19g
Please note that these values are approximate and may vary depending on the specific brands and quantities of ingredients used.
Health Benefits
While these Ice Cream Cone Cupcakes are certainly a treat, their basic ingredients do offer some nutritional contributions, especially when enjoyed in moderation!
- Eggs: A fantastic source of high-quality protein, essential for muscle repair and growth. They also provide important vitamins like B12, crucial for nerve function, and Vitamin D, which supports bone health.
- Milk/Buttermilk: Rich in calcium, which is vital for strong bones and teeth. It also provides Vitamin D, which helps the body absorb calcium, and potassium, important for heart health.
- Flour: Primarily provides carbohydrates, which are the body’s main source of energy. While white flour is refined, it still offers quick energy to fuel your day.
- Vanilla Extract: Beyond its delightful flavor, vanilla contains small amounts of antioxidants, which help protect your cells from damage caused by free radicals.
Remember, desserts like these are meant to be enjoyed. Focusing on whole, unprocessed foods for most of your meals allows room for delicious, joyful treats like these cupcakes!
Serving Suggestions
- Party Perfect: These are an absolute showstopper for birthday parties, picnics, potlucks, or any festive gathering. Arrange them on a platter for an instant “wow” factor!
- Sweet Ending: Serve them as a fun, individual dessert after a casual family meal or a backyard BBQ.
- Kids’ Delight: Let kids help decorate their own (after baking and cooling, of course!) for a fun activity that ends with a delicious reward.
- Gift Idea: Package a few in a clear box or bag with a ribbon for a thoughtful homemade gift.
Storage Tips
Store Ice Cream Cone Cupcakes in an airtight container at room temperature for up to 2 days, or in the refrigerator for up to 3-4 days. The cones can become slightly softer over time due to moisture from the cake, so they are best enjoyed fresh. Freezing the finished cupcakes with the cones is not recommended, as the cones can become soggy upon thawing. However, you can bake the cupcakes in their cones, let them cool completely, and then freeze them unfrosted in an airtight container for up to 1 month. Thaw at room temperature and then frost as desired.


