
Introduction
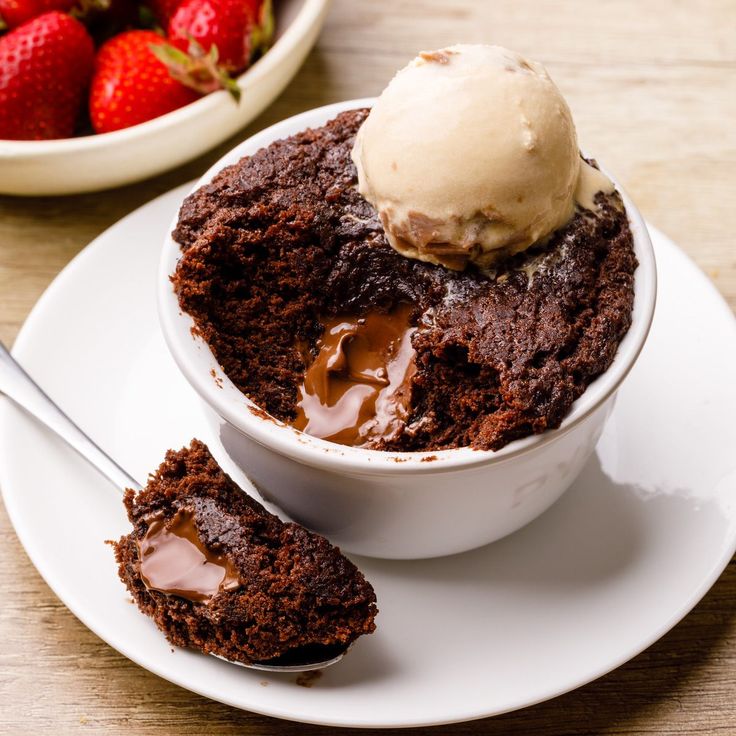
Imagine a warm, gooey, chocolate-hazelnut cake that appears almost magically in minutes. That’s exactly what our Nutella Mug Cake is all about! This delightful single-serving dessert is a little piece of heaven, boasting that irresistible creamy, nutty, and chocolatey flavor we all adore from Nutella, baked into a perfectly fluffy cake texture.
The best part? It’s incredibly easy and unbelievably fast to make. Forget preheating an oven or waiting for a full cake to bake. With just a few simple pantry staples and the power of your microwave, you can whip up this decadent treat in about 5 minutes from start to finish. It’s perfect for those sudden dessert cravings or when you need a quick pick-me-up.
So, get ready to indulge your sweet tooth without any fuss or a mountain of dishes. This Nutella Mug Cake recipe is your new go-to for instant dessert gratification. Let’s dive in and treat ourselves!
Cooking Time & Prep Time
- Prep Time: 3 minutes
- Cooking Time: 1.5 – 2 minutes
- Total Time: 4.5 – 5 minutes
Small tip: Gather all your ingredients and measuring tools before you start. This makes the process even faster and smoother!
Ingredients
This recipe makes 1 serving.
- 3 tablespoons all-purpose flour
- 3 tablespoons granulated sugar
- 1/4 teaspoon baking powder
- 1 tablespoon unsweetened cocoa powder (optional, for extra chocolatey depth)
- 3 tablespoons milk (any kind works)
- 1 tablespoon vegetable oil (or any neutral oil)
- 1/4 teaspoon vanilla extract
- 2 tablespoons Nutella (plus extra for serving, if desired)
Step-by-Step Instructions
Step 1: Prepare Your Mug
Choose a microwave-safe mug that holds at least 12-14 ounces. This ensures there’s enough space for the cake to rise without overflowing. Lightly grease the inside of the mug with a little oil or non-stick spray, though it’s often not strictly necessary.
Small tip: A wider mug can help the cake cook more evenly in the microwave.
Step 2: Combine Dry Ingredients
Add the all-purpose flour, granulated sugar, baking powder, and optional cocoa powder into your chosen mug. Use a small fork or whisk to thoroughly combine these dry ingredients. Make sure there are no lumps of baking powder or flour.
Small tip: Sifting your dry ingredients is not usually needed for a mug cake, but a good mix ensures even leavening and flavor.
Step 3: Add Wet Ingredients
Pour in the milk, vegetable oil, and vanilla extract directly into the mug with the dry ingredients. Try to pour them over the dry mix to start the combining process.
Small tip: Using room temperature milk can sometimes lead to a slightly softer cake texture, but it’s not essential for this quick recipe.
Step 4: Mix Until Just Combined
Using the same fork or a small spoon, gently mix the wet and dry ingredients together. Stir until there are no streaks of dry flour left, but be careful not to overmix. Overmixing can lead to a tough cake.
Small tip: A few small lumps are perfectly fine; don’t stress about achieving a perfectly smooth batter.
Step 5: Incorporate the Nutella
Now for the star ingredient! Add the 2 tablespoons of Nutella to the center of your cake batter. You can gently swirl it in a couple of times with your fork for a marbled effect, or leave it as a dollop in the middle for a molten Nutella core.
Small tip: For an extra gooey center, gently warm the Nutella in the microwave for 10-15 seconds before adding it to make it easier to dollop or swirl.
Step 6: Microwave Your Mug Cake
Place the mug in the microwave. Cook on high power for 1 minute and 30 seconds to 2 minutes. Cooking times can vary widely based on your microwave’s wattage.
Small tip: Start with 1 minute 30 seconds, then check. If it’s still very wet, cook in 15-second intervals until it’s set but still looks slightly moist.
Step 7: Check for Doneness
The cake is done when it looks set around the edges and slightly springy to the touch. The center might still look a little moist, which is perfect for a gooey mug cake. Be careful not to overcook, as this can make the cake dry and rubbery.
Small tip: A slightly undercooked mug cake is often more delicious and moist than an overcooked one, so err on the side of caution.
Step 8: Cool Slightly and Serve
Carefully remove the hot mug from the microwave using oven mitts. Let the mug cake cool in the mug for about 1-2 minutes. This allows it to set a bit more and prevents you from burning your mouth.
Small tip: The cake will be very hot! Allow it to cool for a moment before digging in.
Step 9: Garnish and Enjoy!
Top your warm Nutella mug cake with an extra dollop of Nutella, a sprinkle of powdered sugar, a scoop of ice cream, or some fresh berries if you like. Grab a spoon and enjoy your delicious, homemade treat right from the mug!
Small tip: A tiny pinch of sea salt sprinkled on top can really enhance the chocolate-hazelnut flavor.
Tips & Variations
- Gluten-Free Option: Easily make this cake gluten-free by substituting the all-purpose flour with an equal amount of your favorite gluten-free all-purpose flour blend. Ensure your blend contains xanthan gum, or add 1/4 teaspoon if it doesn’t.
- Vegan Option: This recipe is already egg-free! To make it fully vegan, simply use a plant-based milk (such as almond, soy, or oat milk) and ensure your Nutella is a vegan-friendly chocolate-hazelnut spread. Many brands offer delicious vegan alternatives.
- Adding Protein or Fiber: For a slightly more substantial treat, stir in 1 tablespoon of chia seeds or ground flaxseed with the dry ingredients. You could also mix in a tablespoon of your favorite unflavored or vanilla protein powder, though you might need to add an extra splash of milk to maintain the right consistency.
- Spicy Chocolate Kick: For those who love a hint of heat with their chocolate, add a tiny pinch (1/8 teaspoon or less) of cayenne pepper or chili powder to the dry ingredients. It won’t make it overtly spicy, but it will deepen the chocolate flavor with a subtle warmth.
- Flavor Boosters: Get creative! Add a few mini chocolate chips to the batter for extra chocolatey goodness. A tiny splash of coffee extract or a pinch of instant espresso powder can intensify the chocolate flavor. A dash of orange zest or peppermint extract could also create a delightful twist.
Nutritional Information
Approximate values per serving (based on 1 serving):
- Calories: 450-550 kcal
- Protein: 6-8g
- Carbohydrates: 55-65g
- Fat: 25-35g
Note: These values are approximate and can vary significantly depending on the specific brands and exact quantities of ingredients used.
Health Benefits
While this Nutella Mug Cake is undoubtedly a treat, some of its core ingredients do offer a few benefits when enjoyed in moderation:
- Hazelnuts (from Nutella): Hazelnuts are a good source of healthy monounsaturated fats, which are beneficial for heart health. They also provide dietary fiber, vitamin E (an antioxidant), B vitamins, and essential minerals like magnesium and manganese.
- Cocoa Powder: Unsweetened cocoa powder is rich in flavonoids, which are powerful antioxidants. These compounds can help reduce inflammation and may improve heart health by enhancing blood flow and lowering blood pressure. Cocoa is also known for its mood-boosting properties.
- Milk: Whether dairy or plant-based, milk provides essential nutrients. Dairy milk is an excellent source of calcium for strong bones and teeth, and it’s often fortified with Vitamin D. Plant-based milks are typically fortified with similar vitamins and minerals, offering a good alternative for those with dietary restrictions.
- Energy Boost: The carbohydrates from the flour and sugar provide a quick source of energy, which can be useful for a quick pick-me-up during a busy day.
Remember, this is a dessert meant for enjoyment. It’s about savoring the flavors and the moment!
Serving Suggestions
- Classic Toppings: A scoop of vanilla ice cream melting over the warm cake is pure bliss. Whipped cream, a dusting of powdered sugar, or a drizzle of extra Nutella are also fantastic choices.
- Fruity Freshness: Pair your rich mug cake with some fresh berries like raspberries, strawberries, or blueberries. Their slight tartness provides a wonderful contrast to the sweetness of the cake.
- Crunchy Additions: Sprinkle some chopped toasted hazelnuts, slivered almonds, or even mini chocolate chips on top for added texture and flavor.
- As a Quick Dessert: This mug cake is designed to be a perfect single-serving dessert for those moments when a craving strikes. It’s ideal for a cozy night in or a speedy treat after dinner.
- Elevated Snack: While it’s indulgent, this can serve as a satisfying and quick snack to brighten your afternoon. Think of it as your personal, delightful break.
Storage Tips
This Nutella Mug Cake is truly at its best when enjoyed immediately after baking. It’s designed for instant gratification! If you happen to have any leftovers (which is unlikely!), you can cover the mug and store it in the refrigerator for up to 1 day. However, the texture will change and become denser. We do not recommend freezing this mug cake, as it doesn’t hold up well to thawing and reheating. To reheat, simply microwave for 15-20 seconds until warm, but be aware the texture won’t be as moist as when fresh.
Conclusion
And there you have it – your very own Nutella Mug Cake, ready to delight your taste buds in just 5 minutes! This recipe truly embodies the joy of quick, easy, and incredibly delicious homemade treats. It’s the perfect solution for those moments when you need a little indulgence without all the fuss of traditional baking.
So, why wait? Gather your ingredients and give this recipe a try tonight. You’ll be amazed at how simple it is to create such a wonderfully warm, gooey, and satisfying dessert right


