
Introduction
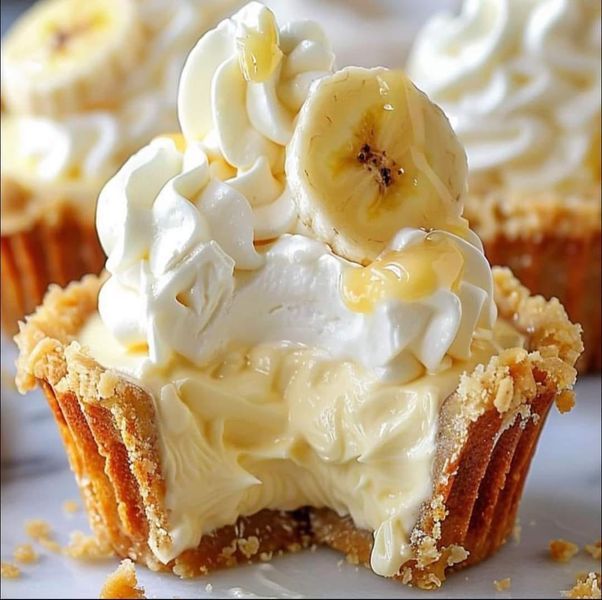
Get ready for a treat that tastes like pure nostalgia! Grandma’s No Bake Cheesecake Cups are a delightful dessert that brings back all those warm, comforting memories. Imagine a creamy, tangy cheesecake filling nestled on a crunchy graham cracker crust, all in a perfectly portioned cup. It’s a little slice of heaven that’s simply irresistible and always a crowd-pleaser.
The best part? You don’t need to turn on your oven for this masterpiece! This recipe is incredibly easy and quick to put together, making it perfect for busy weeknights, last-minute gatherings, or whenever a cheesecake craving strikes. With simple ingredients and straightforward steps, even beginner bakers can achieve dessert glory with these charming cups.
So, whether you’re looking for a fuss-free dessert, a make-ahead option, or just a taste of home, these No Bake Cheesecake Cups are calling your name. Gather your ingredients, put on some cheerful music, and let’s whip up some pure joy together. You won’t regret trying this beloved family favorite!
Cooking Time & Prep Time
- Prep Time: 25 minutes
- Chill Time: 4 hours (minimum)
- Total Time: 4 hours 25 minutes
Small tip: For the best results and a perfectly set cheesecake, plan to make these cups at least one day ahead. Overnight chilling makes them extra firm and delicious!
Ingredients
This recipe makes 12 delicious individual cheesecake cups.
For the Graham Cracker Crust
- 1 ½ cups (about 10-12 full sheets) graham cracker crumbs
- ¼ cup granulated sugar
- ½ cup (1 stick) unsalted butter, melted
For the Creamy Cheesecake Filling
- 2 (8-ounce) packages cream cheese, softened to room temperature
- 1 cup powdered sugar (confectioners’ sugar)
- 1 teaspoon pure vanilla extract
- ½ teaspoon fresh lemon juice (optional, for extra tang)
- 1 ½ cups heavy cream, very cold
For the Topping (Optional)
- 1 cup fresh berries (strawberries, blueberries, raspberries)
- Chocolate shavings or a drizzle of chocolate sauce
- Whipped cream (extra, if desired)
Step-by-Step Instructions
-
Step 1: Prepare Your Muffin Pan and Crust
Line a 12-cup muffin pan with paper liners. This makes it easy to remove your cheesecake cups later. In a medium bowl, combine the graham cracker crumbs, granulated sugar, and melted butter. Mix well until the crumbs are evenly moistened and resemble wet sand.
Small tip: You can crush your own graham crackers by placing them in a Ziploc bag and crushing with a rolling pin for a rustic texture.
-
Step 2: Press the Crust into Cups
Spoon about 1 ½ tablespoons of the graham cracker mixture into the bottom of each lined muffin cup. Use the back of a spoon or a small, flat-bottomed glass to firmly press the crust down. Press it tightly so it forms a solid base for your cheesecake.
Small tip: A shot glass or the bottom of a spice jar works perfectly for pressing down the crust.
-
Step 3: Chill the Crusts
Place the muffin pan with the crusts into the refrigerator while you prepare the filling. This helps the butter in the crust solidify, making it firm and less crumbly. Even a quick 10-15 minute chill helps a lot.
-
Step 4: Make the Cheesecake Filling Base
In a large mixing bowl, using an electric mixer, beat the softened cream cheese on medium speed until it’s smooth and creamy. This should take about 2-3 minutes. Add the powdered sugar, vanilla extract, and lemon juice (if using), and beat until fully combined and no lumps remain. Scrape down the sides of the bowl as needed.
Small tip: Ensure your cream cheese is at true room temperature. This prevents lumps and ensures a super smooth filling.
-
Step 5: Whip the Heavy Cream
In a separate, very cold bowl, pour the heavy cream. Using clean beaters, whip the heavy cream on high speed until stiff peaks form. Be careful not to over-whip, or it might turn grainy. You want it light and airy.
Small tip: Chill your mixing bowl and beaters in the freezer for 10-15 minutes before whipping the cream for faster and firmer results.
-
Step 6: Combine and Fill the Cups
Gently fold the whipped cream into the cream cheese mixture until just combined. Be careful not to deflate the whipped cream; you want to keep the filling light and airy. Spoon or pipe the cheesecake filling evenly into each crust-lined muffin cup, filling them almost to the top.
Small tip: Use an ice cream scoop or a piping bag with a large round tip for neat and even filling.
-
Step 7: Chill and Garnish
Cover the muffin pan loosely with plastic wrap and refrigerate for at least 4 hours, or preferably overnight. The longer they chill, the firmer and more stable they will be. Once chilled and firm, carefully remove the cups from the muffin pan. Peel off the paper liners, then top with fresh berries, chocolate shavings, or extra whipped cream just before serving. Enjoy!
Tips & Variations
- Gluten-Free Option: Easily make these gluten-free by swapping out traditional graham cracker crumbs for gluten-free graham crackers or a nut-based crust. You can use finely ground almonds or pecans mixed with a little melted butter and sugar.
- Vegan Option: To make this recipe vegan, use plant-based cream cheese, vegan butter, and a whipped coconut cream instead of dairy heavy cream. Ensure all ingredients are certified vegan for a truly plant-based treat.
- Boost Protein: For a slight protein boost, you can substitute a portion of the cream cheese (up to half) with full-fat Greek yogurt or skyr, though this may slightly alter the texture and tanginess. You could also gently fold in a scoop of unflavored or vanilla protein powder into the cream cheese mixture before adding the whipped cream.
- Spicy Kick: For an unexpected twist, add a tiny pinch of cayenne pepper to your graham cracker crust mixture for a subtle warmth. Alternatively, create a spicy chocolate ganache by melting dark chocolate with a touch of chili powder to drizzle on top.
- Flavor Swaps & Additions: Experiment with different extracts like almond or peppermint. Mix in mini chocolate chips, chopped nuts, or finely grated lemon or orange zest into the filling. Swirl in fruit purees like raspberry or passionfruit for vibrant flavors and colors.
Nutritional Information
Approximate values per serving (based on 12 servings):
- Calories: 350-400 kcal
- Protein: 4-6 g
- Carbohydrates: 25-30 g
- Fat: 25-30 g
Note: Nutritional values may vary depending on the specific brands and exact amounts of ingredients used. This is an estimate for general guidance.
Health Benefits
While these cheesecake cups are a delightful treat, some of their main ingredients offer nutritional benefits!
The cream cheese, a dairy product, provides a good source of calcium, which is essential for strong bones and teeth. It also contains protein, important for muscle repair and overall body function, and some B vitamins.
If you choose to top your cheesecake cups with fresh berries, you’re adding a burst of vitamins and antioxidants. Berries like strawberries and blueberries are rich in Vitamin C, which supports your immune system, and they provide dietary fiber, beneficial for digestive health.
Graham crackers, especially if you opt for whole grain varieties, contribute some fiber to the dessert. Fiber is crucial for maintaining a healthy digestive system and can help with satiety.
Enjoying a homemade dessert like this also offers the benefit of knowing exactly what goes into your food, allowing you to control sugar levels and ingredient quality. It’s a wonderful way to enjoy a sweet treat in moderation, bringing comfort and joy.
Serving Suggestions
- Fresh Berry Medley: Serve these cups with a generous topping of mixed fresh berries like raspberries, blueberries, and sliced strawberries for a burst of color and natural sweetness.
- Chocolate Lover’s Dream: Drizzle with warm chocolate fudge sauce, sprinkle with chocolate shavings, or add a few mini chocolate chips to the top.
- Caramel or Fruit Sauce: A swirl of salted caramel sauce or a tangy raspberry coulis can elevate the flavor profile beautifully.
- Dessert Platter Star: These individual cups are perfect for a dessert platter at parties, alongside mini brownies, cookies, or fruit tarts.
- Meal Prep Treat: Make a batch at the beginning of the week for a convenient and delicious single-serving dessert whenever a craving strikes.
Storage Tips
Grandma’s No Bake Cheesecake Cups are best stored in an airtight container in the refrigerator for up to 3-4 days. They hold their texture well, especially if you add toppings just before serving. You can also freeze these cheesecake cups (without fresh fruit toppings) for up to 1 month. To freeze, place them on a baking sheet until firm, then transfer to a freezer-safe bag or container. When ready to enjoy, simply thaw in the refrigerator for a few hours, then add your desired fresh toppings.
Conclusion
And there you have it – Grandma’s No Bake Cheesecake Cups, a truly magical dessert that combines simplicity with incredible flavor. This recipe is a testament to how easy it can be to create something truly special and memorable without any fuss. The creamy texture, the tangy sweetness, and that satisfying crunch of the crust make every bite an absolute delight.
We truly encourage you to give this recipe a try. Whether you’re a seasoned baker or just starting your culinary journey, these cheesecake cups are foolproof and guaranteed to impress. They’re perfect for any occasion, from a casual family dinner to a festive celebration, or even just a little treat for yourself after a long day.
So go ahead, whip up a batch, and share the joy! These delightful cups are meant to be savored and shared with loved ones, creating new sweet memories just like Grandma used to do. Happy baking (or rather, no-baking)!


