
Introduction
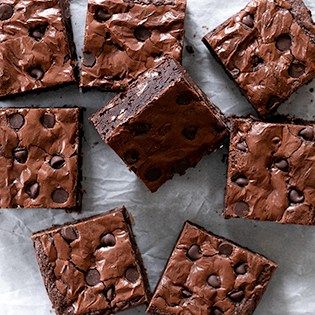
Get ready for the most incredible gluten-free brownies you’ve ever tasted! These aren’t just good for gluten-free; they are simply amazing brownies, period. Imagine a rich, fudgy, intensely chocolatey treat with that perfect crinkly top. Every bite is a little piece of heaven, satisfying all your chocolate cravings without any gluten.
What makes them even better is how wonderfully easy they are to whip up. You don’t need any fancy equipment or complicated steps. Most of the magic happens in one bowl, making cleanup a breeze. In less than an hour, you can go from craving to indulging in warm, gooey brownies fresh from your oven.
So, whether you’re avoiding gluten, baking for a friend, or just looking for an unbelievably delicious dessert, this recipe is for you. Gather your ingredients, put on your favorite tunes, and let’s bake some happiness together!
Cooking Time & Prep Time
- Prep Time: 15 minutes
- Cooking Time: 25-30 minutes
- Total Time: 40-45 minutes
Small tip: Always preheat your oven before you start mixing ingredients. This ensures it’s at the perfect temperature when your batter is ready to bake.
Ingredients
Makes 16-20 servings (using a 9×13 inch baking pan)
For the Brownies:
- 1 cup (2 sticks / 226g) unsalted butter, cut into pieces
- 1 cup (170g) good quality dark chocolate chips or chopped dark chocolate (60-70% cacao recommended)
- 1 cup (200g) granulated sugar
- 3/4 cup (150g) packed light brown sugar
- 4 large eggs, at room temperature
- 1 teaspoon pure vanilla extract
- 3/4 cup (90g) gluten-free all-purpose flour blend (ensure it contains xanthan gum)
- 1/2 cup (45g) unsweetened cocoa powder
- 1/2 teaspoon salt
- 1/2 cup (85g) chocolate chips or chopped chocolate, for mixing in (optional, but highly recommended!)
Step-by-Step Instructions
-
Step 1: Prepare Your Baking Pan and Oven
Preheat your oven to 350°F (175°C). Line a 9×13 inch baking pan with parchment paper, leaving an overhang on the sides. This makes lifting the brownies out super easy. Lightly grease the parchment paper.
Small tip: Criss-crossing two strips of parchment paper works perfectly for a good overhang.
-
Step 2: Melt Butter and Chocolate
In a large, microwave-safe bowl, combine the butter pieces and the 1 cup of dark chocolate chips/chopped chocolate. Microwave in 30-second intervals, stirring well after each, until completely melted and smooth. This usually takes 1.5 to 2 minutes. Alternatively, you can use a double boiler on the stovetop.
Small tip: Be careful not to overheat the chocolate, as it can seize. Low and slow is the way to go.
-
Step 3: Add Sugars
Once the chocolate mixture is smooth, add the granulated sugar and light brown sugar to the bowl. Stir vigorously with a whisk or spatula until the sugars are fully dissolved and the mixture is glossy. This step is key for that beautiful crinkly top!
Small tip: Stirring well here helps create a stable emulsion, contributing to the fudgy texture.
-
Step 4: Incorporate Eggs and Vanilla
Add the eggs one at a time, mixing well after each addition until fully incorporated. Stir in the vanilla extract. The mixture should become thick, shiny, and lighter in color. Don’t rush this part; proper mixing here builds the structure.
Small tip: Using room temperature eggs helps them combine more smoothly with the chocolate mixture.
-
Step 5: Sift Dry Ingredients
In a separate medium bowl, whisk together the gluten-free all-purpose flour blend, unsweetened cocoa powder, and salt. Sifting helps prevent lumps and ensures an even distribution of ingredients.
Small tip: If your gluten-free flour blend doesn’t contain xanthan gum, add 1/2 teaspoon to this mixture.
-
Step 6: Combine Wet and Dry Mixtures
Gradually add the dry ingredient mixture to the wet chocolate mixture. Fold gently with a spatula until just combined. Be careful not to overmix, as this can lead to tough brownies. A few streaks of flour are okay.
Small tip: Overmixing develops gluten (even in GF flours, it can make baked goods gummy), so stop as soon as the flour disappears.
-
Step 7: Fold in Extra Chocolate Chips
If using, gently fold in the remaining 1/2 cup of chocolate chips or chopped chocolate. These will melt into delicious pockets of gooey chocolate in your baked brownies.
Small tip: For extra decadence, sprinkle a few extra chocolate chips on top of the batter before baking!
-
Step 8: Bake the Brownies
Pour the brownie batter into your prepared baking pan and spread it evenly. Bake for 25-30 minutes, or until a toothpick inserted into the center comes out with moist crumbs, but not wet batter. The edges should be set, but the center should still look a little fudgy.
Small tip: Err on the side of under-baking for fudgier brownies; over-baking results in cakey brownies.
-
Step 9: Cool Completely
Remove the pan from the oven and let the brownies cool completely in the pan on a wire rack. This is crucial for the fudgiest texture and clean cuts. Cooling can take 1-2 hours. Once cool, use the parchment paper overhang to lift the brownies out of the pan and cut into squares.
Small tip: For super clean cuts, chill the brownies in the fridge for 30 minutes before slicing with a sharp, warm knife.
Tips & Variations
- Gluten-Free Flour Choice: While the recipe calls for a general gluten-free all-purpose flour blend, ensure you choose one specifically designed for baking, ideally with xanthan gum already included. Brands like Bob’s Red Mill 1-to-1 or King Arthur Gluten-Free Measure for Measure work wonderfully. Always check labels for certified gluten-free products if cross-contamination is a concern.
- Vegan Option: To make these brownies vegan, replace the butter with a high-quality vegan butter substitute (like Miyoko’s Kitchen or Earth Balance sticks) and the eggs with flax eggs (1 flax egg = 1 tbsp ground flaxseed + 3 tbsp water, mixed and let sit for 5 minutes). Ensure your dark chocolate chips are dairy-free.
- Add More Vegetables or Protein: For an extra boost, you can fold in 1/2 cup of pureed black beans (rinsed and drained well) or finely grated zucchini (squeezed of excess moisture) into the batter. They add moisture and nutrients without altering the taste significantly. You can also add 1-2 scoops of unflavored or chocolate protein powder, adjusting liquid slightly if the batter becomes too thick.
- Spicy Kick: For a delightful twist, add 1/2 teaspoon of cayenne pepper or a pinch of chili powder to the dry ingredients. The subtle heat beautifully enhances the chocolate flavor, creating a sophisticated and surprising treat.
- Flavor Boosters: Get creative with extracts! Almond extract adds a lovely nutty note, or try a dash of orange extract for a chocolate-orange delight. You can also swirl in a spoonful of peanut butter or hazelnut spread into the batter before baking for a marbled effect. Top with flaky sea salt before baking for an amazing sweet and salty contrast.
Nutritional Information
Approximate values per serving (based on 18 servings):
- Calories: 310 kcal
- Protein: 4g
- Carbohydrates: 38g
- Fat: 18g
Note: Nutritional values may vary depending on specific brands and ingredients used.
Health Benefits
These gluten-free brownies offer more than just deliciousness! Dark chocolate, a star ingredient, is packed with antioxidants called flavonoids, which can help protect your body’s cells from damage. It’s also known to boost mood and may even improve heart health in moderation.
The eggs in this recipe are a great source of high-quality protein, essential for muscle repair and growth. They also provide important vitamins like Vitamin D, B6, and B12, along with minerals like selenium and zinc, all vital for overall health.
Using a gluten-free flour blend makes these brownies accessible to those with gluten sensitivities or celiac disease, preventing digestive discomfort and allowing everyone to enjoy a delicious treat. Many gluten-free flours, especially those made from whole grains like brown rice or oat flour, can contribute dietary fiber.
While brownies are a treat, enjoying them in moderation can be part of a balanced diet. The satisfaction from a homemade dessert can also contribute to mental well-being and happiness!
Serving Suggestions
- Serve warm with a scoop of vanilla bean ice cream and a drizzle of chocolate sauce for an ultimate dessert experience.
- Enjoy with a dollop of fresh whipped cream and a sprinkle of berries for a lighter, fruity touch.
- Perfect as a standalone treat with a cup of coffee, tea, or a cold glass of milk for an afternoon pick-me-up.
- Cut into smaller squares and arrange on a platter for parties, potlucks, or holiday gatherings.
- Pack individual brownies in lunchboxes for a special surprise, or enjoy one as a delightful after-dinner dessert.
Storage Tips
Store leftover brownies in an airtight container at room temperature for up to 3-4 days. For longer storage, you can keep them in the refrigerator for up to a week. Brownies also freeze beautifully! Wrap individual squares tightly in plastic wrap, then place them in a freezer-safe bag or container for up to 3 months. To reheat, simply microwave a frozen brownie for 30-60 seconds, or let it thaw at room temperature. You can also warm them gently in a low oven for a few minutes for that freshly baked feel.
Conclusion
There you have it – a recipe for gluten-free brownies that are so good, they’ll become your new go-to. They’re rich, they’re fudgy, and they prove that going gluten-free never means sacrificing flavor or texture. These brownies are a true crowd-pleaser, perfect for any occasion or just a cozy night in.
Don’t be shy about trying this recipe. The steps are straightforward, and the reward is absolutely worth it. You’ll be amazed at how easily you can create such a decadent dessert right in your own kitchen. Baking is a joy, and these brownies are sure to bring a smile to your face.
So go ahead, bake a batch (or two!). Share them with your family, surprise your friends, or simply savor every single bite yourself. Happy baking!


