
Introduction
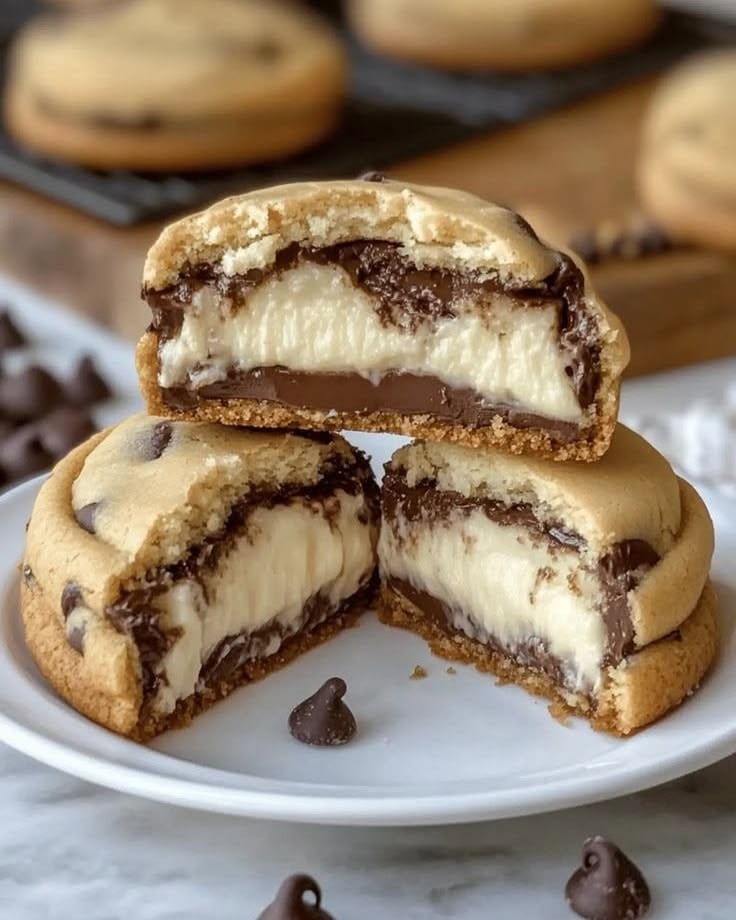
Get ready to meet your new favorite dessert: Cheesecake Filled Chocolate Chip Cookies! Imagine a classic, chewy chocolate chip cookie, warm and perfectly baked. Now, picture a creamy, tangy cheesecake surprise nestled right in the center. It’s truly a match made in heaven, offering the best of both worlds in every single bite.
This recipe might sound fancy, but it’s surprisingly easy to whip up in your own kitchen. We’re talking simple ingredients and straightforward steps that even a beginner baker can master. You’ll create a decadent treat that looks incredibly impressive, but won’t keep you in the kitchen all day. It’s the perfect way to elevate a beloved classic without any stress.
So, if you’re looking to impress your friends, delight your family, or simply treat yourself to something extraordinary, these cookies are calling your name. They’re perfect for parties, potlucks, or just a cozy night in. Let’s get baking and create some delicious magic together!
Cooking Time & Prep Time
- Prep Time: 40 minutes
- Cooking Time: 15 minutes
- Total Time: 55 minutes
Small tip: To save time, you can prepare the cheesecake filling discs and freeze them a day or two in advance. This makes assembly much quicker on baking day!
Ingredients
Makes 18 delicious cookies
For the Cheesecake Filling
- 8 ounces (226g) cream cheese, softened
- 1/4 cup (50g) granulated sugar
- 1 teaspoon vanilla extract
- 1 large egg yolk (reserve the white for another use or discard)
For the Chocolate Chip Cookie Dough
- 1/2 cup (113g) unsalted butter, softened
- 1/2 cup (100g) granulated sugar
- 1/4 cup (50g) packed light brown sugar
- 1 large egg
- 1 teaspoon vanilla extract
- 1 1/4 cups (150g) all-purpose flour
- 1/2 teaspoon baking soda
- 1/4 teaspoon salt
- 1 cup (170g) semi-sweet chocolate chips
Step-by-Step Instructions
-
Step 1: Prepare the Cheesecake Filling
In a medium bowl, combine the softened cream cheese, granulated sugar, and vanilla extract. Beat with an electric mixer until smooth and creamy. Add the egg yolk and mix until just combined, scraping down the sides of the bowl. Do not overmix.
Small tip: Ensure your cream cheese is at room temperature. This prevents lumps and makes for a super smooth filling.
-
Step 2: Chill the Cheesecake Filling
Line a small plate or baking sheet with parchment paper. Drop the cheesecake mixture by the spoonful (about 1 tablespoon each) onto the parchment paper to form 18 small discs. Place the plate or baking sheet in the freezer for at least 30 minutes, or until the discs are firm.
Small tip: Freezing the cheesecake discs solid is crucial. It keeps them from melting too quickly during baking and makes them much easier to handle when assembling the cookies.
-
Step 3: Make the Cookie Dough
In a large bowl, cream together the softened butter, granulated sugar, and brown sugar until light and fluffy. Beat in the egg and vanilla extract until well combined. In a separate bowl, whisk together the flour, baking soda, and salt. Gradually add the dry ingredients to the wet ingredients, mixing until just combined. Fold in the chocolate chips.
Small tip: Be careful not to overmix the dough once the flour is added. Overmixing can lead to tough cookies.
-
Step 4: Assemble the Cookies
Preheat your oven to 375°F (190°C). Line two baking sheets with parchment paper. Scoop out about 1.5 tablespoons of cookie dough for each cookie. Divide each scoop in half. Flatten one half into a disc, place a frozen cheesecake disc in the center, then top with the other half of the cookie dough. Carefully seal the edges all around the cheesecake filling, forming a ball.
Small tip: Make sure the cheesecake filling is completely enclosed by the cookie dough. Any gaps might cause the filling to leak out during baking.
-
Step 5: Bake the Cookies
Place the assembled cookie dough balls onto the prepared baking sheets, leaving about 2 inches between each cookie. Bake for 12-15 minutes, or until the edges are golden brown and the centers are set. The cookies might look slightly puffy when they first come out of the oven.
Small tip: Do not overcrowd your baking sheets. This allows for even baking and prevents the cookies from spreading into each other.
-
Step 6: Cool and Enjoy
Once baked, remove the cookies from the oven and let them cool on the baking sheets for 5 minutes before transferring them to a wire rack to cool completely. This helps them set up and prevents them from breaking. Enjoy them warm or at room temperature!
Small tip: The cheesecake filling will be very hot right out of the oven. Allow them to cool sufficiently to avoid burns and to let the filling firm up slightly.
Tips & Variations
- Gluten-Free Option: Easily make these cookies gluten-free by substituting the all-purpose flour with a 1:1 gluten-free all-purpose flour blend. Ensure your blend contains xanthan gum for the best texture.
- Vegan Option: For a delicious vegan version, use plant-based butter, a flax egg (1 tbsp ground flaxseed + 3 tbsp water) as an egg replacer, and your favorite vegan cream cheese alternative. Don’t forget to use vegan chocolate chips!
- Add Protein: Boost the protein content by adding 1/2 cup of finely chopped nuts like walnuts or pecans to the cookie dough. You can also mix a scoop of unflavored or vanilla protein powder into the dry ingredients, adjusting liquid slightly if needed.
- Spicy Kick: For a surprising twist, add 1/4 teaspoon of cayenne pepper or chili powder to the chocolate chip cookie dough. The subtle heat beautifully complements the sweetness of the chocolate and the tang of the cheesecake.
- Zesty Flavor: Elevate the cheesecake filling by adding 1/2 teaspoon of lemon or orange zest along with the vanilla extract. This brightens the flavor and adds a lovely aromatic note.
Nutritional Information
Approximate values per serving (based on 18 servings):
- Calories: 310 kcal
- Protein: 5g
- Carbohydrates: 35g
- Fat: 18g
Please note: Nutritional values may vary depending on the exact ingredients and brands used. This is an estimate.
Health Benefits
While these cookies are a delightful treat, some of their core ingredients offer interesting health benefits when consumed in moderation.
Dark chocolate, a key component in chocolate chips, is rich in antioxidants called flavanols. These compounds are known to help protect your cells from damage, support heart health, and may even improve brain function. Plus, chocolate has compounds that can boost your mood, making these cookies a truly feel-good indulgence.
Eggs, used in both the cookie and cheesecake filling, are nutritional powerhouses. They provide high-quality protein, essential for muscle repair and growth. Eggs are also packed with vitamins like B12 and D, and choline, which is vital for brain health and metabolism.
Dairy products like cream cheese and butter contribute calcium, which is crucial for strong bones and teeth. They also provide fat-soluble vitamins such as Vitamin A, D, E, and K. These vitamins play roles in vision, immune function, and overall well-being.
Flour, the base of our cookies, provides carbohydrates, which are the body’s primary source of energy. While these cookies are a dessert, enjoying them as part of a balanced diet means you’re getting energy to fuel your day’s activities.
Serving Suggestions
- Serve warm with a scoop of vanilla bean ice cream for an extra decadent dessert.
- Pair with a hot cup of coffee, tea, or a cold glass of milk for the perfect afternoon treat.
- These cookies are fantastic for potlucks, parties, or as a thoughtful homemade gift for friends and family.
- Pack one in a lunchbox for a special surprise that will brighten anyone’s day.
- Crumble a chilled cookie over plain yogurt or oatmeal for a luxurious breakfast twist (in moderation, of course!).
Storage Tips
Store leftover Cheesecake Filled Chocolate Chip Cookies in an airtight container in the refrigerator for up to 3-5 days. The cheesecake filling requires refrigeration. You can also freeze


