
Introduction
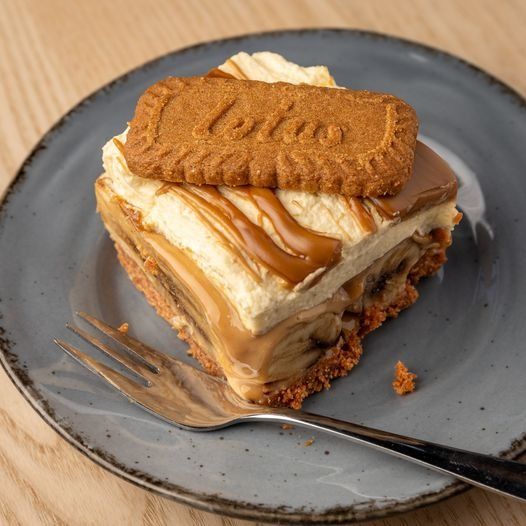
Get ready to discover your new favorite dessert: Biscoff Banana Cream Pie! This incredible pie takes a classic, beloved banana cream pie and elevates it with the irresistible, caramelized spice flavor of Biscoff cookies. It’s a symphony of creamy, crunchy, and sweet, all in one glorious bite.
The best part? This pie is incredibly easy to make. There’s no complicated baking for the filling, and the crust comes together in a flash. It’s a perfect no-bake treat that looks impressive but requires minimal effort. You’ll be amazed at how quickly you can assemble this showstopper.
So, if you’re looking for a dessert that will wow your friends and family without stressing you out, this Biscoff Banana Cream Pie is it. Dive into this recipe and prepare to fall in love with its comforting, unique flavors. You simply have to try it!
Cooking Time & Prep Time
- Prep Time: 30 minutes
- Cooking Time: 5 minutes (for melting butter)
- Chill Time: 4 hours (minimum)
- Total Time: 4 hours 35 minutes
Small tip: You can prepare the pie crust and even the filling a day ahead, then assemble and chill the pie the next day for ultimate convenience.
Ingredients
Makes 8-10 servings
For the Biscoff Crust:
- 250g (about 1 ½ packages) Biscoff Lotus cookies, finely crushed
- 8 tablespoons (113g) unsalted butter, melted
For the Creamy Filling:
- 2 (3.4 oz) packages instant vanilla pudding mix
- 3 cups cold whole milk
- 8 oz cream cheese, softened
- ½ cup confectioners’ sugar
- 1 teaspoon vanilla extract
- 3-4 ripe but firm bananas, sliced into ¼-inch rounds
For the Whipped Topping & Garnish:
- 1 ½ cups heavy cream, very cold
- ¼ cup confectioners’ sugar
- ½ teaspoon vanilla extract
- 6-8 Biscoff Lotus cookies, crushed (for garnish)
- Optional: Biscoff cookie butter, melted, for drizzling
Step-by-Step Instructions
-
Prepare the Biscoff Crust
Finely crush the Biscoff cookies. You can use a food processor for this, or place them in a Ziploc bag and crush with a rolling pin. Transfer the crumbs to a medium bowl. Pour in the melted butter and stir until the crumbs are evenly moistened.
Small tip: Make sure the crumbs are very fine for a compact crust.
-
Form and Chill the Crust
Press the Biscoff mixture firmly and evenly into the bottom and up the sides of a 9-inch pie plate. Use the bottom of a glass or your knuckles to get it nice and compact. Place the pie crust in the refrigerator to chill while you prepare the filling, about 15 minutes.
Small tip: A well-compacted crust will hold its shape better when sliced.
-
Make the Cream Cheese Base
In a large bowl, using an electric mixer, beat the softened cream cheese until smooth and creamy. Add the ½ cup confectioners’ sugar and 1 teaspoon vanilla extract. Beat until well combined and fluffy, scraping down the sides of the bowl as needed.
-
Prepare the Instant Pudding
In a separate large bowl, whisk together the instant vanilla pudding mixes and cold whole milk for 2 minutes, until the mixture begins to thicken. Do not overmix. Let it sit for 1-2 minutes to thicken further.
Small tip: Ensure your milk is very cold; it helps the pudding set faster and thicker.
-
Combine the Filling
Gently fold the cream cheese mixture into the thickened vanilla pudding. Mix until just combined and smooth. Be careful not to deflate the mixture too much. This creates a rich, stable, and incredibly creamy filling.
-
Assemble the Pie Layers
Take your chilled Biscoff crust from the refrigerator. Arrange a single layer of sliced bananas over the bottom of the crust. Pour about half of the creamy filling over the bananas, spreading it evenly. Add another layer of banana slices, then top with the remaining filling, smoothing the top.
Small tip: Slice bananas right before assembling to prevent browning. A little lemon juice can also help if you’re worried.
-
Chill the Pie
Cover the pie loosely with plastic wrap and refrigerate for at least 4 hours, or preferably overnight. This allows the pie to set completely and for all the flavors to meld beautifully. A fully chilled pie is much easier to slice.
-
Prepare Topping and Garnish
Once the pie is fully chilled, make the whipped topping. In a clean, cold bowl, beat the cold heavy cream, ¼ cup confectioners’ sugar, and ½ teaspoon vanilla extract until stiff peaks form. Spread the whipped cream over the top of the pie. Garnish with crushed Biscoff cookies and a drizzle of melted Biscoff cookie butter, if desired.
Small tip: For extra fluffy whipped cream, chill your mixing bowl and whisk attachment for 10-15 minutes before whipping.
Tips & Variations
- Gluten-Free Option: Use gluten-free graham crackers or a gluten-free vanilla cookie for the crust, instead of Biscoff cookies.
- Vegan/Vegetarian Option: Biscoff cookies are naturally vegan. For the filling, use plant-based milk (like almond or oat milk), vegan cream cheese, and a plant-based whipped topping (such as coconut cream or a store-bought vegan whipped cream).
- More Protein/Fiber: While a dessert, you can boost nutrients. Consider adding a thin layer of toasted chopped walnuts or pecans over the bananas for extra protein and healthy fats.
- Spicy Twist: For a subtle warmth, add a tiny pinch of ground ginger or a dash of cinnamon to the Biscoff crust mixture. It complements the Biscoff flavor beautifully.
- Coffee Lover’s Dream: Add 1-2 teaspoons of instant espresso powder to the pudding mix for a coffee-infused cream filling that pairs wonderfully with the Biscoff.
Nutritional Information
Approximate values per serving (based on 8 servings):
- Calories: 550-600
- Protein: 8-10g
- Carbohydrates: 60-70g
- Fat: 30-35g
Note: Values may vary depending on specific ingredients used and portion size.
Health Benefits
While this is a delightful dessert, some key ingredients offer notable health benefits!
Bananas: These wonderful fruits are packed with essential nutrients. They are an excellent source of potassium, which is vital for heart health and maintaining fluid balance in the body. Bananas also provide dietary fiber, aiding in digestion and promoting a feeling of fullness.
They also contain Vitamin B6, important for brain development and immune function, and Vitamin C, an antioxidant that supports skin health and immunity.
Milk (if dairy): Whole milk contributes calcium, which is crucial for strong bones and teeth. It also provides Vitamin D (if fortified), which helps the body absorb calcium, and protein, essential for muscle repair and growth.
Cream Cheese: While used in moderation, cream cheese can offer some protein and calcium. It also provides a satisfying richness that makes the pie feel decadent.
Serving Suggestions
- Serve this pie chilled, as a delightful dessert after any meal.
- It makes a fantastic centerpiece for potlucks, family gatherings, or holiday celebrations.
- Pair a slice with a warm cup of coffee or a comforting mug of tea for a perfect afternoon treat.
- For individual portions, press the Biscoff crust into muffin tins, layer with bananas and filling, and chill. Top with whipped cream before serving.
Storage Tips
Store leftover Biscoff Banana Cream Pie covered loosely with plastic wrap in the refrigerator for up to 3-4 days. It is best enjoyed within the first 2 days for optimal freshness and texture. Freezing is not recommended, as the bananas can become mushy and the cream filling’s texture may change upon thawing. This pie is meant to be served chilled, so no reheating is required.
Conclusion
This Biscoff Banana Cream Pie is more than just a dessert; it’s an experience. The golden, spiced crunch of the Biscoff crust, combined with the smooth, vanilla-infused cream and sweet banana slices, creates a harmony of flavors that is simply irresistible. It’s a true crowd-pleaser that brings a unique twist to a beloved classic.
Don’t let its impressive appearance fool you; this pie is incredibly simple to whip up, making it perfect for both seasoned bakers and kitchen novices alike. The minimal effort for maximum deliciousness ratio is off the charts here. You’ll be proud to present this beautiful creation.
So go ahead, gather your ingredients, and give this Biscoff Banana Cream Pie a try. Share it with your family and friends, watch their faces light up with delight, and enjoy every single, blissful bite. Happy pie making!


