
Introduction
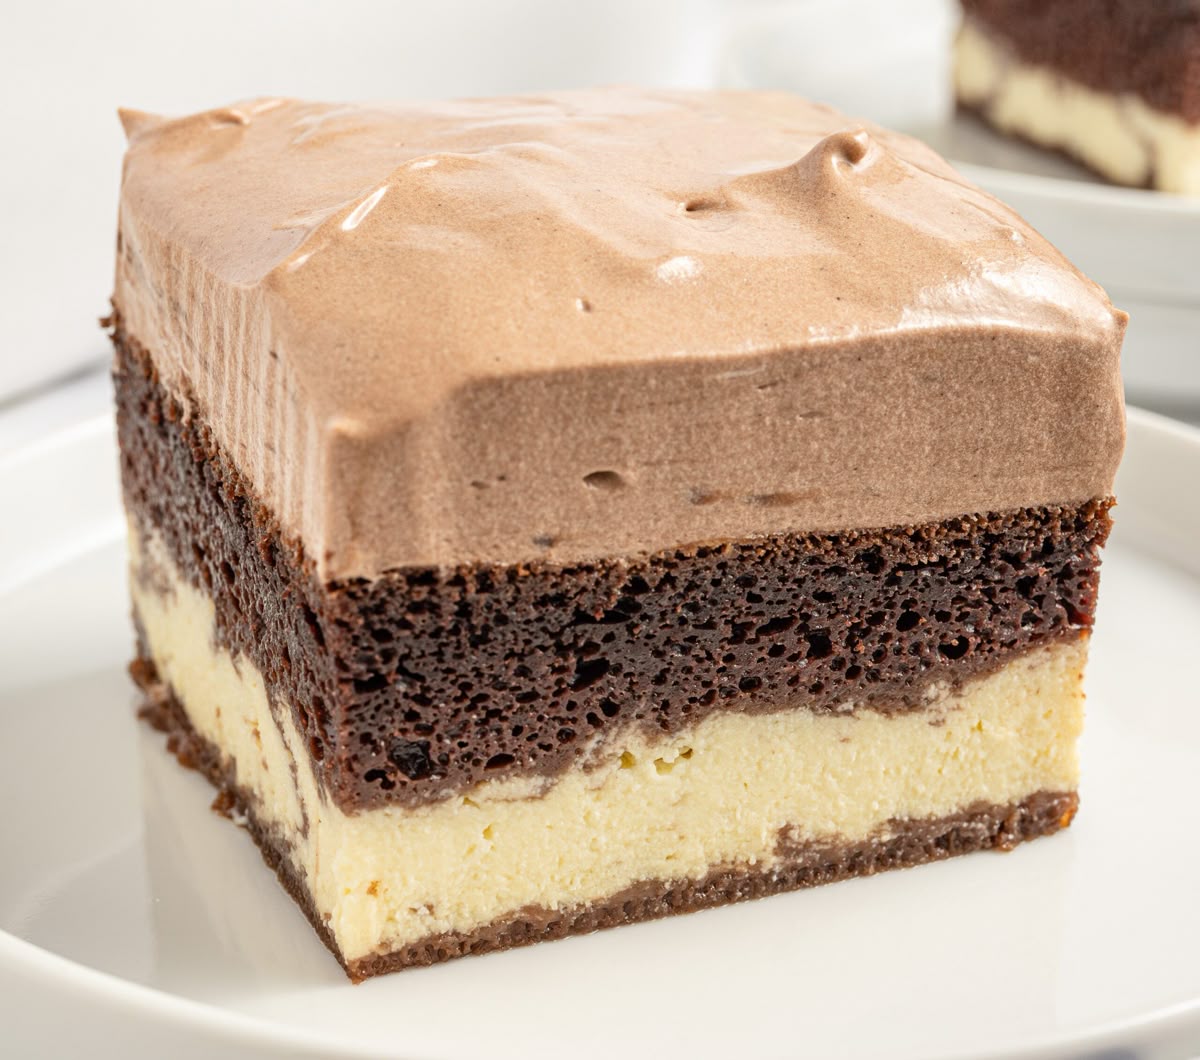
Get ready to fall head over heels for the most delightful dessert you’ll ever bake: Italian Love Cake! This incredible treat is a true masterpiece of flavors and textures. Imagine a moist, tender cake base, generously layered with a sweet, creamy ricotta cheese filling, and then crowned with a light, airy whipped topping and delicate chocolate shavings. It’s a dreamy combination that truly tastes like a hug in every bite.
What makes this cake even more special is how surprisingly simple it is to put together. We’re talking about a recipe that uses a few clever shortcuts to save you time without ever compromising on taste. You’ll be amazed at how easily these humble ingredients transform into something so elegant and utterly delicious. It’s perfect for a special occasion, but easy enough for a cozy weekend treat.
So, clear your schedule and grab your apron! This Italian Love Cake is about to become your new go-to dessert. I promise, your taste buds (and anyone you share it with!) will thank you. Let’s dive into making some magic in your kitchen!
Cooking Time & Prep Time
- Prep Time: 25 minutes
- Cooking Time: 50 minutes
- Total Time: 75 minutes (plus cooling and chilling)
Small tip: The cooling and chilling time is super important for this cake. Don’t rush it! A well-chilled cake is much easier to slice and tastes even better.
Ingredients
This recipe makes 12-16 servings.
- 1 (15.25 ounce) package yellow cake mix (plus ingredients called for on box: typically eggs, water, vegetable oil)
- 2 pounds (32 ounces) whole milk ricotta cheese
- 1 ½ cups granulated sugar
- 4 large eggs
- 2 teaspoons vanilla extract
- 1 (8 ounce) container frozen whipped topping, thawed (like Cool Whip)
- 1 ounce semi-sweet chocolate, shaved or grated (or 1 tablespoon cocoa powder for dusting)
For the Cake Base
For the Ricotta Filling
For the Topping & Garnish
Step-by-Step Instructions
-
Step 1: Get Ready to Bake
Preheat your oven to 350°F (175°C). Lightly grease and flour a 9×13 inch baking dish. This step ensures your beautiful cake won’t stick, making it easy to remove perfect slices later.
Small tip: You can also use baking spray with flour to make this step even quicker!
-
Step 2: Mix the Cake Batter
Prepare the yellow cake mix according to the package directions. This usually involves combining the cake mix with eggs, water, and vegetable oil in a large bowl. Mix until just combined and smooth, being careful not to overmix.
Small tip: Overmixing can lead to a tough cake, so stop as soon as the batter is smooth.
-
Step 3: Prepare the Ricotta Filling
In a separate large bowl, combine the ricotta cheese, granulated sugar, eggs, and vanilla extract. Whisk these ingredients together until the mixture is completely smooth and creamy. Make sure there are no lumps of ricotta remaining.
Small tip: A rubber spatula is great for scraping down the sides of the bowl to ensure everything is fully incorporated.
-
Step 4: Layer It Up
Pour the prepared cake batter into your greased 9×13 inch baking dish. Once the cake batter is in the pan, carefully spoon the ricotta cheese mixture over the top of the cake batter. Don’t worry if it doesn’t spread perfectly; it will settle during baking.
Small tip: Resist the urge to swirl or mix the layers. The ricotta will sink through the cake batter as it bakes, creating that lovely layered effect.
-
Step 5: Bake to Perfection
Place the baking dish in your preheated oven. Bake for 50-60 minutes, or until the cake is golden brown and a wooden skewer inserted into the center comes out clean. The ricotta layer should be set and slightly firm.
Small tip: Ovens can vary, so start checking for doneness around the 50-minute mark.
-
Step 6: Cool Down
Once baked, remove the cake from the oven and place it on a wire rack. Let the cake cool completely to room temperature. This can take a couple of hours. Do not rush this step!
Small tip: A fully cooled cake is crucial before adding the topping, otherwise, your whipped topping will melt.
-
Step 7: Add the Finishing Touch
Once the cake is completely cool, spread the thawed whipped topping evenly over the top of the cake. Then, sprinkle with shaved chocolate or dust lightly with cocoa powder for a beautiful presentation.
Small tip: For neat chocolate shavings, use a vegetable peeler on the side of a chocolate bar.
-
Step 8: Chill and Serve
Cover the cake loosely with plastic wrap and refrigerate for at least 4 hours, or preferably overnight. This chilling time allows the flavors to meld beautifully and helps the cake set, making it much easier to slice and enjoy.
Small tip: Chilling overnight truly makes a difference in the cake’s texture and overall deliciousness.
Tips & Variations
- Gluten-Free Option: Simply swap the regular yellow cake mix for your favorite gluten-free yellow cake mix. Make sure to follow the package instructions for the GF mix, as liquid amounts can sometimes vary.
- Plant-Based Option: For a delicious plant-based version, use a vegan yellow cake mix. For the ricotta layer, you can make a cashew-based “ricotta” by blending soaked cashews with lemon juice, a touch of sugar, and vanilla. Replace the eggs with a flax egg substitute (1 tbsp ground flaxseed + 3 tbsp water per egg) to help bind the filling. Use a vegan whipped topping for the final layer.
- Healthier Twists: You can use a sugar-free or reduced-sugar cake mix and opt for low-fat ricotta cheese to lighten things up a bit. You could also reduce the amount of granulated sugar in the ricotta filling by a quarter cup without losing too much sweetness.
- Flavor Boosts: Add 1 teaspoon of almond extract to the ricotta filling for a subtle nutty flavor, or a pinch of cinnamon. You could also mix a tablespoon of finely grated orange zest into the ricotta for a bright, citrusy note.
- Different Toppings: Instead of whipped topping, you could use a simple chocolate ganache (melted chocolate and cream) or a cream cheese frosting for a richer finish. Fresh berries like raspberries or sliced strawberries are also a lovely addition when serving.
Nutritional Information
Approximate values per serving (based on 16 servings):
- Calories: 390
- Protein: 12g
- Carbohydrates: 45g
- Fat: 20g
Please note: Values may vary depending on specific brands and ingredients used.
Health Benefits
While Italian Love Cake is definitely a treat, some of its key ingredients do offer nutritional benefits!
Ricotta cheese is a star in this recipe. It’s an excellent source of protein, which is vital for building and repairing tissues in your body. It also provides a good amount of calcium, essential for strong bones and teeth, and phosphorus, which works with calcium for bone health.
The eggs in the ricotta filling contribute significantly to the protein content. Eggs are also packed with important vitamins and minerals, including Vitamin B12 for nerve function and energy, and Vitamin D, which helps your body absorb calcium.
Even in a delicious dessert, enjoying ingredients like these in moderation can be part of a balanced diet. It’s all about balance and savoring those special moments!
Serving Suggestions
- Serve a generous slice of Italian Love Cake with a hot cup of coffee or a cold glass of milk for a perfect dessert experience.
- For an extra touch of elegance, plate it with a side of fresh berries like raspberries or blueberries. Their tartness beautifully complements the cake’s richness.
- This cake is definitely a showstopper on its own, making it a fantastic main dessert for any gathering, from family dinners to potlucks and celebrations.
- Meal Prep Idea: This cake is ideal for making ahead! Prepare it the day before your event, allowing it ample time to chill overnight. This not only deepens the flavors but also frees up your time on the day of serving.
Storage Tips: Store any leftover Italian Love Cake tightly covered with plastic wrap in the refrigerator for up to 3-4 days. It tastes best when served chilled. While the cake base can technically be frozen, the texture of the ricotta filling and especially the whipped topping may change upon thawing. If you must freeze, it’s best to freeze individual slices without the whipped topping, then add fresh topping after thawing. To reheat, simply let it come to room temperature for about 15-20 minutes after taking it out of the fridge, or enjoy it cold!
Conclusion
There you have it – your very own Italian Love Cake! This dessert truly lives up to its name, bringing together comforting flavors and a wonderfully unique texture that everyone adores. It’s the kind of cake that looks fancy and impressive, but is secretly a breeze to make, thanks to those smart shortcuts.
Whether you’re celebrating a special occasion, hosting friends, or simply craving a sweet escape, this cake is the perfect choice. The rich, creamy ricotta layer nestled in the moist cake is an experience you won’t soon forget.
So go ahead, give this recipe a try! You’ll be so proud to share this labor of love (that wasn’t actually that much labor!) with your family and friends. Get ready for compliments and requests for the recipe – it’s that good!


