
Introduction
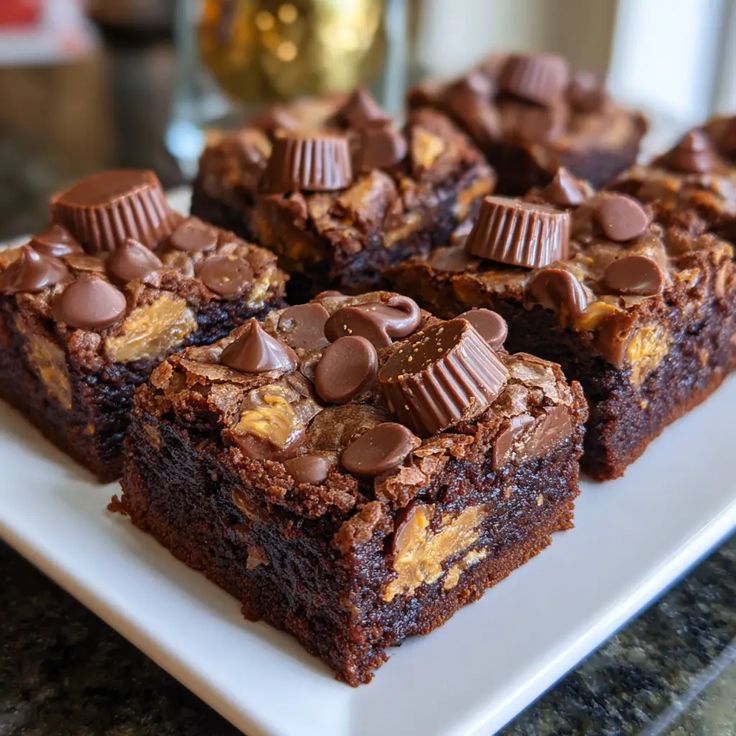
Get ready for a treat that will make your taste buds sing! We’re diving into the wonderful world of Peanut Butter Cup Brownies. Imagine fudgy, rich chocolate brownies studded with your favorite mini peanut butter cups. Every bite is a perfect blend of sweet chocolate and salty, creamy peanut butter. It’s truly a match made in dessert heaven, a classic combination that never disappoints.
The best part? These brownies are surprisingly simple to make. You don’t need to be a baking expert to create this show-stopping dessert. With straightforward steps and common ingredients, you’ll have these irresistible brownies ready in no time. We’ve made sure the process is easy to follow, so you can enjoy baking without any stress.
So, why wait? This recipe is perfect for a cozy night in, a special gathering, or just when you need a little something sweet. Gather your ingredients and get ready to bake some pure happiness. Your friends and family will thank you, and you’ll be proud of the delicious results!
Cooking Time & Prep Time
- Prep Time: 20 minutes
- Cooking Time: 30 minutes
- Total Time: 50 minutes
Small tip: Always preheat your oven and gather all your ingredients before you start mixing. This makes the baking process much smoother and more enjoyable!
Ingredients
This recipe makes approximately 16 servings.
For the Fudgy Brownies
- 1 cup (2 sticks) unsalted butter, melted
- 1 ½ cups granulated sugar
- ½ cup packed light brown sugar
- 4 large eggs
- 1 teaspoon vanilla extract
- 1 cup all-purpose flour
- ¾ cup unsweetened cocoa powder
- ½ teaspoon baking powder
- ¼ teaspoon salt
For the Peanut Butter Cup Filling
- 1 ½ cups (about 25-30 pieces) mini peanut butter cups, unwrapped
Optional Drizzle
- ¼ cup creamy peanut butter, melted
- ¼ cup semi-sweet chocolate chips, melted
Step-by-Step Instructions
-
Step 1: Prepare Your Baking Pan and Preheat Oven
Preheat your oven to 350°F (175°C). Line a 9×13 inch baking pan with parchment paper, leaving an overhang on the sides. This makes it much easier to lift the brownies out later. Lightly grease the parchment paper for extra non-stick insurance.
Small tip: Using parchment paper is a game-changer for easy removal and clean-up!
-
Step 2: Melt Butter and Combine Sugars
In a large microwave-safe bowl, melt the butter. You can also do this on the stovetop in a saucepan. Once melted, add the granulated sugar and light brown sugar to the warm butter. Whisk them together until well combined. The mixture should be smooth and glossy.
-
Step 3: Add Wet Ingredients
Crack the eggs into the butter-sugar mixture, one at a time, whisking well after each addition. Stir in the vanilla extract. Continue whisking until the mixture is light in color and slightly fluffy. This step incorporates air, leading to a chewier brownie.
-
Step 4: Whisk Dry Ingredients
In a separate medium bowl, whisk together the all-purpose flour, unsweetened cocoa powder, baking powder, and salt. Make sure there are no lumps of cocoa powder. This ensures even distribution of all the dry elements in your brownies.
Small tip: Sifting your cocoa powder can help prevent lumps, especially if it’s been sitting in the pantry for a while.
-
Step 5: Combine Wet and Dry Mixtures
Gradually add the dry ingredient mixture to the wet mixture. Fold them together using a spatula or wooden spoon until just combined. Be careful not to overmix the batter. Overmixing can lead to tough brownies.
-
Step 6: Layer the First Half of Batter
Pour about half of the brownie batter into your prepared baking pan. Spread it evenly using your spatula. Ensure it reaches all corners of the pan. This will form the base layer of your delicious brownies.
-
Step 7: Arrange the Peanut Butter Cups
Evenly distribute the unwrapped mini peanut butter cups over the first layer of brownie batter. You can arrange them in neat rows or just sprinkle them randomly. Make sure there’s a good amount in every future bite.
Small tip: If your peanut butter cups are a bit sticky, pop them in the freezer for 10 minutes before unwrapping for easier handling.
-
Step 8: Cover with Remaining Batter
Carefully spoon the remaining brownie batter over the peanut butter cups. Gently spread it out to cover all the cups. Try not to move the cups too much as you spread. Take your time to create an even top layer.
-
Step 9: Bake to Perfection
Place the pan in the preheated oven and bake for 25-30 minutes. The brownies are done when a toothpick inserted into the center (avoiding a peanut butter cup) comes out with moist crumbs, not wet batter. The edges should look set.
-
Step 10: Cool Completely
Remove the brownies from the oven and let them cool completely in the pan on a wire rack. This is a very important step! Cooling allows them to set properly and become fudgy. Warm brownies are delicious but messy.
Small tip: For truly clean cuts, chill the cooled brownies in the refrigerator for at least 30 minutes before slicing.
-
Step 11: Add Optional Drizzle (if desired)
Once cooled, you can add an optional drizzle. Melt ¼ cup of creamy peanut butter in the microwave for 30 seconds. In a separate bowl, melt ¼ cup of chocolate chips. Drizzle both over the brownies in decorative patterns. Let the drizzles set before cutting.
-
Step 12: Cut and Serve
Once completely cooled and the drizzle (if used) is set, use the parchment paper overhang to lift the brownies out of the pan. Place them on a cutting board. Slice into 16 squares and enjoy your amazing Peanut Butter Cup Brownies!
Tips & Variations
- Gluten-Free Option: Easily make these brownies gluten-free by swapping the all-purpose flour for a 1:1 gluten-free baking flour blend. Ensure your blend contains xanthan gum for the best texture.
- Vegan/Vegetarian Option: For a vegan version, use a plant-based butter substitute (like Miyoko’s Kitchen or Earth Balance), flax eggs (1 tbsp ground flaxseed + 3 tbsp water per egg), and ensure your chocolate and peanut butter cups are dairy-free and vegan-friendly.
- Add More Vegetables or Protein: For a subtle veggie boost, finely grate ½ cup of zucchini (squeeze out excess water) and fold it into the batter. It adds moisture and nutrients without altering the taste. To add protein, mix in 2-3 tablespoons of your favorite unflavored or chocolate protein powder with the dry ingredients.
- Spicy Version: For a surprising kick, add ¼ to ½ teaspoon of cayenne pepper along with the cocoa powder and flour. The subtle heat beautifully complements the chocolate and peanut butter flavors.
- Other Flavor Tips: Experiment with different candies! Try chopped caramel candies, M&Ms, or even pretzels for an extra salty crunch. A sprinkle of flaky sea salt on top before baking also enhances all the flavors.
Nutritional Information
Approximate values per serving (based on 16 servings):
- Calories: 350-380
- Protein: 5-7g
- Carbohydrates: 45-50g
- Fat: 20-25g
Please note: Nutritional values may vary depending on the specific brands and ingredients used. This is an estimate for guidance.
Health Benefits
While these Peanut Butter Cup Brownies are a delightful indulgence, some of their key ingredients offer surprising health benefits:
- Cocoa Powder: The star of chocolate, cocoa powder is rich in antioxidants called flavonoids. These compounds can help reduce inflammation and may improve heart health. It also contains minerals like iron, magnesium, and zinc, and can even act as a mood booster.
- Peanut Butter: A good source of healthy monounsaturated and polyunsaturated fats, peanut butter provides sustained energy. It’s also packed with protein, which is essential for muscle repair and satiety. You’ll find vitamins like Vitamin E (an antioxidant) and B vitamins, along with minerals such as magnesium, potassium, and phosphorus.
- Eggs: Eggs are a complete protein source, meaning they contain all nine essential amino acids. They are also rich in choline, which is vital for brain health, and provide vitamins D and B12, supporting bone health and energy production.
- Butter (in moderation): While often demonized, butter from grass-fed cows can contain fat-soluble vitamins like A, E, and K2. It also provides healthy fatty acids. The key is moderation within a balanced diet.
Enjoying treats like these brownies can also contribute to mental well-being and happiness, which is a health benefit in itself! Remember, balance is key to a healthy lifestyle.
Serving Suggestions
- Classic Pairing: Serve warm brownies with a scoop of vanilla bean ice cream. The contrast of warm and cold is simply divine!
- Creamy Topping: A dollop of fresh whipped cream or a drizzle of chocolate syrup makes for an elegant presentation and added richness.
- Beverage Buddy: Pair a brownie with a cold glass of milk, a hot cup of coffee, or a cozy mug of hot chocolate for the ultimate comfort experience.
- Party Platter Perfection: Cut into smaller squares and arrange on a dessert platter with other treats for parties, potlucks, or holiday gatherings.
Storage Tips
Store leftover Peanut Butter Cup Brownies in an airtight container at room temperature for up to 3-4 days. For longer freshness, you can keep them in the refrigerator for up to a week. These brownies also freeze beautifully! Wrap individual brownies tightly in plastic wrap, then place them in a freezer-safe bag or container. They will keep in the freezer for up to 3 months. To reheat, simply let them come to room temperature, or microwave for 10-15 seconds for a warm, gooey treat.
Conclusion
And there you have it – a recipe for truly spectacular Peanut Butter Cup Brownies! These brownies are the perfect combination of rich, fudgy chocolate and creamy, salty peanut butter cups. They are incredibly satisfying and guaranteed to be a hit with anyone who tries them. Plus, making them from scratch means you know exactly what goes into every delicious bite.
Don’t hesitate to give this recipe a try. The steps are simple, and the reward is immense.


