
Introduction
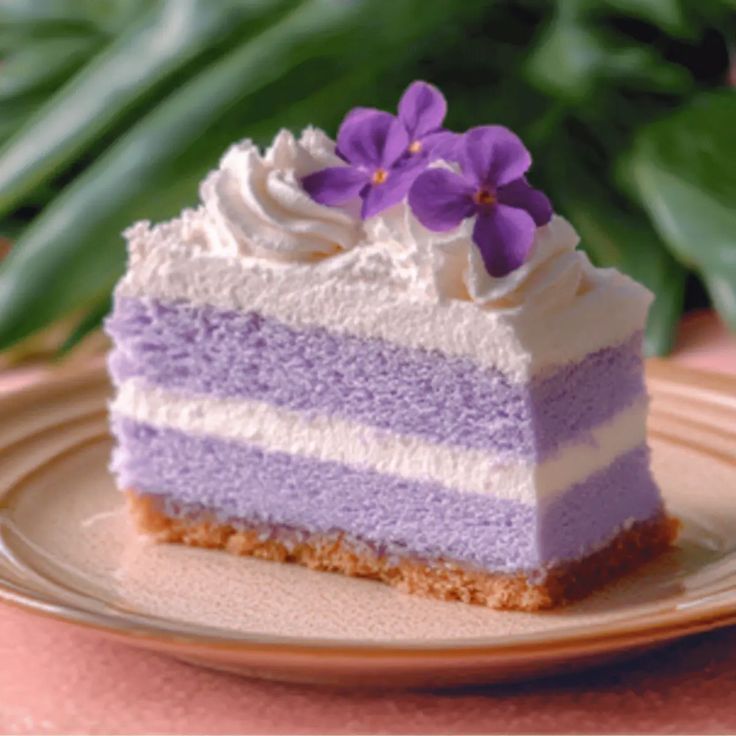
Get ready to discover a dessert that’s as beautiful as it is delicious: the Taro Ube Cloud Cake! This stunning cake brings together the earthy, nutty flavor of taro with the vibrant, sweet notes of ube (purple yam). Imagine layers of incredibly soft, fluffy cake, swirled with a delicate taro filling, and enveloped in a dreamy ube cream cheese frosting. It’s a truly unique treat that will transport your taste buds to a tropical paradise.
You might think such an exquisite cake would be complicated to make, but I promise it’s simpler than it looks! We’re breaking down the steps into easy-to-follow instructions, using readily available ingredients. The “cloud” in its name comes from its wonderfully light and airy texture, which is surprisingly achievable for home bakers. No fancy equipment needed, just a little love and a desire for something extraordinary.
So, why wait? This Taro Ube Cloud Cake is perfect for special occasions, a delightful weekend project, or simply to brighten up your day. Prepare to impress your family and friends with its gorgeous colors and unforgettable flavor. Let’s get baking and create some sweet magic together!
Cooking Time & Prep Time
- Prep Time: 55 minutes
- Cooking Time: 35 minutes
- Total Time: 90 minutes
Small tip: To make your baking process smooth and stress-free, gather and measure all your ingredients before you start mixing. This is called “mise en place” and it saves a lot of time!
Ingredients
This recipe makes 8 generous servings.
For the Taro Cake Layers:
- 2 ½ cups all-purpose flour, sifted
- 1 ½ cups granulated sugar
- 1 tablespoon baking powder
- ½ teaspoon salt
- 4 large eggs, at room temperature
- 1 cup whole milk, at room temperature
- ½ cup vegetable oil (or any neutral oil)
- 2 teaspoons pure taro extract
- ½ teaspoon purple food coloring (optional, to enhance color)
For the Taro Filling:
- 1 cup cooked taro paste (can be found frozen or make from scratch)
- ¼ cup granulated sugar
- ¼ cup whole milk
- 1 tablespoon cornstarch
For the Ube Cream Cheese Frosting:
- 1 (8-ounce) package cream cheese, softened
- ½ cup unsalted butter, softened
- 4 cups powdered sugar, sifted
- 2 teaspoons pure ube extract
- ¼ teaspoon purple food coloring (optional, for deeper ube color)
For Garnish (Optional):
- Toasted coconut flakes
- Fresh ube chips or taro chips
- Edible flowers
Step-by-Step Instructions
Step 1: Prepare the Taro Cake Batter
Preheat your oven to 350°F (175°C). Grease and flour two 8-inch round cake pans, or line them with parchment paper. In a large bowl, whisk together the sifted flour, granulated sugar, baking powder, and salt. Make sure there are no lumps.
Small tip: Sifting your flour makes the cake lighter and more airy, contributing to that “cloud” texture.
Step 2: Combine Wet Ingredients
In a separate medium bowl, whisk together the eggs, milk, vegetable oil, taro extract, and optional purple food coloring. Whisk until well combined and the color is even. This liquid mixture will bring life and flavor to your cake.
Small tip: Ensure your eggs and milk are at room temperature. This helps them emulsify better with the other ingredients, leading to a smoother batter and a finer crumb.
Step 3: Mix and Bake the Cake Layers
Pour the wet ingredients into the dry ingredients. Mix on low speed with an electric mixer, or by hand with a whisk, until just combined. Be careful not to overmix, as this can lead to a tough cake. Divide the batter evenly between the two prepared cake pans.
Small tip: Overmixing develops gluten too much, which makes cakes dense. Mix until you no longer see streaks of flour, then stop!
Step 4: Bake the Cake Layers
Bake for 30-35 minutes, or until a wooden skewer inserted into the center of the cakes comes out clean. Once baked, remove the cakes from the oven and let them cool in their pans on a wire rack for 10-15 minutes. Then, carefully invert them onto the wire rack to cool completely.
Small tip: Cooling cakes completely before frosting is crucial! Warm cakes will melt your beautiful frosting.
Step 5: Prepare the Taro Filling
While the cakes cool, prepare the taro filling. In a small saucepan, combine the cooked taro paste, granulated sugar, and milk. Heat over medium-low heat, stirring constantly, until the sugar dissolves and the mixture is warm. In a tiny bowl, whisk the cornstarch with 1 tablespoon of cold water to create a slurry, then add it to the taro mixture.
Small tip: If your taro paste is very thick, you might need an extra splash of milk to get a smooth consistency for the filling.
Step 6: Thicken and Cool the Taro Filling
Continue to cook and stir the taro mixture for another 2-3 minutes, until it thickens to a spreadable consistency. Remove from heat and transfer to a bowl. Cover the surface directly with plastic wrap to prevent a skin from forming, and let it cool completely in the refrigerator.
Small tip: Chilling the filling makes it much easier to spread evenly between cake layers without it oozing out.
Step 7: Make the Ube Cream Cheese Frosting
In a large bowl, beat the softened cream cheese and softened unsalted butter with an electric mixer until light and fluffy. This usually takes about 2-3 minutes. Gradually add the sifted powdered sugar, one cup at a time, beating well after each addition until smooth.
Small tip: Make sure your cream cheese and butter are truly soft (but not melted!) for the creamiest, lump-free frosting.
Step 8: Flavor and Color the Frosting
Add the ube extract and optional purple food coloring to the frosting. Beat on medium speed until the frosting is light, fluffy, and evenly colored. Scrape down the sides of the bowl as needed to ensure everything is fully incorporated.
Small tip: Add food coloring a little at a time until you reach your desired vibrant ube shade. You can always add more, but you can’t take it away!
Step 9: Assemble the Cloud Cake
Once the cake layers are completely cool, use a serrated knife to level the tops if necessary. Place one cake layer on your serving plate or cake stand. Spread about half of the cooled taro filling evenly over the first cake layer, leaving a small border around the edge. Then, spread about a third of the ube frosting over the taro filling.
Small tip: Create a small “dam” of frosting around the edge of the cake layer before adding the filling. This helps to keep the filling neatly contained.
Step 10: Stack and Frost
Carefully place the second cake layer on top. Spread the remaining taro filling over this layer, again leaving a border. Then, use the rest of the ube frosting to frost the top and sides of the entire cake. Use an offset spatula to create smooth sides or decorative swirls.
Small tip: For a professional look, apply a thin “crumb coat” of frosting first, chill for 15 minutes, then apply your final layer of frosting. This traps any loose crumbs.
Step 11: Decorate and Chill
Garnish your beautiful Taro Ube Cloud Cake with toasted coconut flakes, ube or taro chips, or edible flowers, if desired. For best results, chill the cake in the refrigerator for at least 30 minutes before slicing and serving. This allows the frosting and filling to set nicely.
Small tip: Chilling the cake makes for much cleaner slices, especially with soft fillings and frostings.
Tips & Variations
- Gluten-Free Option: Easily make this cake gluten-free by substituting the all-purpose flour with a 1:1 gluten-free baking flour blend. Ensure your chosen blend contains xanthan gum for best results.
- Vegan/Vegetarian Option: To make this cake vegan, use flax eggs (1 tbsp ground flaxseed + 3 tbsp water per egg), plant-based milk (almond or soy), vegan butter sticks, and vegan cream cheese. Ensure your taro paste is also dairy-free.
- Add More Goodness: While this is a dessert, you can serve it alongside a fresh fruit salad for added vitamins and fiber. For a subtle protein boost, a scoop of vanilla plant-based protein powder can be whisked into the cake batter, adjusting milk slightly if needed for consistency.
- Aromatic Twist: For an exotic, subtly spiced version, add a tiny pinch (⅛ teaspoon) of ground ginger or a small star anise pod (removed before serving) to the taro filling while it cooks. This adds a unique aromatic depth without making it “spicy” hot.
- Mini Cakes or Cupcakes: This recipe can be easily adapted to make mini layer cakes or cupcakes. Adjust baking time accordingly (cupcakes usually take 18-22 minutes). They are perfect for individual servings and party treats!
Nutritional Information
Approximate values per serving (based on 8 servings):
- Calories: 580 kcal
- Protein: 7g
- Carbohydrates: 85g
- Fat: 26g
Note: Nutritional values are approximate and may vary depending on specific brands and exact quantities of ingredients used.
Health Benefits
This delightful cake isn’t just a treat for your taste buds; its star ingredients also offer some wonderful health benefits!
Taro is a fantastic root vegetable packed with dietary fiber. Fiber is essential for a healthy digestive system, helping to prevent constipation and promote gut health. Taro also provides a good source of potassium, which is important for maintaining healthy blood pressure, and offers vitamins B6 and E.
Ube (purple yam) is celebrated for its vibrant purple color, which comes from anthocyanins. These are powerful antioxidants that help protect your body’s cells from damage caused by free radicals. Anthocyanins are also known for their potential anti-inflammatory properties, contributing to overall wellness.
Like taro, ube is also a good source of dietary fiber, supporting digestion and helping you feel full longer. It contains vitamins A and C, which are crucial for immune function and skin health. So, while enjoying this sweet treat, you’re also getting a dose of beneficial nutrients from these unique root vegetables.
Of course, it’s a dessert, so moderation is key! But knowing the goodness hidden within makes each bite even more enjoyable.
Serving Suggestions
- Serve a slice of this beautiful cake with a hot cup of coffee or a soothing mug of herbal tea.
- Pair it with a scoop of vanilla bean ice cream or a dollop of freshly whipped cream for an extra


