
Introduction
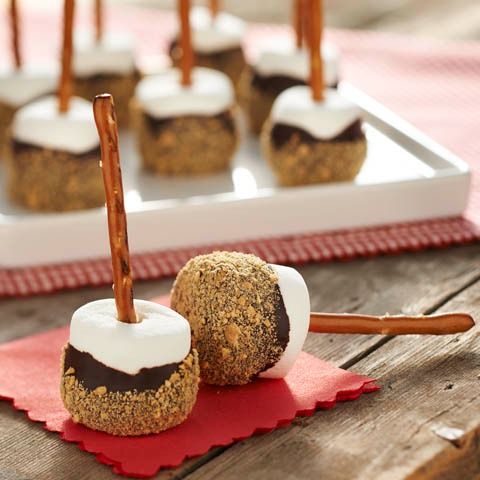
Get ready for a treat that brings all the cozy campfire vibes right into your home, with a spooky twist! Our Halloween S’Mores Pops are a delightful take on the classic s’mores, transformed into fun, easy-to-eat lollipops. Imagine fluffy marshmallows dipped in rich melted chocolate, then rolled in crunchy graham cracker crumbs and vibrant Halloween sprinkles. They are the perfect blend of sweet, gooey, and crunchy, making every bite an absolute joy.
What makes these pops truly special is how incredibly simple and quick they are to make. There’s no need for a bonfire or even an oven! With just a few basic ingredients and a microwave, you can whip up a batch of these festive treats in no time. They are ideal for busy parents, last-minute party planners, or anyone looking for a no-fuss dessert that still makes a big impact. Plus, they’re so much fun to customize!
So, whether you’re hosting a ghoulish gathering, looking for a sweet activity with the kids, or simply craving a taste of autumn magic, these Halloween S’Mores Pops are calling your name. They are guaranteed to bring smiles and spooky cheer to everyone who tries them. Let’s get dipping and decorating!
Cooking Time & Prep Time
- Prep Time: 20 minutes
- Cooking Time: 5 minutes (for melting chocolate)
- Total Time: 25 minutes (plus setting time)
Small tip: You can prepare the graham cracker crumbs and set out all your sprinkles before you even start melting the chocolate to make the assembly process super smooth.
Ingredients
This recipe makes approximately 12 Halloween S’Mores Pops.
For the S’Mores Pops:
- 12 large marshmallows
- 12 lollipop sticks or sturdy paper straws
- 1 cup (about 6 oz) dark or semi-sweet chocolate chips, or melting wafers
- 2 tablespoons coconut oil (optional, for smoother chocolate)
- 6-8 full graham cracker sheets, crushed into fine crumbs
- 1/4 cup Halloween-themed sprinkles
Step-by-Step Instructions
-
Step 1: Prepare Your Workstation
First, line a baking sheet with parchment paper or wax paper. This will be where your finished pops will set. Next, place the crushed graham cracker crumbs into a shallow bowl and the Halloween sprinkles into another shallow bowl. Have your lollipop sticks ready.
Small tip: Having everything organized and within reach makes the dipping process much less messy and more efficient.
-
Step 2: Insert Lollipop Sticks
Carefully insert a lollipop stick into the flat end of each large marshmallow. Push the stick about halfway into the marshmallow to ensure it’s secure. Be gentle to avoid tearing the marshmallow.
Small tip: If marshmallows are a bit sticky, you can lightly dust your hands with cornstarch, but it’s usually not necessary for this step.
-
Step 3: Melt the Chocolate
In a microwave-safe bowl, combine the chocolate chips (or wafers) and coconut oil, if using. Microwave on high in 30-second intervals, stirring well after each, until the chocolate is completely melted and smooth. This usually takes about 1.5 to 2 minutes total.
Small tip: Stirring frequently prevents the chocolate from burning and helps it melt evenly. The coconut oil helps thin the chocolate for a smoother dip, but it’s optional.
-
Step 4: Dip the Marshmallows
Hold a marshmallow by its stick and dip it into the melted chocolate. Turn and swirl it gently to coat the entire marshmallow, or as much as you like. Let any excess chocolate drip back into the bowl.
Small tip: If your chocolate starts to thicken, pop it back into the microwave for 10-15 seconds and stir again to re-smooth.
-
Step 5: Decorate Your Pops
Immediately after dipping, gently roll the chocolate-coated marshmallow in the graham cracker crumbs. Then, roll it in the Halloween sprinkles to add that festive touch. You can also spoon crumbs and sprinkles over the marshmallow if rolling is too difficult.
Small tip: Work quickly after dipping in chocolate, as the chocolate sets fast! Don’t be afraid to get creative with your sprinkle patterns.
-
Step 6: Let Them Set
Place the decorated s’mores pops onto the prepared parchment-lined baking sheet. Repeat with the remaining marshmallows. Once all pops are dipped and decorated, transfer the baking sheet to the refrigerator for about 10-15 minutes, or until the chocolate is fully set.
Small tip: Ensure there is enough space between each pop on the baking sheet so they don’t stick together as they set.
-
Step 7: Serve and Enjoy!
Once the chocolate is firm, your Halloween S’Mores Pops are ready to be enjoyed! Serve them upright in a festive jar or display them on a platter for a spooky-sweet treat. Watch them disappear!
Small tip: These are best enjoyed within a day or two for optimal freshness and texture.
Tips & Variations
- Gluten-Free Option: Easily make these gluten-free by using certified gluten-free graham cracker crumbs. Many brands offer delicious GF versions that work perfectly.
- Vegan/Vegetarian Option: Opt for vegan marshmallows (often made with tapioca starch instead of gelatin) and dairy-free chocolate chips or melting wafers. Most sprinkles are vegan, but always double-check the label for gelatin or shellac.
- Add More Protein: For a protein boost, spread a thin layer of your favorite nut butter (like peanut or almond butter) onto the marshmallow before dipping it in chocolate. You could also mix a tiny bit of protein powder into the melted chocolate, though this might alter its texture slightly.
- Spicy Version: For a kick, add 1/4 to 1/2 teaspoon of ground cayenne pepper or chili powder to your melted chocolate before dipping. It creates a surprisingly delicious sweet and spicy contrast!
- Flavor Fun: Experiment with different chocolate types (milk, white, or even a mix). You can also add a few drops of food-grade essential oils like peppermint or orange to the melted chocolate for extra flavor. Or, try rolling in crushed cookies (like Oreos) instead of graham crackers!
Nutritional Information
Approximate values per serving (based on 12 servings):
- Calories: 180 kcal
- Protein: 2g
- Carbohydrates: 28g
- Fat: 8g
Please note: These values are approximate and may vary depending on the specific brands and exact quantities of ingredients used.
Health Benefits
While these Halloween S’Mores Pops are definitely a treat, some of their components offer a few surprising benefits when enjoyed in moderation. Let’s take a closer look!
Dark chocolate, a key ingredient, is packed with antioxidants called flavonoids. These powerful compounds can help protect your cells from damage and may contribute to heart health. Dark chocolate also contains minerals like iron, magnesium, and copper, which are essential for various bodily functions.
Graham crackers, particularly those made with whole grains, provide a source of dietary fiber. Fiber is important for digestive health, helping to keep things moving smoothly and contributing to a feeling of fullness. Choosing whole-grain options adds a little extra nutritional value to your festive treat.
Marshmallows, while primarily sugar, offer a moment of pure joy and satisfaction. Sometimes, the mental and emotional benefits of enjoying a beloved treat can contribute to overall well-being. It’s all about balance and mindful indulgence!
Remember, these pops are designed to be a fun, celebratory dessert. Enjoy them as part of a balanced diet and savor every delightful bite!
Serving Suggestions
- Party Perfection: Arrange these pops upright in a tall jar or a festive pumpkin-shaped container for an eye-catching display at your Halloween party dessert table.
- After-School Treat: Surprise your kids with a homemade Halloween S’Mores Pop as a special after-school snack. It’s a fun way to get into the holiday spirit!
- Movie Night Magic: Pair these pops with a spooky movie marathon. They’re easy to eat and mess-free, perfect for enjoying on the couch.
Storage Tips
Store leftover Halloween S’Mores Pops in an airtight container at room temperature for up to 2 days, or in the refrigerator for up to 3-4 days, especially if your kitchen is warm. While you can technically freeze marshmallows, freezing these pops is not recommended as the chocolate coating may crack and the marshmallows can become chewy or watery upon thawing. There’s no need to reheat them; they are best enjoyed at room temperature or slightly chilled.
Conclusion
There you have it – a recipe for Halloween S’Mores Pops that is as fun to make as it is delicious to eat! These charming treats bring the beloved flavors of a campfire s’more to life with a delightful, festive twist. They’re quick, they’re easy, and they’re guaranteed to be a hit with everyone, from little ghouls to grown-up goblins.
Don’t wait to try this recipe. Gather your ingredients, get creative with your sprinkles, and embark on a sweet adventure. You’ll be amazed at how simple it is to create such a charming and tasty dessert that looks like it came straight from a professional bakery.
So, go ahead and make a batch (or two!). Share these delightful Halloween S’Mores Pops with your family and friends, and watch their faces light up with joy. Happy Halloween and happy cooking!


