
Introduction
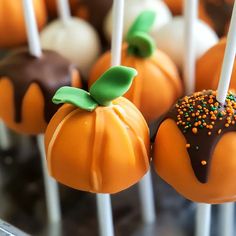
Get ready to fall in love with our delightful Fall Cake Pops! These little bites of joy are perfect for celebrating the cozy autumn season. They are moist, flavorful, and packed with the warm spices we all adore this time of year. Imagine a tiny cake on a stick, bursting with pumpkin spice goodness and covered in a sweet, snappy shell. They are truly a special treat!
You might think cake pops are complicated, but they are surprisingly easy to make. This recipe uses a clever shortcut with a boxed cake mix, making the process much quicker. You’ll combine baked cake crumbs with creamy frosting, roll them into balls, and then dip them in melted chocolate. It’s a fun project, and the results are always impressive.
Whether you’re hosting a fall gathering, looking for a festive dessert, or simply want a fun baking project, these Fall Cake Pops are calling your name. They are a crowd-pleaser and a joy to create. So, gather your ingredients, put on your favorite autumn playlist, and let’s make some magic in the kitchen!
Cooking Time & Prep Time
- Prep Time: 60 minutes (includes chilling time)
- Cooking Time: 30 minutes (for baking the cake)
- Total Time: 90 minutes (plus additional chilling/setting time)
Small tip: Breaking down the prep into stages, like baking the cake the day before, can make the process feel even quicker and more relaxed.
Ingredients
This recipe makes approximately 40-50 Fall Cake Pops, depending on their size.
- For the Cake:
- 1 box (15.25 oz / 432g) pumpkin spice cake mix
- Ingredients required on cake mix box (typically eggs, vegetable oil, water)
- For the Cake Pop Base:
- 1 can (16 oz / 450g) cream cheese frosting (store-bought or homemade)
- For the Coating & Decoration:
- 16 oz (450g) white candy melts or white chocolate chips
- 2-3 tablespoons shortening or coconut oil (optional, for thinning chocolate)
- 40-50 lollipop sticks
- Fall-themed sprinkles, edible glitter, or additional colored candy melts for drizzling
Step-by-Step Instructions
-
Step 1: Bake the Cake
Preheat your oven and prepare a 9×13 inch baking pan according to the directions on your pumpkin spice cake mix box. Mix the cake batter as instructed. Pour the batter into the prepared pan and bake for the recommended time, usually 25-30 minutes, or until a toothpick inserted into the center comes out clean.
Small tip: Do not overbake the cake, as this can make the cake pops dry. -
Step 2: Cool and Crumble the Cake
Once baked, let the cake cool completely in the pan. This is important for easy handling. Once cool, transfer the cake to a large mixing bowl. Use your hands to crumble the entire cake into fine crumbs. Ensure there are no large chunks left.
-
Step 3: Mix with Frosting
Add the entire can of cream cheese frosting to the crumbled cake. Use your hands to thoroughly mix the frosting into the cake crumbs. Continue mixing until a dough-like consistency forms and you can easily roll it into a ball that holds its shape.
Small tip: If the mixture feels too sticky, add a little more crumbled cake or a tablespoon of powdered sugar. If it’s too dry, add a tiny bit more frosting. -
Step 4: Chill the Cake Pop Dough
Cover the bowl with plastic wrap and refrigerate the cake pop dough for at least 30 minutes. This chilling step is crucial. It helps the mixture firm up, making it much easier to roll into perfect balls.
-
Step 5: Roll into Balls
Remove the chilled dough from the fridge. Scoop out small portions, about 1-1.5 tablespoons each. Roll them between your palms to form smooth, uniform balls. Place the rolled cake balls on a baking sheet lined with parchment paper.
Small tip: For perfectly even cake pops, use a cookie scoop to portion out the dough. -
Step 6: Chill Again
Once all the cake balls are rolled, place the baking sheet back into the refrigerator. Chill them for another 15-20 minutes. This second chill helps them maintain their shape and prevents them from falling apart when dipped.
-
Step 7: Prepare the Coating
While the cake balls are chilling, melt your white candy melts or white chocolate chips. Place them in a microwave-safe bowl and heat in 30-second intervals, stirring well after each, until smooth and fully melted. If the chocolate is too thick, stir in 1-2 tablespoons of shortening or coconut oil to thin it out.
Small tip: Be careful not to overheat the chocolate, as it can seize and become unusable. -
Step 8: Dip the Sticks
Take one lollipop stick and dip about 1/2 inch of the tip into the melted chocolate. Immediately insert the chocolate-dipped end of the stick into a chilled cake ball, pushing it about halfway through. The chocolate acts as glue to secure the stick. Repeat this for all cake balls.
-
Step 9: Dip the Cake Pops
Working one by one, dip each cake pop into the melted white chocolate. Gently tap the stick against the edge of the bowl to remove any excess chocolate. You want a smooth, even coating.
Small tip: If your chocolate starts to thicken, reheat it briefly in the microwave. -
Step 10: Decorate and Set
Immediately after dipping, sprinkle your fall-themed sprinkles or apply any other decorations before the chocolate sets. Place the decorated cake pops upright in a Styrofoam block or a cake pop stand to dry completely. This usually takes about 15-20 minutes. Once set, they are ready to enjoy!
Tips & Variations
- Gluten-Free Option: Simply substitute the regular pumpkin spice cake mix with a gluten-free pumpkin or yellow cake mix. Ensure your frosting is also gluten-free.
- Vegan/Vegetarian Option: Use a vegan cake mix (many brands offer them now). Replace eggs with flax eggs or applesauce, and use a vegan butter or oil for the cake. For the frosting, choose a vegan cream cheese frosting or make your own with vegan cream cheese and powdered sugar. Finally, use vegan white chocolate chips for the coating.
- Spiced Version: For an extra kick of fall flavor, add 1/2 teaspoon of ground ginger and 1/4 teaspoon of ground cloves to your cake batter before baking. You can also mix a pinch of cinnamon into your melted white chocolate coating for a subtle spice finish.
- Different Cake Flavors: Feel free to experiment with other fall-inspired cake mixes! Apple spice, carrot cake, or even a classic yellow cake with added cinnamon and nutmeg would be delicious.
- Creative Coatings & Drizzles: Instead of plain white, use orange, brown, or yellow candy melts for dipping. You can also melt different colored candy melts and drizzle them over the set cake pops for a beautiful striped effect. A sprinkle of chopped pecans or walnuts before the chocolate sets adds a nice texture.
Nutritional Information
Approximate values per serving (based on 45 servings):
- Calories: 180 kcal
- Protein: 2g
- Carbohydrates: 25g
- Fat: 8g
Note: These values are approximate and may vary depending on the specific brands and exact amounts of ingredients used.
Health Benefits
While cake pops are certainly a treat, some of their components do offer a sprinkle of goodness!
- Pumpkin Spice Cake: If your cake mix contains real pumpkin, it’s a source of Vitamin A, which is crucial for vision and immune function. The spices like cinnamon and nutmeg also have their own benefits.
- Cinnamon: This warming spice is known for its anti-inflammatory properties and may help regulate blood sugar levels. It’s a wonderful addition to any fall treat.
- Nutmeg: Often paired with cinnamon, nutmeg is rich in antioxidants. It has been traditionally used for its digestive benefits and can add a lovely aromatic depth.
- Homemade Advantage: When you make treats at home, you have control over the ingredients. You can choose higher-quality options and avoid artificial flavors or preservatives often found in store-bought versions.
Serving Suggestions
- Festive Dessert Platter: Arrange your Fall Cake Pops on a beautiful platter with other seasonal treats like mini pumpkin pies, caramel apples, or spiced nuts for an impressive display.
- Party Favors: Individually wrap each cake pop in small cellophane bags and tie with a festive ribbon. They make adorable and delicious take-home gifts for guests at fall parties or Thanksgiving gatherings.
- Coffee or Tea Companion: Enjoy a cake pop with a warm cup of coffee, chai tea, or a spiced apple cider for a perfect afternoon pick-me-up.
- Edible Centerpiece: Arrange them in a tall vase or a decorative pumpkin for a fun and edible centerpiece that guests can enjoy throughout your event.
Storage Tips
Fall Cake Pops store beautifully! Keep them in an airtight container in the refrigerator for up to 5-7 days. The chocolate coating helps keep them fresh and moist. They can also be frozen for longer storage. Place them in a single layer on a baking sheet to freeze solid, then transfer them to a freezer-safe bag or container. They will keep for up to 1 month. To enjoy, simply thaw them in the refrigerator overnight or at room temperature for a few hours. Reheating is not recommended, as they are best enjoyed chilled or at room temperature.
Conclusion
There you have it – a complete guide to making the most adorable and delicious Fall Cake Pops! These little gems are a true celebration of autumn, combining the comforting flavors of pumpkin spice with a fun, bite-sized format. They are perfect for sharing, gifting, or simply enjoying as a sweet moment to yourself.
Don’t be shy about trying this recipe. The process is straightforward, and the joy of seeing your beautifully decorated cake pops come to life is incredibly rewarding. It’s a fantastic way to get into the festive spirit and create something truly special with your own hands.
So, roll up your sleeves, gather your loved ones, and make a batch of these delightful Fall Cake Pops. They’re sure to bring smiles and warmth to anyone who tries them. Happy baking, and enjoy the delicious flavors of fall!


