
Introduction
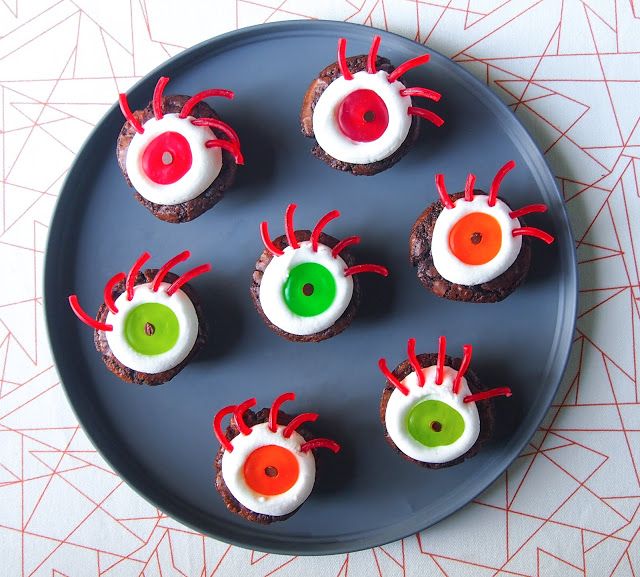
Get ready for a treat that’s as fun to look at as it is delicious to eat! Our Monster Eye Brownie Bites are fudgy, chocolatey brownies transformed into adorable, slightly spooky “eyes.” They are perfect for parties, holidays, or just a sweet craving. Each bite is packed with rich chocolate flavor and a fun surprise.
You’ll be amazed at how quickly these come together. We start with a simple brownie base, then add a few clever decorations. Even if you’re new to baking, you can easily create these show-stopping treats. No fancy tools or complex techniques are needed, just a little creativity and a love for chocolate.
So, gather your ingredients and let’s make some magic in the kitchen! These Monster Eye Brownie Bites are sure to bring smiles to everyone who tries them. They are a delightful way to add a playful touch to your dessert table. Let’s get baking!
Cooking Time & Prep Time
- Prep Time: 20 minutes
- Cooking Time: 25 minutes
- Total Time: 45 minutes
Small tip: You can make the brownie batter ahead of time and store it in the fridge for up to 24 hours. Just bring it to room temperature before baking.
Ingredients
Makes 24 brownie bites
For the Fudgy Brownie Bites:
- 1/2 cup (113g) unsalted butter, melted
- 1 cup (200g) granulated sugar
- 2 large eggs
- 1 teaspoon vanilla extract
- 1/2 cup (60g) all-purpose flour
- 1/3 cup (30g) unsweetened cocoa powder
- 1/4 teaspoon baking powder
- 1/4 teaspoon salt
- 1/2 cup (85g) chocolate chips (optional, for extra fudginess)
For the Monster Eyes Decoration:
- 1 cup (170g) white chocolate chips or white melting wafers
- 1-2 tablespoons milk or cream (if needed for melting consistency)
- 24 candy eyeballs (store-bought)
- Red gel food coloring (or any color you prefer for “veins”)
Step-by-Step Instructions
-
Step 1: Preheat and Prepare
Preheat your oven to 350°F (175°C). Line a 24-cup mini muffin tin with paper liners. This makes it easy to remove the brownie bites later. Make sure the liners are seated well in each cup.
Small tip: If you don’t have a mini muffin tin, you can bake the brownies in an 8×8 inch pan and cut them into small squares after cooling.
-
Step 2: Melt Butter and Sugar
In a medium mixing bowl, combine the melted butter and granulated sugar. Whisk them together until smooth and well combined. This step helps create that signature fudgy texture.
-
Step 3: Add Wet Ingredients
Beat in the eggs one at a time, mixing well after each addition. Stir in the vanilla extract. The mixture should become light and slightly fluffy. This incorporates air, which helps with the brownie’s rise.
-
Step 4: Combine Dry Ingredients
In a separate small bowl, whisk together the flour, cocoa powder, baking powder, and salt. Make sure there are no lumps in the dry ingredients. This ensures even distribution in the batter.
-
Step 5: Mix Wet and Dry
Gradually add the dry ingredient mixture to the wet ingredients. Mix until just combined. Be careful not to overmix, as this can lead to tough brownies. Gently fold in the chocolate chips if you are using them.
Small tip: Overmixing develops gluten, which can make your brownies more cake-like instead of fudgy. Mix until no streaks of flour remain.
-
Step 6: Fill Muffin Tin
Spoon the brownie batter into the prepared mini muffin cups, filling each about two-thirds full. Use a small cookie scoop for even portions. This ensures they bake uniformly.
-
Step 7: Bake the Brownies
Bake for 20-25 minutes, or until a toothpick inserted into the center of a brownie bite comes out with moist crumbs, not wet batter. Do not overbake. Remove from the oven and let them cool completely in the tin before decorating.
Small tip: Brownies continue to cook slightly after being removed from the oven. Undercooking them slightly can result in a chewier, fudgier texture.
-
Step 8: Melt White Chocolate
Once the brownie bites are cool, melt the white chocolate chips or wafers. You can do this in a microwave-safe bowl in 30-second intervals, stirring well after each. Alternatively, use a double boiler. Add milk or cream if needed to reach a smooth, dippable consistency.
-
Step 9: Attach the Eyes
Dip the bottom of each candy eyeball into the melted white chocolate. Press the chocolate-coated side onto the top of a cooled brownie bite. The melted chocolate acts as a “glue.” Repeat for all brownie bites.
-
Step 10: Add “Veins”
Dip a toothpick into the red gel food coloring. Carefully draw thin, squiggly lines radiating from the candy eyeball’s pupil onto the white chocolate base. This creates the “bloodshot” monster eye effect. Let the white chocolate set completely before serving.
Small tip: For more control, you can also use a fine-tipped food-safe brush for drawing the veins. Practice on a piece of parchment paper first if you’re nervous!
Tips & Variations
- Gluten-Free Option: Simply swap the all-purpose flour for a 1:1 gluten-free baking flour blend. Ensure your blend contains xanthan gum for the best texture.
- Vegan or Vegetarian Option: For a vegan version, use a flax egg (1 tbsp ground flaxseed + 3 tbsp water per egg) and plant-based butter. Ensure your chocolate chips and candy eyeballs are dairy-free.
- Add More Protein: Stir 1-2 tablespoons of unflavored or chocolate protein powder into the dry ingredients. You might need to add a tiny bit more milk to maintain the batter consistency.
- Spicy Version: Add 1/4 teaspoon of cayenne pepper or chili powder to the dry ingredients for a subtle, warming kick. It pairs surprisingly well with chocolate!
- Different Eye Colors: Instead of red, use green, blue, or black gel food coloring for the “veins” to create different monster looks. You can also use different colored candy eyeballs.
- Chocolate Lover’s Dream: Drizzle a little extra melted dark chocolate over the top of the finished brownie bites before the white chocolate sets for an even richer experience.
Nutritional Information
Approximate values per serving (based on 24 servings):
- Calories: 180
- Protein: 2g
- Carbohydrates: 25g
- Fat: 9g
Please note: Nutritional values may vary depending on specific brands and ingredients used.
Health Benefits
While these are certainly a treat, some ingredients offer surprising benefits! Dark cocoa powder, a key component of our brownies, is rich in antioxidants called flavonoids. These compounds can help protect your cells from damage and may support heart health.
Eggs provide a good source of protein and essential vitamins like B12 and D. They also contain choline, which is important for brain health and memory. Using real eggs contributes to the structure and nutritional value of the brownie bites.
Even a little bit of sugar provides quick energy. When consumed in moderation, it can fuel your body and mind. The butter adds healthy fats, which are important for vitamin absorption and overall bodily functions.
Enjoying treats like these can also boost your mood! The joy of baking and sharing delicious food has its own mental well-being benefits. Remember, balance is key in a healthy diet.
Serving Suggestions
- Serve these Monster Eye Brownie Bites on a festive platter at your next party or gathering.
- Pair them with a scoop of vanilla bean ice cream or a dollop of whipped cream for an extra decadent dessert.
- They make a fantastic individual treat for lunchboxes or after-school snacks.
- These are primarily a dessert, but they can be a fun, bite-sized offering on a dessert buffet.
- For meal prep, you can bake the brownie bites ahead of time and store them. Decorate just before serving for the freshest look.
Storage Tips
Store Monster Eye Brownie Bites in an airtight container at room temperature for up to 3-4 days. If your kitchen is very warm, you can store them in the refrigerator for up to a week. They can also be frozen for up to 2 months. Place them in a single layer in an airtight freezer-safe container, with parchment paper between layers if stacking. Thaw at room temperature for a few hours before serving. Reheating is generally not necessary, as they are best enjoyed at room temperature.
Conclusion
There you have it – a recipe for Monster Eye Brownie Bites that’s as fun to make as it is to eat! These fudgy, chocolatey treats are guaranteed to be a hit with kids and adults alike. They bring a playful charm to any occasion and are incredibly satisfying.
Don’t wait to try this recipe. It’s simple, quick, and delivers big on flavor and fun. You’ll love how easy it is to transform a classic brownie into something truly special. Get creative with your “veins” and make each monster eye unique!
Whip up a batch for your family, bring them to a potluck, or share them with friends. These Monster Eye Brownie Bites are perfect for spreading joy and a little bit of delicious spookiness. Happy baking!


