
Introduction
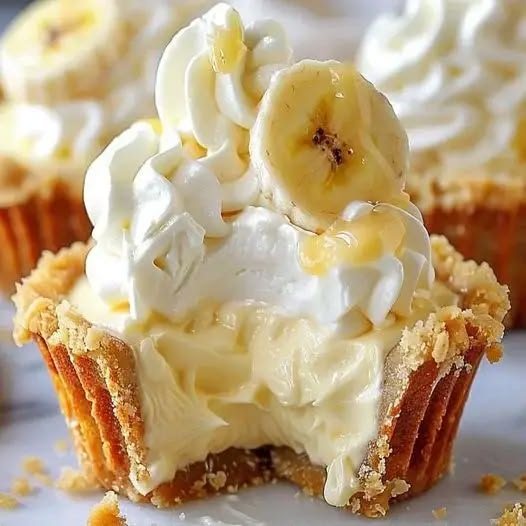
Get ready to discover your new favorite dessert! These No-Bake Banana Cream Pie Bars take everything you love about classic banana cream pie and transform it into an easy, delightful bar. Each bite offers a dreamy combination of a buttery cookie crust, creamy vanilla pudding, fresh banana slices, and a cloud of whipped cream. It’s truly a taste of pure comfort!
The best part? There’s absolutely no baking involved! This recipe is incredibly simple to put together, making it perfect for busy days or when you want a show-stopping dessert without turning on the oven. You’ll layer a few simple ingredients, chill, and then enjoy a perfectly set, delicious treat. It’s quick, easy, and always a crowd-pleaser.
So, whether you’re hosting a get-together, need a potluck superstar, or just craving something sweet and refreshing, these Banana Cream Pie Bars are the answer. They are light, creamy, and packed with fresh banana flavor. We promise you’ll want to make them again and again. Let’s get started on this no-fuss dessert adventure!
Cooking Time & Prep Time
- Prep Time: 30 minutes
- Chill Time: 4 hours (minimum)
- Total Time: 4 hours 30 minutes
Small tip: The chill time is crucial for the bars to set properly. Don’t rush it! For best results, chill overnight.
Ingredients
This recipe makes 12 generous servings.
For the Graham Cracker Crust:
- 1 ¾ cups (about 14 full sheets) graham cracker crumbs
- ½ cup (1 stick) unsalted butter, melted
- ¼ cup granulated sugar
For the Creamy Vanilla Layer:
- 2 (3.4 ounce) packages instant vanilla pudding mix
- 3 cups cold milk (whole or 2%)
- 1 teaspoon vanilla extract
- 1 (8 ounce) package cream cheese, softened
- ½ cup powdered sugar
For the Banana & Topping:
- 3-4 medium ripe bananas, sliced (about 3 cups)
- 1 (8 ounce) container frozen whipped topping (like Cool Whip), thawed OR 2 cups heavy cream, whipped with 2 tablespoons powdered sugar
- Optional garnish: extra graham cracker crumbs, chocolate shavings, or a drizzle of caramel sauce
Step-by-Step Instructions
-
Step 1: Prepare the Crust
In a medium bowl, combine the graham cracker crumbs, melted butter, and granulated sugar. Mix well until the crumbs are evenly moistened. Press this mixture firmly into the bottom of a 9×13 inch baking dish. Use the back of a spoon or a flat-bottomed glass to ensure an even, compact layer.
Small tip: Pressing the crust very firmly helps it hold together beautifully when sliced. -
Step 2: Chill the Crust
Place the prepared crust in the refrigerator while you prepare the filling. This allows the butter to firm up, creating a sturdy base for your bars. A quick chill makes a big difference in preventing a crumbly crust.
-
Step 3: Make the Pudding Layer
In a large bowl, whisk together the instant vanilla pudding mix and cold milk for about 2 minutes, until the mixture starts to thicken. Stir in the vanilla extract. Set this aside to thicken further while you prepare the cream cheese mixture.
-
Step 4: Prepare the Cream Cheese Mixture
In a separate medium bowl, beat the softened cream cheese with the powdered sugar until smooth and creamy. An electric mixer works best for this step to ensure there are no lumps. Scrape down the sides of the bowl as needed.
-
Step 5: Combine Layers and Spread
Gently fold the thickened vanilla pudding into the cream cheese mixture until just combined. Be careful not to overmix, as this can thin out the pudding. Pour this creamy filling over the chilled graham cracker crust and spread it evenly with an offset spatula or the back of a spoon.
-
Step 6: Add the Bananas
Arrange the sliced bananas evenly over the creamy vanilla layer. You can place them in neat rows or scatter them for a more rustic look. Ensure the bananas cover most of the surface for delicious banana flavor in every bite.
Small tip: Slice your bananas just before adding them to prevent browning. -
Step 7: Chill the Bars
Cover the baking dish loosely with plastic wrap and refrigerate for at least 4 hours, or preferably overnight. This chilling time is essential for the bars to set completely and become firm enough to slice. Patience is key for perfect bars!
-
Step 8: Top and Serve
Just before serving, spread the thawed whipped topping or freshly whipped cream over the banana layer. You can make pretty swirls with a spoon or a piping bag. If desired, sprinkle with extra graham cracker crumbs, chocolate shavings, or a drizzle of caramel. Slice into bars and enjoy!
Tips & Variations
- Gluten-Free Option: Easily make this recipe gluten-free by using gluten-free graham crackers for the crust. The rest of the ingredients are naturally gluten-free, but always check labels for pudding mixes.
- Vegan or Vegetarian Option: For a vegan version, use a plant-based graham cracker (many are accidentally vegan), vegan butter, plant-based milk (like almond or soy), dairy-free cream cheese, and a vegan whipped topping. Ensure your instant pudding mix is dairy-free, or make a homemade vegan custard.
- Add More “Goodness”: While this is a dessert, you can boost the nutrition slightly! Sprinkle a thin layer of chia seeds or finely chopped nuts (like walnuts or pecans) over the banana layer for extra fiber and healthy fats.
- Spiced Version: For a warm twist, add ¼ teaspoon of cinnamon or a pinch of nutmeg to the graham cracker crust mixture. You can also lightly dust the top with cinnamon before serving for a cozy flavor.
- Different Flavor Profile: Instead of vanilla pudding, try instant banana pudding mix for an even more intense banana flavor. You could also experiment with chocolate or coconut pudding for a completely different bar experience!
Nutritional Information
Approximate values per serving (based on 12 servings):
- Calories: 380
- Protein: 5g
- Carbohydrates: 50g
- Fat: 19g
Please note: These values are approximate and may vary depending on the specific brands and exact amounts of ingredients used.
Health Benefits
While these bars are a delicious treat, some key ingredients offer notable health benefits!
Bananas: These wonderful fruits are a fantastic source of potassium, which is vital for heart health and blood pressure regulation. They also provide dietary fiber, aiding in digestion and promoting gut health. Bananas contain Vitamin B6, important for brain function and metabolism.
Milk: The milk used in the pudding layer contributes essential calcium and Vitamin D, both crucial for strong bones and teeth. It also provides protein, which is necessary for muscle repair and growth. Whole milk contains healthy fats that help with nutrient absorption.
Graham Crackers (Whole Grains): Many graham crackers are made with whole wheat flour, offering some dietary fiber. Fiber helps keep you feeling full and supports a healthy digestive system. It can also help manage blood sugar levels.
Cream Cheese: While used in moderation for richness, cream cheese provides some calcium and Vitamin A. Vitamin A is important for vision and immune function. It also contributes a small amount of protein to the overall dish.
Serving Suggestions
- Serve these bars chilled, straight from the refrigerator, for the best texture and flavor.
- They are perfect as a light dessert after any meal, especially a summer barbecue or a cozy family dinner.
- For a fun twist, cut them into smaller squares and serve them on a dessert platter with other no-bake treats.
- These bars are fantastic for meal prep! Make a batch at the beginning of the week and enjoy a sweet treat whenever a craving strikes.
Storage Tips
Store leftover Banana Cream Pie Bars covered tightly with plastic wrap in the refrigerator for up to 3-4 days. The bananas may start to brown slightly over time, but the flavor will still be delicious. We do not recommend freezing these bars, as the texture of the bananas and the pudding can become watery upon thawing. Always serve these bars chilled; no reheating is needed!
Conclusion
There you have it – a truly delightful and incredibly easy recipe for No-Bake Banana Cream Pie Bars! This dessert truly delivers on all fronts: a crisp crust, a luscious creamy filling, tender fresh bananas, and a light whipped topping. It’s the perfect blend of simple ingredients coming together to create something extraordinary.
You’ll love how quickly these come together, leaving you more time to enjoy your day. Plus, the minimal effort means you can whip up a batch for any occasion, big or small. Give this recipe a try; you won’t regret it!
So go ahead, gather your ingredients, and create some sweet memories in your kitchen. These bars are sure to bring smiles to everyone’s faces, whether you’re sharing them with family, friends, or simply treating yourself. Happy no-baking!


