
Introduction
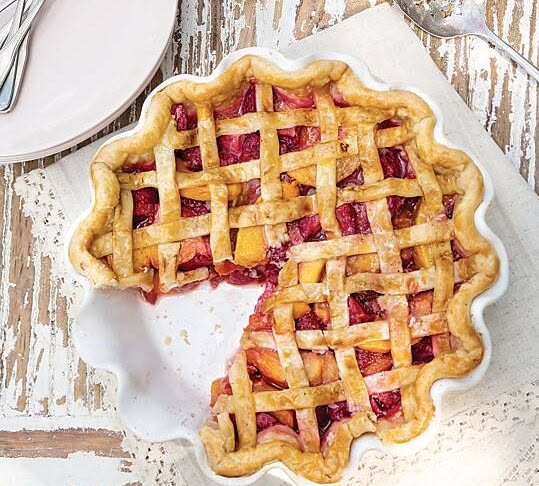
There’s nothing quite like a homemade pie, and our Strawberry and Peach Pie is pure summer bliss in every bite. Imagine sweet, ripe strawberries mingling with tender, juicy peaches, all tucked into a perfectly flaky crust. It’s a dessert that brings smiles and a comforting warmth to any table.
You might think making pie from scratch is complicated, but this recipe makes it wonderfully simple. We’re using easy techniques and accessible ingredients, so even if you’re new to baking, you’ll feel like a pro. The fruit filling comes together quickly, and with a little guidance, your crust will be golden and perfect.
So, get ready to fill your kitchen with the most amazing aromas. This pie is a celebration of seasonal flavors, perfect for sharing with loved ones or enjoying all by yourself. Let’s bake something truly special together!
Cooking Time & Prep Time
- Prep Time: 30 minutes
- Cooking Time: 55-65 minutes
- Total Time: 85-95 minutes
Small tip: To save time, you can prepare your fruit filling a day in advance and store it in the refrigerator.
Ingredients
Makes 8 generous servings
For the Pie Crust
- 2 (9-inch) store-bought pie crusts, or your favorite homemade recipe
- 1 large egg, whisked (for egg wash, optional)
- 1 tablespoon turbinado sugar (for sprinkling, optional)
For the Fruit Filling
- 4 cups fresh peaches, peeled, pitted, and sliced (about 4-5 medium peaches)
- 2 cups fresh strawberries, hulled and quartered (about 1 pound)
- ½ cup granulated sugar (adjust to sweetness of fruit)
- ¼ cup cornstarch (or all-purpose flour for a slightly less firm set)
- 1 tablespoon fresh lemon juice
- ½ teaspoon vanilla extract
- ¼ teaspoon ground cinnamon (optional)
- Pinch of salt
- 2 tablespoons unsalted butter, cut into small pieces
Step-by-Step Instructions
-
Step 1: Prepare Your Fruit
First, wash and prepare your fruit. Peel the peaches, remove their pits, and slice them into roughly ½-inch thick pieces. Hull the strawberries and quarter them. Place all the prepared fruit into a large mixing bowl.
Small tip: For easier peach peeling, blanch them in boiling water for 30 seconds, then immediately transfer to an ice bath. The skins will slip right off!
-
Step 2: Mix the Filling
To the bowl with the fruit, add the granulated sugar, cornstarch, lemon juice, vanilla extract, cinnamon (if using), and salt. Gently toss everything together until the fruit is evenly coated. Let it sit for about 10-15 minutes while you prepare the pie crust; this allows the juices to release and mix with the thickener.
Small tip: Adjust the sugar amount based on how sweet your fruit is. Taste a small piece of fruit first!
-
Step 3: Preheat Oven and Prepare Pie Dish
Preheat your oven to 400°F (200°C). Carefully unroll one of the pie crusts and fit it into a 9-inch pie dish. Press it gently into the bottom and up the sides. Do not trim the edges yet.
Small tip: If your crust cracks, you can easily patch it with a small piece of excess dough and a little water.
-
Step 4: Fill the Pie
Pour the fruit filling evenly into the pie crust-lined dish. Dot the top of the fruit filling with the small pieces of unsalted butter. These butter pieces will melt into the filling, adding richness and a lovely sheen.
Small tip: Arrange some of the prettier fruit pieces on top for a more appealing look before adding the top crust.
-
Step 5: Add the Top Crust
Carefully unroll the second pie crust and place it over the fruit filling. You can make a lattice top if you prefer, but a simple full crust works beautifully too. Trim the edges of both crusts, leaving about a ½-inch overhang.
Small tip: For a lattice top, cut the second crust into strips and weave them over the filling.
-
Step 6: Crimp the Edges
Fold the overhanging crust edges under themselves, creating a thicker border. Then, use your fingers or a fork to crimp the edges firmly all around the pie dish. This seals the pie and creates a beautiful decorative finish.
Small tip: Make sure the crimping is tight to prevent the filling from bubbling out during baking.
-
Step 7: Egg Wash and Vents
If desired, brush the top crust with the whisked egg wash. This will give your pie a golden, glossy finish. Sprinkle with turbinado sugar for extra sparkle and crunch. Cut several small slits or decorative shapes into the top crust to allow steam to escape during baking.
Small tip: The vents are crucial! Without them, steam can build up and make your crust soggy or even burst.
-
Step 8: Bake the Pie
Place the pie on a baking sheet (to catch any potential drips) and bake in the preheated oven for 20 minutes at 400°F (200°C). Then, reduce the oven temperature to 375°F (190°C) and continue baking for another 35-45 minutes, or until the crust is deeply golden brown and the filling is bubbly and thick. You can cover the edges with foil if they start to brown too quickly.
Small tip: The pie is done when you see the filling bubbling vigorously through the vents, indicating it has thickened properly.
-
Step 9: Cool Completely
Once baked, carefully remove the pie from the oven and place it on a wire rack. It is very important to let the pie cool completely for at least 3-4 hours, or even longer, before slicing. This allows the filling to set properly, preventing a runny mess.
Small tip: Patience is key here! A properly cooled pie will have a perfect slice.
Tips & Variations
- Gluten-Free Option: Easily make this pie gluten-free by using your favorite gluten-free pie crusts. Ensure all other ingredients are naturally GF.
- Vegan/Vegetarian Option: For a vegan pie, use a vegan-friendly pie crust (many store-bought options are accidentally vegan). Replace the egg wash with a plant-based milk (like almond or soy milk) mixed with a tiny bit of agave or maple syrup for shine, and swap butter for vegan butter in the filling.
- Adding More Substance: For a heartier dessert, consider adding a streusel topping instead of a second crust. Combine ½ cup rolled oats, ½ cup flour, ¼ cup brown sugar, and ¼ cup cold vegan butter or regular butter, then crumble over the fruit before baking.
- A Hint of Spice: For a subtle warmth, add a tiny pinch of freshly ground black pepper or a very small amount of ground ginger to the fruit filling. It enhances the fruit flavor without making it “spicy.”
- Flavor Boosters: Experiment with a tablespoon of finely chopped fresh mint mixed into the fruit for a refreshing twist, or a splash of almond extract instead of vanilla for a different aromatic profile.
Nutritional Information
Approximate values per serving (based on 8 servings):
- Calories: 350-400
- Protein: 3-4g
- Carbohydrates: 55-65g
- Fat: 15-20g
Please note: Nutritional values may vary depending on the specific brands and ingredients used, especially with homemade versus store-bought crusts.
Health Benefits
This Strawberry and Peach Pie isn’t just delicious; it’s packed with goodness from its star ingredients! Strawberries and peaches are both nutritional powerhouses, bringing a host of benefits to your dessert plate.
Strawberries are famous for their high Vitamin C content, which is crucial for immune health and skin vitality. They are also rich in antioxidants like anthocyanins, which give them their vibrant red color and help fight inflammation and protect your cells from damage. Plus, they contribute dietary fiber, aiding digestion.
Peaches are equally impressive. They are a good source of Vitamins A and C, both important for vision, skin health, and immune function. Peaches also provide potassium, an essential mineral for maintaining healthy blood pressure and fluid balance. Their natural sweetness comes with a good dose of dietary fiber, promoting gut health.
Enjoying this pie in moderation means you’re not just indulging in a treat but also getting a lovely boost of vitamins, minerals, and beneficial plant compounds from these wonderful fruits. It’s a sweet way to nourish your body!
Serving Suggestions
- Classic A La Mode: Serve a warm slice with a scoop of vanilla bean ice cream. The cold, creamy ice cream melting into the warm pie is simply divine!
- Whipped Cream Dream: A generous dollop of freshly whipped cream adds a light, airy contrast to the rich fruit filling.
- Breakfast Delight: Believe it or not, a slice of cold pie makes a surprisingly satisfying breakfast, especially with a cup of coffee.
- Potluck Perfection: This pie is a crowd-pleaser and travels well, making it ideal for picnics, potlucks, or family gatherings.
Storage Tips
Leftover pie can be stored at room temperature for up to 2 days, or in the refrigerator for up to 3-4 days. Cover it loosely with plastic wrap or foil. You can freeze a baked pie for up to 3 months; wrap it tightly in plastic wrap and then foil. To reheat, thaw in the refrigerator overnight if frozen, then warm slices in a 350°F (175°C) oven for about 15-20 minutes, or until heated through.
Conclusion
And there you have it – a truly spectacular Strawberry and Peach Pie, ready to impress and delight! This dessert is more than just a recipe; it’s an experience, from the joyful process of baking to the first delicious bite. The combination of sweet, tender fruit and a golden, flaky crust is simply irresistible.
Don’t hesitate to give this recipe a try. You’ll find it’s a rewarding project that yields incredible results. The simple steps and helpful tips are designed to make your baking journey smooth and enjoyable.
So go ahead, gather your ingredients, and fill your home with the comforting aroma of freshly baked pie. This Strawberry and Peach Pie is perfect for sharing with family, friends, or simply savoring on a quiet afternoon. Happy baking, everyone!


