
Introduction
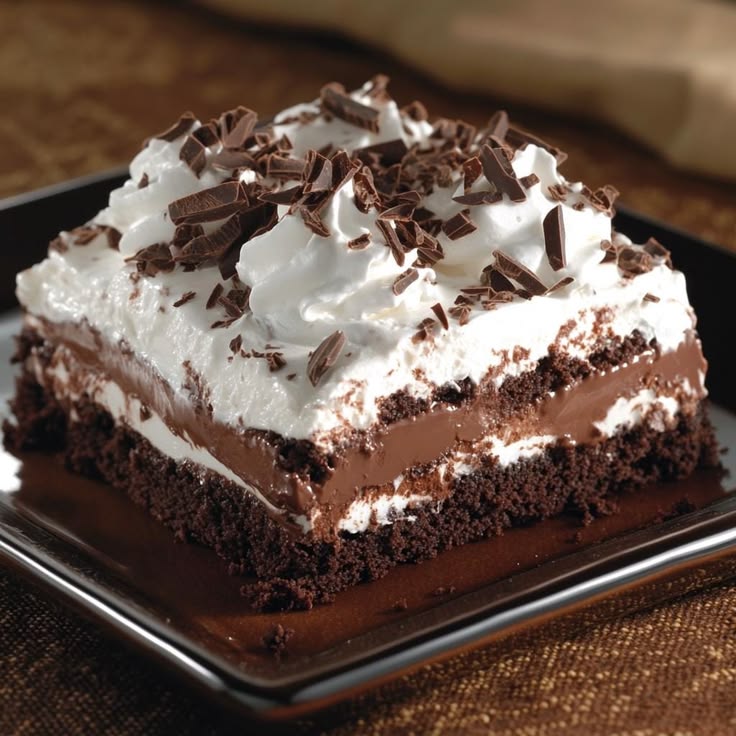
Get ready to meet your new favorite dessert: Brownie Cake! This incredible treat combines the best of both worlds. Imagine a rich, fudgy brownie base, perfectly dense and intensely chocolatey, topped with a light, tender, and moist chocolate cake layer. It’s an indulgence that will make every bite a moment of pure bliss.
What makes this Brownie Cake so special is how surprisingly simple it is to create. You don’t need any fancy equipment or advanced baking skills. We use everyday ingredients and straightforward steps to achieve a dessert that looks and tastes like it came straight from a gourmet bakery. It’s the perfect recipe for when you want something impressive without all the fuss.
So, clear your counter, preheat your oven, and get ready to create some magic. This Brownie Cake is perfect for celebrations, a cozy night in, or just because you deserve something wonderfully delicious. I promise, once you try this recipe, it will become a cherished part of your baking repertoire!
Cooking Time & Prep Time
- Prep Time: 30 minutes
- Cooking Time: 35-40 minutes
- Total Time: 65-70 minutes (plus cooling time)
Small tip: You can prepare most of your ingredients for both layers while the oven is preheating to save time and make the process smoother.
Ingredients
This recipe makes 12 generous servings.
For the Brownie Layer
- 1/2 cup (113g) unsalted butter, melted
- 1 cup (200g) granulated sugar
- 2 large eggs
- 1 teaspoon vanilla extract
- 1/2 cup (60g) all-purpose flour
- 1/2 cup (50g) unsweetened cocoa powder
- 1/4 teaspoon baking powder
- 1/4 teaspoon salt
- 1/2 cup (85g) chocolate chips (optional, but recommended!)
For the Cake Layer
- 1 cup (120g) all-purpose flour
- 1/2 cup (100g) granulated sugar
- 1/4 cup (25g) unsweetened cocoa powder
- 1/2 teaspoon baking soda
- 1/4 teaspoon salt
- 1/2 cup (120ml) milk (any kind)
- 1/4 cup (60ml) vegetable oil
- 1 large egg
- 1 teaspoon vanilla extract
- 1/2 cup (120ml) hot water or hot coffee
For the Chocolate Glaze (Optional)
- 1/2 cup (85g) chocolate chips
- 2 tablespoons unsalted butter
- 1 tablespoon milk or cream
- 1/2 teaspoon vanilla extract
Step-by-Step Instructions
-
Step 1: Preheat Oven & Prep Pan
Preheat your oven to 350°F (175°C). Grease and flour a 9×13 inch baking pan, or line it with parchment paper, leaving an overhang on the sides for easy lifting. This prevents sticking and makes cleanup a breeze.
Small tip: Using parchment paper makes removing the cake much easier, especially if you want to transfer it to a serving platter.
-
Step 2: Make the Brownie Batter
In a medium bowl, whisk together the melted butter and granulated sugar until well combined. Beat in the eggs one at a time, then stir in the vanilla extract. In a separate bowl, whisk together the flour, cocoa powder, baking powder, and salt. Gradually add the dry ingredients to the wet ingredients, mixing until just combined. Fold in the chocolate chips, if using.
-
Step 3: Spread the Brownie Layer
Pour the brownie batter into the prepared 9×13 inch baking pan. Use a spatula to spread it evenly across the bottom of the pan. This will form the delicious base of our Brownie Cake.
-
Step 4: Prepare the Cake Batter
In a large bowl, whisk together the flour, granulated sugar, cocoa powder, baking soda, and salt. In another bowl, whisk together the milk, vegetable oil, egg, and vanilla extract. Add the wet ingredients to the dry ingredients and mix until just combined. The batter will be thick.
-
Step 5: Add Hot Water/Coffee to Cake Batter
Carefully pour the hot water or hot coffee into the cake batter. Whisk until the batter is smooth and runny. This step is crucial for a moist and tender cake layer, and the hot liquid helps to bloom the cocoa powder, intensifying the chocolate flavor.
Small tip: Hot coffee enhances the chocolate flavor without making the cake taste like coffee. It’s a secret weapon for chocolate desserts!
-
Step 6: Layer and Bake
Gently pour the runny cake batter over the brownie layer in the pan. Don’t worry if it looks a little messy; it will bake beautifully. Place the pan in the preheated oven and bake for 35-40 minutes, or until a wooden skewer inserted into the center of the cake layer comes out with moist crumbs, but not wet batter.
-
Step 7: Cool the Cake
Once baked, remove the Brownie Cake from the oven and let it cool completely in the pan on a wire rack. Cooling is important for the cake to set properly and for easy glazing. This might take 1-2 hours.
-
Step 8: Make the Chocolate Glaze (Optional)
While the cake cools, if you’re making the glaze, combine the chocolate chips and butter in a microwave-safe bowl. Microwave in 30-second intervals, stirring in between, until melted and smooth. Stir in the milk/cream and vanilla extract until well combined and glossy.
-
Step 9: Glaze and Serve
Once the cake is completely cool, pour the chocolate glaze over the top, spreading it evenly with a spatula. Let the glaze set for about 15-20 minutes at room temperature, or briefly in the fridge. Slice and serve your magnificent Brownie Cake!
Small tip: For a neat cut, use a warm, sharp knife. Wipe the knife clean between each slice.
Tips & Variations
- Gluten-Free Option: Easily swap out the all-purpose flour in both layers for a good quality 1:1 gluten-free baking flour blend. Ensure your blend contains xanthan gum for best results.
- Vegan Option: For a vegan Brownie Cake, use plant-based butter, a flax egg (1 tbsp ground flaxseed + 3 tbsp water per egg) or commercial egg replacer, and plant-based milk. Ensure your chocolate chips are dairy-free.
- Add More Flavor/Texture: Stir in a handful of chopped walnuts or pecans into either the brownie or cake batter for added crunch and nutty flavor. A sprinkle of sea salt on top of the glaze can also enhance the chocolate.
- Spicy Kick: For a subtle warmth, add 1/4 teaspoon of cayenne pepper or chili powder to the brownie batter. It won’t make it overtly spicy, but it will deepen the chocolate flavor in an intriguing way.
- Different Frosting: Instead of a simple glaze, you could top this cake with a rich chocolate buttercream, a cream cheese frosting, or even a simple dusting of powdered sugar for a different look and texture.
Nutritional Information
Approximate values per serving (based on 12 servings):
- Calories: 420 kcal
- Protein: 5g
- Carbohydrates: 55g
- Fat: 22g
Please note that nutritional values may vary depending on the exact ingredients and brands used.
Health Benefits
While this Brownie Cake is certainly a treat, some of its core ingredients offer surprising benefits!
- Dark Chocolate/Cocoa Powder: Rich in antioxidants called flavonoids, which can help fight free radicals in the body. Dark chocolate is also known to potentially improve heart health and mood.
- Eggs: A fantastic source of high-quality protein, essential amino acids, and important vitamins like B12 and D. They also provide choline, which is vital for brain health.
- Flour: Provides carbohydrates, which are the body’s primary source of energy. Opting for whole wheat flour in variations can add more fiber and nutrients.
- Milk: A good source of calcium for strong bones and teeth, and it also provides protein and vitamin D (if fortified).
Remember, moderation is key. Enjoying a slice of this delicious cake can be part of a balanced diet and certainly contributes to happiness!
Serving Suggestions
- Serve warm with a scoop of vanilla bean ice cream or a dollop of freshly whipped cream for an extra special treat.
- Pair it with fresh berries like raspberries or strawberries to add a touch of tartness and color.
- Enjoy a slice with a hot cup of coffee or a cold glass of milk for a delightful afternoon indulgence.
Storage Tips
Store leftover Brownie Cake in an airtight container at room temperature for up to 3 days, or in the refrigerator for up to 5 days. You can also freeze individual slices, wrapped tightly in plastic wrap and then foil, for up to 2 months. Thaw frozen slices in the refrigerator overnight or at room temperature for a few hours. Reheat gently in the microwave for 15-30 seconds if you prefer it warm.
Conclusion
There you have it – your guide to making the most incredible Brownie Cake! This dessert truly is a showstopper, offering the best of fudgy brownies and tender cake in one delightful package. It’s perfect for impressing guests, celebrating a special occasion, or simply treating yourself to something truly extraordinary.
Don’t be intimidated by the two layers; each step is straightforward and rewarding. The effort is minimal, but the payoff in flavor and texture is huge. You’ll be amazed at how easily you can create such a professional-looking and tasting dessert right in your own kitchen.
So go ahead, bake this Brownie Cake, and share the joy! It’s the kind of dessert that brings smiles to faces and warmth to hearts. Happy baking, my friends!


